Rarely will I just make something up and immediately conclude that it is amazing. Those who know me will testify to how I critique what I make, and recipes go through several iterations before I am happy with them. As I write, I’ve suddenly realised that this recipe also had several predecessors as a cookie re-enacted as a blondie. Wow – I had dismissed that because I hadn’t been trying to tweak that recipe. Nonetheless, this blondie came about with happy accidental happenstance.
Basically, a couple of Mondays ago, I decided that I wanted to bake brownies or blondies. On the Tuesday I ate a rich peanut brownie from Chocnroll, which satisfied my craving for brownies and so I turned my mind to blondies. When Wednesday evening happened, I had finished disseminating the findings of the first round of testing we had done on a major project I’m working on at work, written a lot of action points and very much needing to bake as therapy. Does anybody else do this? I know that I’m not alone in this.
I mentioned before that I have been working on another – yet unfinished – blondie recipe and I set out to make that. However this time, I added in another egg for extra hoped for fudginess, so that it mimicked my fudgy brownie recipe. As I browned some butter, I realised that I had no pecans nor white chocolate. So the substitutions began and a new blondie was birthed.
Once roasted, rub the hazelnut skins off with a tea towel – Step 2
I’ve since seen on the internet other recipes that call their version of a hazelnut and chocolate blondie a gianduja one. I’ve since thought about grinding up hazelnuts to make a chocolate hazelnut butter that I add in as a layer in the middle or on top. Then in consultations with friends, I decided that this added layer of complication takes away from the simple joy of baking blondies. Admittedly the browning of the butter may be a step too far for some, but it is so essential for the flavour! I promise you that it will be worth learning a new technique that you can use over and over again.
Ribbon stage – Step 4
Ingredients for Brown Butter, Hazelnut and Chocolate Blondies
200g butter which I then browned
200g dark brown sugar
3 eggs
1/2 tsp salt
200g plain flour
100g hazelnuts
150g chocolate. I used 100g of milk and 50g dark chocolate.
Method
Preheat the oven to 350F/180C or 170C fan.
Roast the hazelnuts first for 10 mins using the baking tin for the blondies, until the skins come off them. Use a dry tea towel to rub the skins off the hazelnuts, then chop just over half of them. Don’t miss out this step.
Brown the butter: melt the butter in a medium saucepan on a medium heat and it will start to froth and cackle. That is the water evaporating. Continue and stir the sides and scrape the bottom a few times so that it doesn’t burn. When it is ‘as quiet as a ninja’ (quote from Stella Parks) it is ready. Take it off the heat and either pour the butter in a bowl to cool down, not forgetting to scrape the browned bits from the sides and bottom. Or as I often do, fill up the sink with cold water and carefully place the hot pan in there to cool down.
Now whisk the eggs and sugar together until it is at a ribbon stage. I used a stand mixer on a medium setting (3 on a Kenwood) for about 8 mins. I have instructions on whisking to a ribbon stage in my fudgy brownie recipe
As the eggs and sugar are whisking, line the tin. I used a 20cm square tin.
Now on the lowest setting, continue whisking but pour in the butter and add the salt. Whisk again on a medium setting until combined. I’m always amazed by the reaction and how it goes to almost like a buttercream consistency.
Fold in the flour, chopped hazelnuts and chopped chocolate.
Pour half the mixture into the tin, sprinkle over the unchopped hazelnuts and pour the rest of the mixture into the tin.
Bake in the middle of the oven for 17-20 mins until cooked on top. If it looks a bit jiggly, that is ok. It’ll harden up as it cools.
Allow to cool completely. I like to leave mine overnight. And then cut into 12-16 pieces.
Hazelnuts added as a middle layer – Step 8The baked brown butter, hazelnut and chocolate blondies
And the verdict? Suitably more-ish, dense and fudgy. Surprisingly not overly sweet with the milk chocolate because of the dark chocolate. Lastly, it is always worth roasting the hazelnuts because it improves the texture and flavour.
I wanted to make hot cross buns. Every year, for the past 9 years, I have made my version of Paul Hollywood’s Hot Cross Buns. However, mixed citrus peel hadn’t been available in the Asda online shop for almost a month and we had, actually still have, a surplus of green apples in the house. So I decided to think of it as an opportunity to try out a new hot cross bun recipe without mixed peel but using green apples and a new method. One that I’ve been hearing about and seeing on my social media feeds for a while: the tangzhong method.
I’ve been really intrigued by this method, which originated in Japan and was popularised by Taiwanese cookbook author Yvonne Chen, and how it helps to create a soft fluffy texture that lasts longer than a couple of days. This is useful for something like this as this recipe makes between 17-18 buns. I don’t think anyone or any family could consume them all in one day. I researched a few other posts and found these really useful by way of introduction to using it:
The chemistry of it is quite precise. When flour is cooked with a hot liquid, it can absorb more water. You mix it together and cook it until a roux or slurry forms (pictures below), which is when the temperature of the slurry reaches 65°C/149°F. It pre-gelatinises the the starches in the flour meaning that it can absorb more liquid more, thus creating a dough that has a higher percentage of water.
Mix the flour and liquidHeat until a thick slurry forms
To make a tangzhong, it suggests that you use 5-10% of your flour. Thus in the recipe below 560g x 0.05 = 28g
1 part flour to 5 parts cold liquid. e.g. 28g flour to 140g liquid.
Whisk to combine until no lumps remain.
Heat, whilst stirring, until a roux/slurry forms to 65°C/149°F
Allow it to cool before adding to the dough
As it holds a higher percentage of water, the hydration level is important too. When you’re not a natural mathematician, like me, then you may spend a fair chunk of time adding the wet ingredients out loud and dividing it by the flour in order to figure out the hydration ratio. King Arthur Baking says that you’re looking for a hydration ratio of 75%. When I calculated it for this recipe, the result was 67%. Hmmm… my next question was whether eggs add hydration to a dough. The internet answer is yes. I learnt that eggs are 75% water. Therefore, an unshelled UK large egg weighs about 60g, so 60g x 0.75 = 45g. This recipe uses 2 eggs, thus adding 90g of water to the recipe. When I did the maths again, with the addition of the water from the eggs:
(375+90)/560 = 0.83 = 83% hydration level.
Does it matter that the hydration is far above 75% and is 83%? By this stage I’m hoping not and just wanting to get on to baking the hot cross buns. On a related tangent, in my research I also learned that the weight of a large egg differs depending on the country. A large egg is bigger in the UK than the US or Australia. Did you know that? I did not.
I’ve heavily adapted this recipe from Not Quite Nigella’s Apple and Cinnamon hot cross buns, who is an Australian food blogger. Do you remember that in my previous blog post, I highlighted that US cup measures differ from Australian ones? This was a useful titbit of information to remember whilst converting her recipe into grams. I decided to add raisins because I wasn’t ready to move on from not having dried fruit in my hot cross bun. Sultanas or currants would work too. The first time, I added in 100g and I felt like they could do with more. If you don’t like dried fruit then you could omit them completely.
I adapted her method too by simplifying some of the steps and adding in an extra rise. I almost forgot to add in the salt the first time I made the recipe. I realised just as the dough was finishing proving a second time (I’d decided to prove the dough three times) and so I sprinkled it in hoping that it would be absorbed. Sadly not. I had a mouthful of salt in the first hot cross bun that I ate. Thus, I decided to add the salt in at the beginning when I made these a second time. I don’t think that it made a noticeable difference but it improved the flavour of the bun, as one didn’t randomly get a mouthful of salt, and there’s less chance of forgetting the salt at a later step. I also added all the wet ingredients and the butter into the roux and whisked it together before adding it all into the flour. I gave the dough three rises, rather than two, so that the dough would be less sticky and easier to work with when shaping them. One rise before adding the fruit, another afterwards and one more time after I shaped them into buns.
1 medium sized, tart, green apple, chopped (I used a Granny Smith). I don’t peel it. I rather like the look of the bright green skin in the buns
200g raisins
Ingredients for the crosses
40g plain flour (about 3 tbsp)
4-5tbsp of water
Ingredients for the sticky glaze
2tbsp water
2tbsp of granulated sugar
Method
1. In a big bowl (I use the standmixer bowl), measure out the bread flour. Then, take 2 level tbsp of the flour and put it into a small saucepan to make the tangzhong. If you want to be more precise than this, then measure out 28g of flour. Next add the water to the saucepan.
2. Use a whisk to mix the flour and the water together for the roux. Heat on a low-medium heat until the roux reaches 65°C/149°F. If you don’t have a thermometer handy then on a low-medium heat, this will take between 1.5-2 mins. Leave to cool while measuring out the dry ingredients. I’ve used both a whisk and a spatula for this. The whisk works much better to mix the water and flour together. (See the photos above for the consistency of the slurry.)
3. Add the yeast, salt and cinnamon to the bowl that has the bread flour. Mix it together with the dough hook. *If kneading by hand, rub in the butter to the flour at this stage. It will make the kneading of the dough much easier.
4. To the tangzhong, whisk in the butter, milk, honey, vanilla extract and eggs. The butter won’t melt and that is okay. It will be incorporated into the dough in the kneading process.
Don’t be perturbed the unmelted butter cubes. They will be kneaded in.Knead until you get a very elastic dough
5. Use the dough hook to mix the liquid and the flour together so that it roughly combines. Then knead until it is soft and very elastic. At a medium setting (3 on a Kenwood), I let it knead for 7 minutes. Keep an eye on your stand mixer so that it doesn’t walk off the counter. I have let that happen before – a big ooopsadaisy!
6. Then cover and leave to rise until doubled in size for about 45mins – 1 hour. In the meantime, chop up the green apple and weigh out the raisins. Add them into the dough after the first rise. I just add them into the bowl with the dough and use the dough hook to knead it again so that it combines. By doing so, it knocks back the air in the dough and as it rises a second time, will create a more even crumb. Shape into a ball, place in an oiled bowl and cover to rise again until doubled in size, about 45 mins – 1 hour.
7. Whilst the yeast is doing its magic, this is a good time to decide how many buns you’d like. I wanted 18 but did I tell you already that maths isn’t my strongest point? I ended up with 17. If you’re my brother-in-law, this fact may make you laugh. I want the buns to bake evenly, so I will weigh out the dough then divide by the number of buns that I want.
8. Once the dough has doubled in size, lightly flour the surface and turn the dough out of the bowl. Strengthen the dough by shaping into a vague rectangle. Take hold of a longer side, fold one third towards the centre and press down with your thumbs or the heel of your hand. Fold the other third towards the centre and press down. Finally fold it in half lengthways, press down and roll it out a bit with your hands into a long sausage shape. The dough should feel stronger.
9. Divide the dough into the number of buns. If you want 15, then divide it into 3 equal parts, then into 5. If you want 18… well I think that you should tell me what I should do .
10. Lightly flour the surface in order to roll each piece a smooth ball. To roll the buns, turn the sides into the middle, then turn over so that the seam side is on the bottom. Make your hand into a claw shape and roll the ball inside your claw and move your hands quickly in circles. Arrange the buns on a baking tray lined with baking paper, leaving just enough space so that buns touch when they expand. Lightly cover with oiled clingfilm or a damp tea towel. Leave to rise for a 45mins to an hour.
11. Preheat the oven to 200°C and make the paste for the crosses. Measure out the flour. Add in the water, 1 tablespoon at a time, until it forms a smooth, thick paste. It needs to be pipe-able, not too thin so that it disappears when it bakes and not too thick that it’s impossible to pipe. Put the paste into a piping bag.
12. Once the buns have risen, pipe crosses onto the buns, by piping a line along each row of buns and then repeat in the other direction. The crosses want to hug the sides of the buns.
13. Bake on the middle shelf of the oven for 10 mins and then lower the temperature to 180°C. Bake for another 15-20 minutes, until golden brown. My oven has hot spots, so I turn the tray around after the first 20 mins.
14. Measure out the sugar and water into a small saucepan and melt the sugar over a gentle heat. Brush the sugar syrup over the warm buns and leave them to cool.
15. Gently break apart the sticky buns and enjoy.
Verdict? They are fast becoming a favourite and I was surprised that I didn’t miss the citrus flavour of my usual hot cross buns. 3 teaspoons of cinnamon may seem like a lot, but it disperses in this amount of flour producing a flavoured but not heavily spiced bun. If you wanted to experiment and adapt the spicing then please comment below and share.
3 days later, and they are still soft and springy.
‘I hate cups!‘ is how I began this post in a fit of frustration. I was trying to follow a recipe from the Cook’s Cook which had provided their cup measurements and the volume so had written 59ml (1/4 cup) of flour. Who weighs out 59ml of flour? What would have been more helpful would have been to write it as 1/4 cup (30g) of flour. Either they don’t understand the concept of measuring scales or they were trying to add precision to using cups.
Before I start explaining my irritation with cups, however, I’d like to be more measured (pun very much intended 😉) and state that I do see the value in using cups. When I’m measuring out rice, I like using the cup measure that comes with the rice cooker because it’s quicker and much more convenient. The same goes with other dried grains and pulses, such as lentils and barley. Furthermore, as cups measure by volume, I don’t mind using them to measure out liquids. It’s worth noting here that US cups measure 240ml whereas Australian, Canadian and South African cups measure 250ml. This is something that Caroline, one of my Australian friends highlighted to me.
In addition, say a recipe asks for a tablespoon or three of flour or sugar, it doesn’t bother me much either. Normally it seems to appear more in cooking recipes rather than baking. Thus, even though the same inaccuracies will happen, I have less of an aversion to some measurements in tablespoons and teaspoons, apart from butter! Sticks of butter didn’t make any sense to me until I baked in America and saw how butter is packaged into sticks and each stick is divided into tablespoons. By the way, one stick of butter is 4oz/113g/8tbsp.
From that experience, I also realised that many households may not own kitchen scales and therefore use cups. For most of the years that I lived in Cambodia it was difficult to buy kitchen scales to measure smaller measurements, although the big ones that market sellers used to sell their produce were abundant. Thus once again, cups were used. Forewarned, I packed kitchen scales with me when I moved out there. I knowingly admit that growing up, in the UK, using scales influences my views on the cups vs measuring scales debate. I hate measurements in cups in baking because there are such disparities in the measurements in a matter that does require consistency and a level of precision.
My heart sinks when I see recipes with a list of the ingredients in cups because inevitably I will look up various conversion tables to adapt the recipe into grams and revisit that familiar feeling of resentment and annoyance when the web throws up differing measurements. Look let me give you an example of the inconsistencies on the web when it comes to volume and weight conversions. In the UK Doves Farm website they say that 1 cup of brown sugar is 180g whereas in the US King Arthur baking website they state it is 213g. At this point, I probably trust a US website to translate it from cups to grams for me because in the King Arthur table they know to specify that this is packed brown sugar and thus displays their greater experience of baking using volume rather than weights. But do you see the difference? ‘So what?’ perhaps you’re asking, ‘what is in 33g?’ Okay, so what? Well, let’s multiply this number when a recipe asks for 2 or 3 cups of brown sugar. I’ve illustrated the difference in a table below:
No. of cups
Doves Flour
King Arthur
Difference in weight
2 cups
360g
426g
66g
3 cups
540g
639g
99g
66g or almost 100g makes a big difference in the taste and texture of what you’re baking and it can be the difference of whether you have enough of an ingredient when nearing the bottom of a bag. At this point, to be fair, I’d also be questioning why there needs to such a high amount of sugar and whether I’ll reduce it to prevent future me from developing type 2 diabetes. So, why am I quibbling about it?
Well my second point is about wanting clarity and precision, particularly when trying out a new recipe. I know that there is a knack to using cups with flour and sugar to do with a little shake to let the flour settle and using a knife to run over the top to level it. Even when I do that, I find it irritatingly inconsistent. Clearly I am not a pro at it. To add an added element of difficulty, different cooks measure their cups differently and how am I to know what a cup of flour weighs for them? It’s a bit of a lottery whether I’ll guess it correctly. Here’s the proof. At Lunar New Year, I was trying to make steamed buns and I decided to follow Maangchi’s jjinbang recipe and method which asks for 3.5 cups of flour and 1.5 cups of milk. Using both the Doves Farm and King Arthur tables, which agreed with each other, I converted that into 420g. However, it turned into such a wet, sticky dough, reminiscent of a ciabatta dough, and nothing like the photos of her dough, that I decided that there was no way I’d be able to shape it into buns with cute ox faces on them and then steam them. So then I added some more flour to make it a firmer dough but either that is never a remedy or I didn’t add enough. In the end, I relinquished that dough to bake into a tasty focaccia style bread, turned to What to Cook Today’s Year of the Ox steamed bun recipe and started a new dough. She also specifies a total of 2 cups plus 11 tablespoons of flours and 2/3 cup of milk but I didn’t get irritated because she also gives the weight in grams. A smooth, pliable dough formed and I made steamed baozi buns for the first time. I’ve posted the photos of the end result of both doughs at the end of this post.
Interestingly I came across this golden nugget of information in Maangchi’s Hotteok filled with vegetables video beginning at 3mins 11secs onwards when she weighs her cup of flour and it is 5oz or 156g. I will keep this in mind when I use her recipes. By the way, King Arthur and Doves Farm Flour weigh 1 cup of flour as 120g. So I guess then going back her jjimbang recipe that her 3.5 cups of flour = 546g, and not 420g. *Big sigh* Now we’re back to my rant about big discrepancies.
Sidenote: I’m considering blogging a monthly post with my cooking/baking failures, mistakes and disasters that happened that month. Would you be up for that?
I’d planned to share this recipe in January in case anyone had resolved to do veganuary. I wanted to let you know that this scrummy, flavoursome cake was possible to make and eat. You probably have the ingredients in your cupboard and fridge already, unless you aren’t vegan and possibly don’t already have an alternative dairy free milk in your fridge.
However, I don’t know whether people will have given up on their January resolutions, like dry January (not drinking alcohol in January) and veganuary (going vegan for January) after last week’s announcement about England going into lockdown 2.0. Whoever had been hoping that the stroke of midnight on Hogmanay 2020 was going to herald in a better year had their hopes cruelly dashed. Lockdown was something that I’m guessing most people were hoping would be left behind in 2020.
In the last real lockdown in March 2020, (I’m not counting what happened in November because there were fewer restrictions than what we have now), the internet exploded with stories and images of people baking banana cakes, banana breads, cookies and sourdough breads. Flour and yeast disappeared off the supermarket shelves and a little black market for flour and yeast began. I’ve bought a 25kg bag of flour, who wants to buy some from me? XX bakery is selling yeast. I understood the sourdough bread fascination – more time at home on their hands perhaps, so could feed the starter, watch the starter, turn the dough, bake the bread. I didn’t understand why banana cake or bread held the same fascination. I still don’t. Anyone want to enlighten me?
I created this vegan cake simply because of a combination of reasons. I’ve been wanting to create a good vegan banana cake recipe for a while, one of my colleagues is vegan and on Fridays, it had become a custom to have some sort of sweet treat that one of us would share. That was before Christmas, and the wildfire spread of the new Covid variant when we were able to go into the office.
Previously when I had researched vegan baking, bananas came up as a common, easily accessible substitute for eggs. If you’re interested, the other common substitutes in a cake are applesauce or a mixture of vinegar and bicarbonate of soda. Often they suggest replacing one egg with one banana: it helps to hold the structure of the cake together, which is what an egg does in a cake. I’m still a novice when it comes to vegan baking and I’ve only tried this in a banana cake, so I don’t know how it would affect the flavour of another type of cake.
I mushed together my recipes for vegan chocolate cake and spiced banana cake to come up with this recipe. The addition of boiling water at the end, was the one final comparison test that I did before I wrote up this blog post. In the final taste test when I was paying particular attention to the texture, my taste testers and I noted that the addition of water created a slightly lighter and more moist cake crumb.
Searching for textural differences. The top row: with the addition of hot water and the bottom row: without hot water. Welcome to my world of recipe testing.
You can play around with the filling. In version 1.0 I used purely currants and in 2.0, a mixture of currants and raisins. Both work. I think that walnuts and pecans, or dark chocolate would work too. You can also vary the spices. I chose to go with vanilla so that more of the banana flavour would come out. However, I know that lots of people like to add ground cinnamon or ginger or mixed spice to their banana cakes. I like doing it too. I also vary whether or not I add the icing. I think the addition of the lemon drizzle icing takes the cake up another level. However, if parents are trying to limit refined sugar from their children’s diet (or their own) then you can omit it completely. I think there is enough sweetness from the bananas and the dried fruit. It’s also less messy to transport as muffin snacks if there is no icing.
Edit 30th Jan: yesterday, I added an extra banana because I had one; reduced the sugar slightly to 80g (I think that I could have reduced it further) because overly ripe bananas have their own sweetness; replaced vanilla with ground ginger for a hint of heat and paired it with the lemon icing. It produced a bigger loaf and the house smelt glorious. Half of it disappeared within a day.
Just to add, I’m currently living with 4 other humans.
Perfect on a cold January day
Lastly, I experimented to see how easily this cake could adapt from a banana loaf to muffins. Very easily. This recipe will bake in a 2lb loaf tin (21x11x7cm) or 16 muffin cases.
The verdict? “Moist, scrummy, yummy, amazing, delicious..” – my colleagues, former housemate and the family that I currently live with are fans of this banana cake. Sometimes though, I’m not sure whether they’d say anything negative because they like homemade baked goods. You’ll have to try it for yourself and let me know.
Ingredients for Vegan Banana Cakeor Muffins
75ml vegan buttermilk (70ml soy milk or any vegan alternative milk + 1tsp of apple cider vinegar or lemon juice)
85 ml of sunflower oil
3-4 very ripe bananas mashed (about 300g-400g)
80g-90g light brown sugar
1tsp vanilla extract
75g currants + 1/2tsp bicarbonate of soda – soaked in boiling water
225g self raising flour
1/2 tsp baking powder
1/2 tsp bicarbonate of soda
3/8 tsp salt
50g boiling water
Ingredients for the lemon drizzle icing
80-100g icing sugar
juice of half a lemon, you want between 3-5tsp so it really depends on the size of the lemon.
Measuring out the wet ingredients and the dry ingredients
Method
Preheat the oven to 180°C/350°F/Gas Mask 4. If you are making a loaf, then oil and line a 2lb loaf tin. If you are making muffins, then line two muffin tray with 16 muffin cases.
Prepare the dried fruit and make the buttermilk. In a cup combine the soymilk with one teaspoon of vinegar or lemon juice. Leave to one side for 10 minutes so it curdles. Boil the kettle and in a heatproof cup, measure out the currants and 1/2tsp of bicarbonate of soda. Add in the boiled water and leave it to one side while preparing the other steps.
In a medium sized bowl, whisk together to combine the sugar with the mashed bananas, oil, buttermilk and vanilla extract. There will be white flecks where the buttermilk breaks up (I’ve included a photo below so that you don’t worry when you see this.)
In another small bowl, measure out the flour, bicarbonate of soda, baking powder and salt. Whisk together to combine.
Drain the currants and I rinse them with cold water to wash off any residual bicarbonate of soda.
Add the currants and the flour to the wet mixture and use a spatula to combine together.
Finally carefully add in the boiling water and mix thoroughly.
Pour the mixture into a 1.5lb loaf or measure out into the muffin cases. I used silicone ones and put in 2 tablespoons of mixture in each.
For the loaf: bake in the centre of the oven for 40-50 mins. Check after 30 mins and if it is browning at the top too much then cover with foil and continue baking. For muffins: bake for 15-18mins. To check if they are done, test with a sharp knife and it should come out clean. Leave to cool for at least 10 minutes.
Prepare the lemon drizzle icing by sifting the icing sugar in a bowl and add in the lemon juice one teaspoon at a time until you get a runny consistency that coats the back of a metal spoon. Once the cake/muffins have cooled for 20 minutes poke holes in them and drizzle it over the cake or muffins in whatever shapes you desire.
Storage: Store the loaf/muffins in an airtight container. I think it tastes better the second and third day. It keeps well for 5 days and maybe longer, but it has always been all eaten by then.
Mix the wet ingredients together with the sugarMuffin cases filled with 2 tablespoons of mixtureThe vegan banana loaf 2.0 this time as muffins with no icing.
A bag of kale, reduced down to 20p, was the last thing I bought before I received a notification from the Covid-app informing me that I had been in close contact with somebody with Covid-19 and I had to self-isolate for the next 8 days. So at 6.11am that morning I sent a message to cancel a run with my friend that morning, emailed my work to let them know and we did some rescheduling gymnastics so that I could work from home. Isn’t it odd that a bag of kale holds this memory for me now.
To be honest, I didn’t mind staying at home. My housemate didn’t have to self-isolate so she could get groceries for me and update me on what was happening in the realm outside of the front door. That is an odd detail, I know. I don’t fully understand the track and trace system we have in England. We figured out that my phone must have picked up something on my 20 minute train journey to work. Commuters who don’t wear their masks properly or socially distance appropriately stress me out. I was happy to temporarily cut out that bit of stress from my life.
I still had leftover pumpkin, lentil and goats cheese salad in the fridge, so I decided that for dinner that night, I’d crisp up kale and add it to the salad. I had only just mastered it the previous week whilst making a roasted squash risotto with crispy kale.
The goats cheese, pumpkin and lentil salad with crispy kale
I have been trying to make crispy kale for about 8 years and failing each time. Somehow, I had it in my head that I had to bake the kale at a low heat and so each time it would just come out soggy and burnt: an odd combination. This was due to the fact that I had first read about crispy kale in a post by Gwyneth Paltrow that also told me how to make oven dried tomatoes and either the recipe is actually wrong or I got confused between the two recipes. Then it was compounded by other recipes which told me to bake at a low temperature for 15-20 minutes. Instead, this roasted squash risotto with crispy kale recipe told me to preheat the oven to 230°c for the baking of the kale. I read that instruction twice to check and it worked.
Top Tip: the secret to crispy kale is a short baking time in a hot oven and dry kale.
Yes, once you’ve chopped and washed the kale, leave it to dry in a colander, or even better a salad spinner, for a while then spot dry it with a clean tea towel. This saves your tea towel from getting completely soaked. That is, unless you happen to have a bag of already prepped and washed kale.
1tbsp Sunflower/rapeseed or vegetable oil (depends on how much kale you have)
Salt and pepper to season, maybe a 1/4 tsp of each.
1/2 tsp – 1tsp Paprika/Cayenne pepper/Chilli flakes or whatever spices you’d like (optional but highly recommended)
Method
Preheat the oven to 220°C/425°F/Gas Mark 7 and prepare two large baking trays.
Prepare the kale. Cut the kale, 2-3cm long. Remove any particularly tough bits of stalk, nearer the bottom of the kale. As you can see from the photos, I don’t really bother that much with removing the stalks because I don’t mind the extra bite. Wash the kale to remove any dirt. Leave it to dry in a colander or alternatively use a salad spinner. Then use a clean tea towel or paper towel to spot dry the kale so that it is as dry as possible.
Add the kale into a large mixing bowl. Sprinkle over the oil, salt, pepper and any optional spices and massage in to make sure that each leaf has been coated. I prefer to do this part in a bowl because I find it gives a more even coat than when I do it on a baking tray. However, if you want to save on washing up, do this step on a baking tray.
Lay out the kale in a single sheet as much as possible. This prevents steaming and sogginess. There will be a bit of overlap, don’t worry.
Bake between 8-10 minutes so that they crisp up and are a mix of darker green and brown. Some leaves will get browner than others. I think that’s okay but if you want a more even crisp, then halfway through the baking time, move the leaves around.
Leave it out on the baking trays to cool a bit before munching on it. It can be eaten on its own, added to a salad or a risotto for extra texture. Enjoy.
First, cut, wash and dry the kale Coat with oil, sprinkle with salt, pepper and optional spices. This one has paprika. Then lay out on a baking tray
Here’s a seasonal recipe for you, perhaps not the sweet one that you were hoping for this Christmas from me. If you like brussels sprouts or are somewhat ambivalent about them, do me a favour and give this recipe a go. I had boiled ones the other week at my work cafe as part of a Christmas lunch, and to be honest, I was a bit disappointed by their lack of imagination with this humble vegetable, given that they teach culinary skills.
I’m obsessed with roasted brussels sprouts. I first made them 3 years ago and they were a game changer. Roasting them brings out a nutty flavour somehow that you do not get when boiling or frying them. And texturally I find it really pleasing: soft but not soggy. Another bonus to roasting is that there is no bad smell when you cook them, although at the other end, I can not promise that the gasses will smell any sweeter.
Since being back in the UK, I have discovered that roasting brassica is my favourite way of cooking and eating them. Bold statement, I know. But so far, it holds true.
Brussels sprouts prepped with the bottoms sliced off and halved.
I have not given you quantities. Sorry. I have never measured out this recipe and now I’ve become that recipe writer who might say to you annoyingly, add a glug of olive oil and if you’re like me, you’d get peeved with them because how many millilitres is there in a glug of oil? Nevertheless, the only thing I can offer by way of excuse is that I have never measured this out because I always vary the amount of brussels sprouts depending on the number of people. I believe I think that 8 brussels sprouts per person is normal, based on the photo at the top, but then again, I do really love brussels sprouts.
Ingredients for roasted brussels sprouts
Brussels sprouts (however many that you’d like)
Olive oil (enough to coat the brussels sprouts)
Salt (to season)
Pepper (to season)
Chilli flakes (optional)
Juice of a lemon (optional)
Method
Preheat the oven to 180°C/350°F/Gas Mark 4.
Slice the bottoms off and halve them.
Place cut side down on a baking dish.
Sprinkle with olive oil and season with salt, pepper and if you want, chilli flakes.
Bake in the oven for 20-25 minutes. Check halfway and shake them around a bit. If you forget this bit, don’t worry, there will be a bit of charring on some, but that tastes alright too.
For a tangy finish, squeeze a bit of lemon juice over them at the end.
One of my friends recommended adding a drizzle of honey with chilli on them before baking them for additional flavour. That is a new twist that I’ll try this season.
Incidentally, I have also discovered whilst writing up this post that I’ve been spelling brussels sprouts incorrectly all my life, as brussel sprouts. Well, now I know.
What is your favourite way of cooking and eating brussels sprouts?
Experimenting with peanut butter and salted caramel brownies.
Recently, I was asked in an interview, “what do you contribute to a team?” The first thought that popped into my head was brownies. However, perhaps that wouldn’t be such a professional way to answer the question? So, instead I answered something about how I am a really good team player and the many different skills I’d bring to the team, rather than saying that my contribution is a baked sugar high laden with chocolate. I meant to mention my excellent brownies at the end as an aside, but I forgot.
Immediately once the interview was over and as I reflected on how it went, I wished that I had led with the brownies though because it would have revealed more of my true self. My flatmate and colleague concurred (now assigned to the status of previous flatmate and colleague: that teaching job contract having just ended and we’ve moved out). Though, we then agreed in the next breath that my crack cookies are my best work. So, another time, I’ll be that little bit braver, relax and say, “brownies and cookies.”
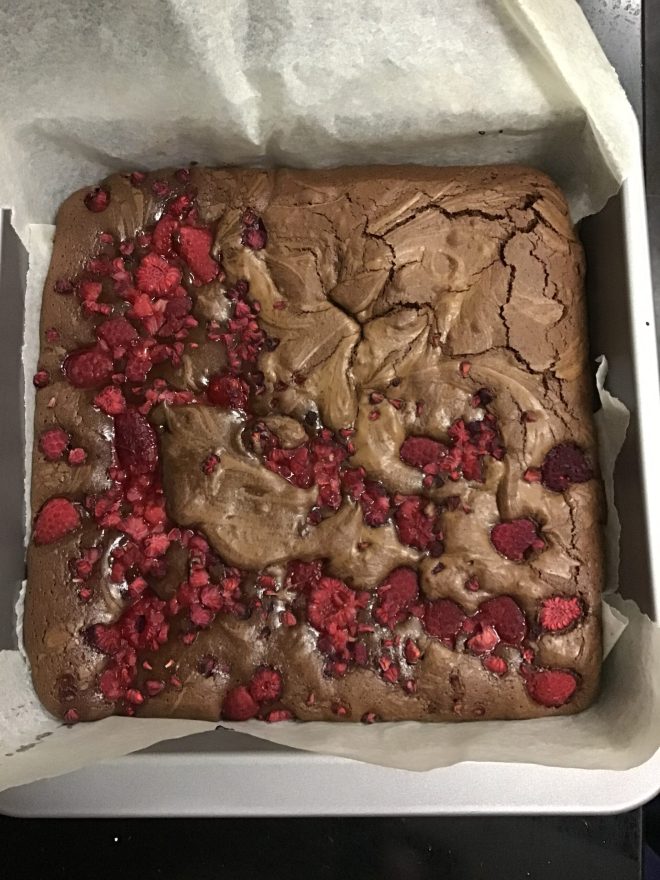
The first time that I made these during lockdown was at the beginning of marking many, many student essays whilst living at my sister’s. I’d broken a personal record and spent 5 hours on a paper, checking for plagiarism and looking up citations, and still hadn’t finished it when thoroughly fed up and discouraged, I decided to put it down until the next day. A WOD (workout of the day) with 100 burpees and an evening spent singing, baking these brownies put me in a better mood. I left it out on the side to cool down and develop even more flavour overnight. My sister said that her contribution to my happiness was not diving into them that night. I shared a photo of them on a work group chat and subsequently made friends with a colleague who wanted the recipe.
The raspberry burst brownies which fuelled the essay marking
Awkwardly, I didn’t have the recipe at hand to share. It lived in the form of an excel spreadsheet, a hangover from my baking business days. Instead, I sent her a link to my raspberry burst brownies and made a mental note that it was time to publish this recipe.
I created this recipe in Cambodia whilst supplying brownies for a cafe because I wanted to create a brownie with more height and volume that I could adapt with a variety of fillings, such as cheesecake and salted caramel. In addition, my usual go to, very easy brownie recipe which the raspberry burst brownies are adapted from suddenly stopped working for me after I upgraded my oven. They were coming out cakier. Some people prefer their brownie consistency like that but I much prefer them to be fudgier with that delightful cracked top. The timing of it might have been purely a coincidence and have nothing to do with me switching from one of these electric toaster ovens to a standing oven cooker. I’ve shared the only decent photo that I appear to have of my toaster oven for you. If you’ve always lived in the UK, then you may have no concept of what I’m talking about. In most parts of S.E Asia, ovens do not come standard in a furnished kitchen. This is the oven in which I began my baking business and I used it for the first 2 years. It only allowed me to do one tray of cookies, a cake or brownies at a time and by the end it wouldn’t heat above 150°C. When I moved and invested in a new oven, it was a game changer.
My toaster oven lived on the floor. I’m piping coconut churros.I moved apartment and my new oven fitted into this space perfectly. This was taken the day the oven was delivered and fitted. If you look carefully you can see I had to buy extra long wiring because the power socket was on the other side of the room.
Anyway, it gave me an excuse to try out a new brownie making method for me that I’d seen Ed Kimber use in this video in which you mix the eggs and sugar for about 10 minutes until they form into a ribbon stage (I’ve explained what ribbon stage is in step 4 of the method) and then add the melted chocolate and butter. Mixing the eggs and sugar for that long, creates volume and structure and I deduced, would help me create that dense fudgy consistency and crinkly top each time. It did. At the bottom of the post, I’ve also included for you, a few photos of the different flavours that I’ve played with and how I’ve adapted them.
I played around with the sugar quantity. Most brownie recipes ask for larger quantities of sugar, but I’ve always liked the challenge of seeing how little sugar I can add to baking and it still taste good. From experience, 150g is too little but anything between 200-230g is perfect. I’ll adapt it depending on the additional flavours I want to add. For example, with salted caramel, I use less because of the added sweetness from the caramel. With raspberry I use more to counteract the tartness of the raspberries.
All the components ready to mix together
I prefer to make these in a stand mixer using the whisk attachment because it is easier to leave the stand mixer running during the egg and sugar whisking part whilst getting on with other tasks, rather than holding an electric hand mixer for 10 minutes.
Top tip 1: if using an electric hand mixer, place a tea towel underneath the bowl to keep it stable and stop it moving around.
Top tip 2: once baked, leave these to cool down completely, cover and place in the fridge overnight. Not only will they taste better as the flavours mature and deepen, but they will also be cold. Cut them with a sharp knife and you’ll get those beautiful clean lines.
So here’s the recipe for the Infinitely Adaptable Fudgy Chocolate Brownies. They’ll make between 12-16 brownies or 20 mini brownie bites.
Ingredients
150g unsalted butter, cut into small cubes
150g dark chocolate (at least 60%), broken up, roughly chopped
3 large eggs
200-230g caster sugar (depending on how sweet you’d like them and the additional flavours you want to add)
100g plain flour
20g cocoa powder
1/2 tsp of salt
1 tsp of vanilla extract
1 tsp of instant coffee granules (optional) – I use it because it helps bring out the chocolate flavour
And then whatever flavours* you’d like to add, or not.
Method:
Preheat the oven to 180°C/355°F/Gas Mark 4. Line a deep tin. For this quantity a 20cm square tin or a rectangular 27×20 or 28×18 will work.
Melt the chocolate and butter together and just after it has melted, add in the salt, vanilla extract and the optional instant coffee granules and leave it on the side to cool down. There are various ways you can melt chocolate and butter.
The more cautious, ahem proper, approach is to use a bain marie, that is put the butter and dark chocolate in a heatproof bowl that can sit on top of a saucepan with simmering water. Make sure that the bottom of the bowl doesn’t touch the hot water in the saucepan. Slowly melt the chocolate and stir regularly. This way you won’t burn the chocolate.
Another easier way is to use the microwave. Put chocolate and butter in a heatproof bowl, place a paper kitchen towel on top of the bowl so that butter won’t pop out as it melts. Melt it in 20 second bursts, stirring each time.
My way, is to use a heavy bottomed saucepan. I put the chocolate and butter in it and melt it at a low heat, stirring regularly. I take it off, just as the last few chocolate/butter bits aren’t quite melted because they will melt in the residual heat of the saucepan.
In the meantime, measure out the flour and cocoa powder into a small bowl. Sieve it if there are lots of lumps in the flour and cocoa. Otherwise, use a whisk to loosen and mix them together.
As soon as the chocolate/butter mixture is off the heat, crack the eggs into a medium sized bowl and add the sugar. Use a stand mixer or an electric hand mixer on high speed to start whisking the eggs and sugar until they are at a ribbon stage. Ribbon stage is when the egg and sugar mixture are a pale yellow colour, doubled or even tripled in volume and when you lift the whisk over the mixture, the batter will fall slowly and leave a trail like a ribbon that will hold its shape for a few seconds. It will take about 10 minutes. I still use a timer to make sure I beat them for long enough. Don’t start beating the eggs/sugar until the chocolate/butter has melted because the chocolate/butter mixture needs this time to cool down.
When the eggs and sugar have reached a ribbon stage, reduce the speed to low and add the melted chocolate and butter mixture to the eggs and sugar. Whisk until it all appears to have mixed together. If you are using an electric hand mixer, you may need to turn off the mixer, add the chocolate/butter and then switch it back on again to avoid a mess. I speak from experience, haha.
Now fold in the flour and cocoa powder using a spatula, or a spoon until it is well combined.
Pour into the baking tin.
Bake in the oven for 18-20 minutes. They should be firm to touch at the top but still wobble when you shake it. Leave to cool completely in the tin and if you can bear it, cover them and leave them overnight in the fridge. They will be easier to cut and the flavours will have deepened.
*You can add various flavours to this, or not if you want them plain. I’ve given you a few of suggestions and photos below. Do let me know how else you adapt them.
For raspberry burst brownies 2.0, I add 90g of raspberries. I mix in half before I pour it into the baking tin and then scatter the remaining half where there are spaces.
For raspberry and white chocolate, do the above and add 100g of chopped white chocolate. Mix half the chocolate into the batter with the raspberry and then fill the spaces with the remaining 50g.
For nutty ones, I use 100g of nuts. For this one, I’ve used walnuts. I pick out 12-16 walnut halves to place on top for evenly then roughly chop and mix in the rest to the mixture before I pour into the baking tin and then place the remaining walnut halves on the top.
For hazelnut and salted caramel. I made these to use up leftover ingredients as I was packing to return to the UK. Use 100g of roughly chopped hazelnuts and 100g of salted caramel. I mixed in half the hazelnuts into the mixture, then after I poured it into the tin, I blobbed salted caramel with a teaspoon evenly and scattered the rest of the hazelnuts over the top.
Swirled cheesecake brownies, but I’ve realised that the salted caramel and the cheesecake ones are a little more complicated, so I’ll post those recipes another day.
What happened next with that interview? How many points have I accumulated? In this current job hunting cycle, I racked up 103 points. Incidentally, I got offered that job, even without the promise of these brownies. So, I’m currently in the throes of transition once again and relocating down to the Midlands.
It was my sister’s birthday recently and I asked her if she’d like a cake or baked goodie. She answered, “shortbread, if that’s possible!!” I laughed when I read the message. It didn’t surprise me. She had declared previously that shortbread was her favourite item from everything that I had baked whilst living with them, during lockdown for 3 months. The week before, I had moved out into university accommodation when lockdown measures had eased allowing me to social bubble with them.
However, how was I going to go about making it a birthday special shortbread with limited baking equipment and none of my usual baking and decorating tools?
Make a cake structure out of shortbread biscuit? Maybe, but I wanted to make something more personal.
Stamp out happy birthday with cookie cutters? I didn’t have any alphabet cookie cutters and didn’t know any shops within walking distance that would stock them. I couldn’t ask her to drive me to a shop because, well that would ruin the surprise.
So, I let the thought percolate for a night and then I hit on the idea to create shortbread scrabble tiles, spelling out Happy Birthday Ee-Reh. My sister really likes playing scrabble so this would be special and personal to her. Importantly, I figured out how I’d be able to make them by improvising with what I had in the kitchen already. So yesterday I spent a happy Saturday morning improvising baking tools and creating these shortbread scrabble tiles, whilst working out how to do my laundry in the on-campus laundrettes.
Here’s how I made the scrabble tiles, if you’d like to make them.
I searched the internet for an image of scrabble tiles and counted out how many letters I needed for my birthday message to my sister. I used my go to Fiona Cairns shortbread recipe. This blog post has a more detailed methodology, and worth reading if you’ve not made shortbread before. This time, in the absence of salted butter in my fridge, I substituted it with unsalted butter and added salt. I also accidentally softened half the butter in the microwave for 10 seconds too long, so it was a liquid goo. But it was okay because when I added the rest of the still cold butter chunks, it started to harden and sort of get to the right temperature and consistency. I used cornflour because it is more readily available in UK supermarkets than rice flour but either is fine. I resisted the urge to use a ruler (didn’t have one, haha) or measuring tape (which I do have) and eyeballed the shaping and cutting. It’s homebaking, you know, not the GBBO.
Equipment you’ll need
Medium sized mixing bowl
Clingfilm – baking paper will also work
Chopping board
Tea spoon
Hand mixer
sharp knife
metal or wooden improvised carving tool – I used the end of the beater. I kept thinking that a metal chopstick would have been great.
Metal baking tray and baking paper
My improvised cookie decorating tools
Ingredients
250g unsalted butter, softened and cubed
100g golden caster sugar, plus some more for sprinkling post-baking
1tsp table salt – about 5g
250g of plain flour
125g of cornflour
Method
1. Cream together the butter, salt and the sugar together first. I use a hand mixer because it’s faster and easier.
2. In another bowl, measure out the flour and cornflour. Mix it with a whisk. Unless you’ve got weevils or clumps, that is all the ‘sifting’ you need to do. Mix into the butter and sugar in three batches to stop the flour flying out of the bowl until it starts to come together. Then gently knead the dough for about 5 minutes, until it is smooth.
3. Get a piece of clingfilm or baking paper. Place half the mixture evenly in a long oblong shape on the clingfilm. Fold the clingfilm over to cover the dough and use your hands to massage it into a more recognisable rectangular oblong log. I tried to make each side 3.5cm, which is the length of my thumb. I was eye-balling it. Try to give it corners so when you cut it, it will look like a square. Twist the edges of the clingfilm and pop it into the fridge for at least 30 minutes. This will make the dough easier to cut. Do the same with the other half of the dough.
The shaped oblong rectangular logs
4. In the meantime, write the message on a piece of paper, count the number of scrabble letter tiles that you’ll need and check the internet for the font and numerical value of each letter tile. Also wash up the beaters.
5. Preheat the oven to 170°C/340°F/gas mark 3. Line a metal baking sheet with baking paper.
6. Take one of the logs out of the fridge and place it on a chopping board. Unwrap and cut off the rounded edges. Slice each log into 1cm thick squares. I eyeballed it. Rotate the log every 4-5 slices to ensure that they keep an even square shape.
7. Take one square and transfer it onto the lined baking tray. I used the end of the hand mixer beater to carve out the letter and the end of a tea spoon to make the numbers, holding the square with my other hand to keep it still. Carve about 5mm deep. Every so often, I would use a sharp knife to remove the shortbread ‘debris’ and if it was a letter like a B or an E, I would pad some of the ‘debris’ gently in between the carved furrows to strengthen the shape of the letter, hoping that it wouldn’t disappear as it baked. Curved round 3’s proved impossible for me.
8. Bake in the middle of the pre-heated oven for 14-16 minutes. It should be a lightly golden colour on top and little browner on the bottom. DON’T pick one up when fresh out the oven to check if the bottoms are browned because it will break!* Wait until they have cooled down and are stronger. Instead trust the oven and sprinkle a little caster sugar on top immediately when they come out of the oven. If any of the pieces have baked into each other, separate them with a sharp knife.
*I needed 19 letters, but as I picked up the ‘I’ to do exactly what I told you not to do, it broke in half. So I got my second log out and decided to carve out some more letters so that my sister’s family could spell out each of their names, if they wanted to. Sometimes, this is how the creativity juices unfold.
And that’s it. Tada!
I was so excited to show her what I’d made for her. I asked my 3 year old nephew to say which letters he saw as I ‘wrote out’ her birthday shortbread.
P.S I asked my sister for a lift so that the shortbread biscuits wouldn’t break into crumbs whilst walking the hour over to her house.
P.P.S She really liked them, and so did the rest of her family.
I meant to publish this recipe a few months ago, but I didn’t have the photos ready. I still don’t have the perfect photo sequence for how to make these cookies. But it’s the middle of the Open and these cookies were thought up between a few crossfitters so better like this than never, right? Besides, what better timing than the middle of the CrossFit Open Games to tell you how I got started on CrossFit and baking paleo cookies.
The ingredients for the cookies minus the bicarbonate of soda
I started CrossFit in February last year. I had been given a tough teaching schedule at my school and they weren’t letting me push back on it. As I despaired, I felt God say to me, “Han-Na, you’re stronger than you think you are.” Since I often experience God in physical activities, I decided to also translate that into trying out CrossFit to see how strong I was. This was after months of pushing back on my coaches because I was very happy in the Bootcamp classes and not interested in getting stronger.
Pretty soon, it was clear to my coaches, that I had the potential to lift heavy weights. I, on the other hand, intimidated by lifting anything vaguely heavy and the technicalities of the lifts, really did not enjoy the barbell work for the first few months. Not long ago, one of them encouraged me, as I was going for my 1 rep front squat max, that I had the ideal physique of a squatter. I’m not entirely sure what he means by that, do you? Still, I managed 72kg that day, which I was delighted with.
Then one day, one of my coaches asked me when I was going to bake some paleo cookies for her. I told her that Christina (of Joyfully Nutty) and I had just been talking about how to use cashew almond nut butter in baked goods and so why not try them in a cookie.
So, thank you Minna and the CrossFit community for pushing us into trying to make these paleo cookies.
I use the Dazed and Cashewed, cashew almond nut butter from Joyfully Nutty. You could make these with a cashew nut butter or an almond nut butter, it comes down to preference. I went off the back of Julie Wampler’s recipe from Table for Two, and experimented with reducing and changing the sugar to make it suitably paleo. I was also baffled as to whether palm sugar is paleo or not. It would appear that the paleo community embrace coconut sugar but differ on palm sugar. The little personal research that I’ve done suggests that palm sugar is produced in the same way as coconut sugar, and therefore is paleo.
Then I discovered this delightful nugget. With the addition of different spices, I could halve the sugar or omit the sugar completely and they would still result in tasty ‘sweet’ morsels, that are soft yet chewy. Curious, I tried a sugar free version, which admittedly, is more delicate and will thus crumble more easily, but because there’s a lot of dark chocolate, you hardly notice that the sugar is gone.
Top tip: by adding spices, you can reduce or omit the sugar.
I believe that you could make these vegan by replacing the egg with flaxseed or chia seed but I’ve yet to try it.
Baking these is a cinch (read the method below), which is another reason why I like them. You want to satisfy that cookie craving but don’t have to wait 24 hours to rest the cookie dough. From start to finish, you could be sitting down with a cookie (or twelve) in 30 minutes, or less.
So here is the Dark Chocolate Cashew Almond Butter Cookies, adapted from Table for Two.
Makes between 12-14 cookies
1 large egg
60g palm sugar (*optional)
1/4 tsp salt
1/2 tsp cinnamon
1/2 tsp turmeric
250g cashew almond nut butter
1tsp bicarbonate of soda
100g dark chocolate*, broken into chunks. Or you could use dark chocolate chips. I use small round discs of chocolate.
*use one that is at least 65%.
Method
Preheat the oven to 180ºC/350ºF or gas mark 4. Line a large baking tray (or two depending on size) with baking paper.
Whisk the egg, sugar, salt, cinnamon and turmeric together in a small mixing bowl.
Add in the cashew almond nut butter and the bicarbonate of soda and mix until it is all combined.
Stir in the dark chocolate.
Place generous tablespoon dollops (sort of ping pong ball sized) of the cookies on the baking tray. I use a 1½tbsp cookie scoop for the sake of ease now.
Bake in the middle rack of the oven for 12-15 mins, or 10-12 mins in a fan oven.
They will have puffed up a bit and be lightly golden brown in colour. As they cool they will collapse slightly into themselves. At this point, I like to place a chocolate disc on top of each cookie because I like how it looks. Allow them to cool completely on the baking tray and then store them in an airtight container.
In Cambodia’s humid climate, they’ll keep outside the fridge for about 3-4 days. I normally store them in the fridge and they’ll happily chill out there for 2 weeks. Or they freeze well. But you know, they’re pretty tasty straight out of the freezer too.
The verdict? You’d never know that this was a gluten free, dairy free cookie. Soft in texture and rich in flavour. I get orders for these, with sugar, without sugar, without chocolate… hehe. So you know that they’re customisable. I like them as a pre-workout snack. I also like them because it’s such an easy recipe.
I never knew that fruit cake could be offensive. That is, until Kiley, an American friend of mine, explained that in the U.S, there’s this tradition that people tend to ‘re-gift’ fruit cakes because they don’t like fruit cakes. Hence those receiving the cake are kind of being told, “Here I’ve brought you a cake. I mean, I don’t like it and someone gave it to me. I guess you probably won’t like it too but hey, now it’s your problem. And no, I didn’t like what you got up to at the office party.” Hence, there’s offence in the giving and receiving of fruit cakes in the States.
The ease with which one can buy pineapples, ready to eat (or bake with!) in Cambodia. This is at the Russian Market, Phnom Penh
Lining this 8inch cake tin for its looooong bake.
Not so in the UK. I mean, some Brits really dislike fruit cake and would spit it out. However, most like to eat fruit cake at any given time, from celebrating marriage with a rich boozy fruited wedding cake covered in marzipan and icing to the everyday cup of tea with a sticky slice of fruited malt loaf. Shall I even mention Christmas cakes, Easter simnel cakes, Dundee cake..? My mum used to make a fruited tea loaf which was delicious when toasted and buttered.
Perhaps (if I may venture a guess without causing offence) this clear cultural divide over fruit cake is because the majority of Americans have never experienced a good moist fruit cake? I can relate! I never really enjoyed eating fruit cake very much either growing up. Much like how I didn’t really enjoy mince pies. Too rich, too sweet, too dry, too much whiskey! But I tolerated them because they were synonymous with Christmas. I’d peel off the royal icing, give it to my brother and nibble away at the marzipan (which I loved even as a small child). Sometimes I picked out the fruit when there was too much of it and the dried fruit was really dry and almost bitter. Or the alcohol overwhelmed the cake. But, from time to time, a homemade fruit cake would redeem all the bad ones for me.
Then one day at Mrs Milne’s* house, she gave us a slice of her christmas cake. Oh it was glorious in it’s moistness, flavour and simplicity. Not overly sweet. No royal icing. No marzipan. No alcohol in this one either. Just. a. naked. fruit. cake. Mrs Milne told us that it was the addition of pineapple that set this cake apart, and I believe her. Whenever I’ve used pineapples in a cake, they often impart moisture, rather than pineapple flavour to a cake.
Now, over a decade later, it’s still my go-to fruit cake recipe. I used it as my marathon training cake this time. It seemed apt to fuel up on. I left it a couple of weeks in a sealed container in the fridge while I went on holiday to Penang and 4 weeks on, it was still moist and moreish. I baked it for Christmas for Paul, one of my colleagues, because he’d been hankering after fruit cake for as long as I’d worked with him. 3 months on, he still requests I bake him one, once a fortnight, and then complains that he can’t stop himself devouring it. He likes royal icing but not marzipan, so that’s how I make it for him.
What I love about this recipe is the lack of planning required. See, I just can’t be bothered with the whole affair of soaking and feeding the fruit weeks or even days in advance. I don’t have the fridge space for it and I definitely don’t want to leave it out for the ants, cockroaches and rats now that I live in the tropics. I can pretty much make this cake from start to finish within 2-3 hours, depending on which cake tin I use. (more on that below). And now that I can source almost all of the dried fruit here in Phnom Penh, there’s nothing stopping me making this cake all year round. I still have difficulty finding mixed citrus peel and currants, but it’s so much better compared to 3 years ago. You can buy bags of mixed dried fruit in Thai Huot but they look weird with chopped red and green cherries perhaps? So I came up with my own measurements, based on looking at the proportions of the ingredients of a Sainsburys bag of mixed dried fruit.
Anyway, what’s stopping you. Go on, I dare you not to like this.
If you do add brandy, or whiskey… Then do tell me what you did. I’ve never bothered, but I might like to one day.
*Mrs Milne was my singing teacher from when I was 14-18 and one of those wonderful, life-giving, energetic, charismatic, generous Scottish women. I don’t know where she got this recipe from, so I attribute this recipe to her.
Ingredients for Naked Christmas Cake from Mrs Milne.
7oz/200g plain flour
3 tsp baking powder
8oz/225g tin crushed pineapple (drained) or 1 fresh small pineapple, skin and eyes taken off. One weighs between 250-300g here in Cambodia.
2oz/50g glacé cherries, quartered
5oz/150g butter, cubed and softened
4½oz/125g soft dark brown sugar
2 large eggs
12oz/350g mixed fruit or
170g sultanas or golden raisins, as they’re called in Cambodia
68g black raisins
62g currants
50g mixed peel
Brandy if required.
Method
Chop up the pineapple* very finely and put it into a medium sized bowl. I guess you could also blitz it in a food processor for speed, but I don’t have one so it’s a knife and the chopping board for me. *If using tinned pineapple, drain the crushed pineapple first before putting it in the bowl.
Measure out the dried fruit and add them to the pineapple. If you’re going to add brandy, then add it in now. Give it all a good stir so that they mix well. Leave it as you get on with the rest of preparation. As the dried fruit sits with the pineapple, they’ll get a chance to plump up as they soak in the liquid.
Preheat the oven to 160ºC/320ºF/Gas Mark 2½. Prepare your cake tin. Because of the long baking time, I wrapped the outside of my baking tin with newspaper, tied it up with some string. I also lined the bottom and sides of my cake tin as well.
Measure out the flour in a medium sized bowl and add the chopped glacé cherries to the flour and coat them in flour. This helps the cherries not to all sink to the bottom of the cake.
Cream together the butter and sugar in a large mixing bowl. I use a hand mixer on high speed for about 5 minutes. Next beat in the eggs one by one. Then lower the speed and mix in the flour with the cherries. Finally, add the fruit. You can continue with the hand mixer, or using a spatula, fold in the fruit or give it a good stir. Whichever way you choose, make sure it’s evenly mixed in.
Pour the mixture into the prepared cake tin and level the top with the back of metal spoon or the spatula. Then pop it in the middle shelf of the oven and bake… I do recommend checking on the cake to make sure it doesn’t burn on top. I’ve put suggested timings below according to cake tin sizes.
I have used various sized cake tins to make this and of course the baking time differs.
8 or 7 inch tin = 1hour 45mins. Check on it at 1 hour 15mins
split the mixture into two 6inch tin = 1 h – 1h 15mins. Check on it at 45 mins
split the mixture into two 2lb loaf tins = 45mins-1hour. Check on it at 40 mins.
My colleague, Paul, wanted it with royal icing but without the marzipan. So, this is what he got.