Cheesecake Brownies

Two baking trays with brownie mixture. The one on the left hand side has salted caramel, the one on the right hand side is cheesecake
Salted caramel and cheesecake brownies side by side

You may have picked up already that I really enjoy playing around with the different flavour combinations in a brownie. When I ran a home baking business, as my side hustle, in Phnom Penh, I’d sometimes put a poll out on social media. What brownie flavour would you like next? Cheesecake was a popular request. Cambodians generally really like cheesecake but I made very few to sell because the ingredients were pricey. Thus when this hybrid worked out, it turned out to be a happy compromise. As I am me, I found ways to play around with more flavours and ingredients. I’ve listed them at the end of the cheesecake ingredients.

cake box with cheesecake brownies inside, a green business card with love, Han-Na
Cheesecake Brownies were a popular order

Last month, I wrote about how I’d picked up a painful thumb injury which I was trying to let heal. It is mostly better now so I made cheesecake brownies and a giant cookie this weekend.

When I posted a picture of this cheesecake version on the post about the infinitely variable fudgy brownies, I said that I’d give you the recipe later as it involves a few more steps. Since then, my brownie recipe and story have featured on TheBrightApp (which is a new social networking site that someone I know is involved in – go check it out). There was a comment that the variations could feature as a different recipe post each time, which is kind. I’m not sure if that will be possible, but here’s the cheesecake brownie version in the meantime.

Ingredients all lined up
Cheesecake Brownie ingredients all lined up ready
All the swirls

I adapted this from Smitten Kitchen’s Cheesecake-Marbled Brownie recipe. I wanted to use my more recent whisking to ribbon stage brownie method, so I took note of the cheesecake ingredients and the marbling instructions but combined it with my chosen brownie method. However, you could use my simpler, no frills or ribbons, brownie recipe too. There are more detailed instructions in the previous posts on how to make brownies in general. I’ve added photos below the recipe to expand on the addition of cheesecake.

Ingredients for Cheesecake Brownies, adapted from Smitten Kitchen

Brownie ingredients

  • 150g unsalted butter, cut into small cubes
  • 150g dark chocolate (at least 60%), broken up, roughly chopped
  • 2 large eggs plus 1 egg white*
  • 200g caster sugar
  • 100g plain flour
  • 20g cocoa powder
  • 1/2 tsp of salt
  • 1 tsp of vanilla extract

Cheesecake ingredients

  • 150g full-fat cream cheese
  • 1 egg yolk from the egg in the brownie ingredients*
  • 50g caster sugar
  • 1tsp vanilla extract, or replace with
  • Optional flavour ideas – zest of an orange, 1 tbsp of dark rum or plum wine.
  1. Preheat the oven to 180°C/355°F/Gas Mark 4. Line a deep tin. For this quantity a 20cm square tin or a rectangular 27×20 or 28×18 will work.
  2. Start preparing the brownie mixture. Melt the chocolate and butter together and just after it has melted, add in the salt, vanilla extract and leave it on the side to cool down. Ways of doing this are on a previous post.
  3. As you keep an eye on the chocolate and butter melting, prepare the cheesecake mixture. Put all the cheesecake ingredients into a small bowl. Save the egg white for the brownie mixture. Mix to combine until smooth. I often use a hand mixer, but you could beat with a spatula. See photos below.
  4. Turn your attention to readying the rest of the brownie mixture. In a stand mixer bowl (if using) otherwise a medium bowl, crack the two eggs and add the saved egg white into the bowl and add the sugar. Use a stand mixer or an electric hand mixer on high speed to start whisking the eggs and sugar until they are at a ribbon stage. Ribbon stage is when the egg and sugar mixture are a pale yellow colour, doubled or even tripled in volume and when you lift the whisk over the mixture, the batter will fall slowly and leave a trail like a ribbon that will hold its shape for a few seconds. It will take about 10 minutes. I still use a timer to make sure I beat them for long enough. Don’t start beating the eggs/sugar until the chocolate/butter has melted because the chocolate/butter mixture needs this time to cool down.
  5. As the eggs and sugar are whisking, measure out the flour and cocoa powder into another bowl. Sieve it if there are lots of lumps in the flour and cocoa. Otherwise, use a whisk to loosen and mix them together.
  6. When the eggs and sugar have reached a ribbon stage, reduce the speed to low and add the melted chocolate and butter mixture to the eggs and sugar. Whisk until it all appears to have mixed together. If you are using an electric hand mixer, you may need to turn off the mixer, add the chocolate/butter and then switch it back on again to avoid a mess. I speak from experience.
  7. Now fold in the flour and cocoa powder using a spatula, or a spoon until it is well combined.
  8. Pour all the mixture into the baking tin. Debs says that if you want to create an even more marbled effect, then reserve some brownie batter to dollop on top of the cheesecake before swirling them together. I’ll let you experiment.
  9. Use a tablespoon to dollop the cheesecake mixture evenly into the brownie mixture. Use the back of the spoon to swirl the brownie and cheesecake together. I like to go up and down vertically and then again horizontally. See photo below.
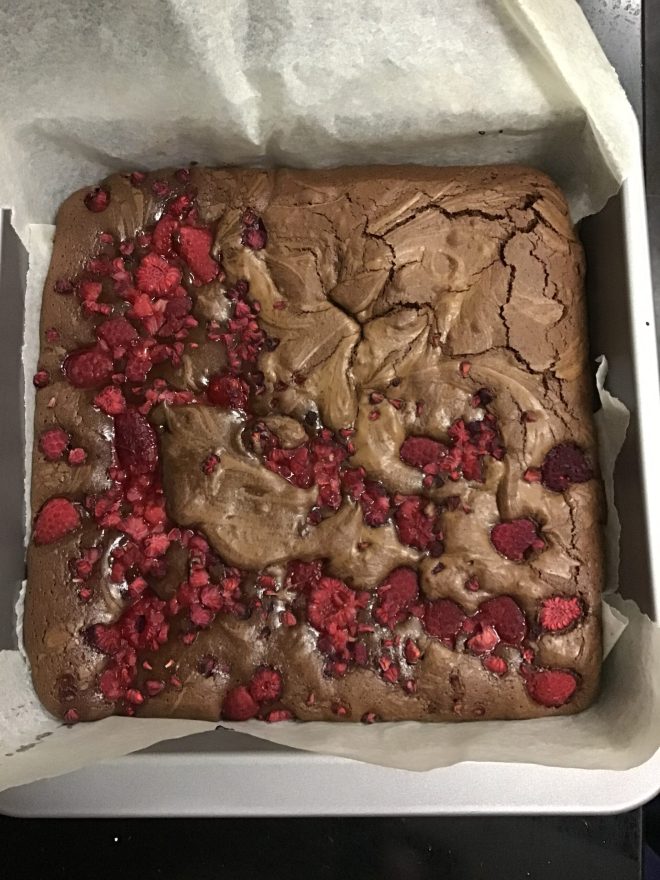
  10. If you want to add in any texture (such as crushed biscuits) or fruit (such as raspberries or blackberries), do it now and push them into the marbled mixture.
  11. Bake in the oven for 20-25 minutes. They should be firm to touch at the top but still wobble when you shake it. Leave to cool completely in the tin and if you can bear it, cover them and leave them overnight in the fridge. They will be easier to cut and the flavours will have deepened.
ingredients for the cheesecake element
The ingredients for the cheesecake mixture – see step 3
Cheesecake mixture beaten until smooth
Beat the cheesecake mixture until smooth – see step 3
a table spoon dolloping cheesecake mixture into the brownie mix
Cheesecake mixture being dolloped – Step 9
the end of the spoon going up and down to create a swirling effect between the brownies and the cheesecake mixtures
Begin to swirl – step 9
frozen raspberries added to half of the cheesecake brownie before baking
I added some frozen raspberries to half of the tin because I fancied some raspberry cheesecake brownies. I didn’t measure it out, but I’m guessing 45g for half a tin?
4 cut up brownies.  The two nearest are raspberry cheesecake brownies and the two further away are vanilla cheesecake brownies
Tada – two variations from one tin. At the forefront there is raspberry cheesecake brownies and at the back, vanilla cheesecake brownies

Fudgy Chocolate Brownies: infinitely adaptable

Experimenting with peanut butter and salted caramel brownies.

Recently, I was asked in an interview, “what do you contribute to a team?” The first thought that popped into my head was brownies. However, perhaps that wouldn’t be such a professional way to answer the question? So, instead I answered something about how I am a really good team player and the many different skills I’d bring to the team, rather than saying that my contribution is a baked sugar high laden with chocolate. I meant to mention my excellent brownies at the end as an aside, but I forgot.

Immediately once the interview was over and as I reflected on how it went, I wished that I had led with the brownies though because it would have revealed more of my true self. My flatmate and colleague concurred (now assigned to the status of previous flatmate and colleague: that teaching job contract having just ended and we’ve moved out). Though, we then agreed in the next breath that my crack cookies are my best work. So, another time, I’ll be that little bit braver, relax and say, “brownies and cookies.”

The first time that I made these during lockdown was at the beginning of marking many, many student essays whilst living at my sister’s. I’d broken a personal record and spent 5 hours on a paper, checking for plagiarism and looking up citations, and still hadn’t finished it when thoroughly fed up and discouraged, I decided to put it down until the next day. A WOD (workout of the day) with 100 burpees and an evening spent singing, baking these brownies put me in a better mood. I left it out on the side to cool down and develop even more flavour overnight. My sister said that her contribution to my happiness was not diving into them that night. I shared a photo of them on a work group chat and subsequently made friends with a colleague who wanted the recipe.

Pretty Raspberry Brownies
The raspberry burst brownies which fuelled the essay marking

Awkwardly, I didn’t have the recipe at hand to share. It lived in the form of an excel spreadsheet, a hangover from my baking business days. Instead, I sent her a link to my raspberry burst brownies and made a mental note that it was time to publish this recipe.

I created this recipe in Cambodia whilst supplying brownies for a cafe because I wanted to create a brownie with more height and volume that I could adapt with a variety of fillings, such as cheesecake and salted caramel. In addition, my usual go to, very easy brownie recipe which the raspberry burst brownies are adapted from suddenly stopped working for me after I upgraded my oven. They were coming out cakier. Some people prefer their brownie consistency like that but I much prefer them to be fudgier with that delightful cracked top. The timing of it might have been purely a coincidence and have nothing to do with me switching from one of these electric toaster ovens to a standing oven cooker. I’ve shared the only decent photo that I appear to have of my toaster oven for you. If you’ve always lived in the UK, then you may have no concept of what I’m talking about. In most parts of S.E Asia, ovens do not come standard in a furnished kitchen. This is the oven in which I began my baking business and I used it for the first 2 years. It only allowed me to do one tray of cookies, a cake or brownies at a time and by the end it wouldn’t heat above 150°C. When I moved and invested in a new oven, it was a game changer.

My toaster oven that lived on the floor
My toaster oven lived on the floor. I’m piping coconut churros.
my new oven
I moved apartment and my new oven fitted into this space perfectly. This was taken the day the oven was delivered and fitted. If you look carefully you can see I had to buy extra long wiring because the power socket was on the other side of the room.

Anyway, it gave me an excuse to try out a new brownie making method for me that I’d seen Ed Kimber use in this video in which you mix the eggs and sugar for about 10 minutes until they form into a ribbon stage (I’ve explained what ribbon stage is in step 4 of the method) and then add the melted chocolate and butter. Mixing the eggs and sugar for that long, creates volume and structure and I deduced, would help me create that dense fudgy consistency and crinkly top each time. It did. At the bottom of the post, I’ve also included for you, a few photos of the different flavours that I’ve played with and how I’ve adapted them.

I played around with the sugar quantity. Most brownie recipes ask for larger quantities of sugar, but I’ve always liked the challenge of seeing how little sugar I can add to baking and it still taste good. From experience, 150g is too little but anything between 200-230g is perfect. I’ll adapt it depending on the additional flavours I want to add. For example, with salted caramel, I use less because of the added sweetness from the caramel. With raspberry I use more to counteract the tartness of the raspberries.

Brownies components ready to mix together
All the components ready to mix together

I prefer to make these in a stand mixer using the whisk attachment because it is easier to leave the stand mixer running during the egg and sugar whisking part whilst getting on with other tasks, rather than holding an electric hand mixer for 10 minutes.

Top tip 1: if using an electric hand mixer, place a tea towel underneath the bowl to keep it stable and stop it moving around.

Top tip 2: once baked, leave these to cool down completely, cover and place in the fridge overnight. Not only will they taste better as the flavours mature and deepen, but they will also be cold. Cut them with a sharp knife and you’ll get those beautiful clean lines.

So here’s the recipe for the Infinitely Adaptable Fudgy Chocolate Brownies. They’ll make between 12-16 brownies or 20 mini brownie bites.

Ingredients

  • 150g unsalted butter, cut into small cubes
  • 150g dark chocolate (at least 60%), broken up, roughly chopped
  • 3 large eggs
  • 200-230g caster sugar (depending on how sweet you’d like them and the additional flavours you want to add)
  • 100g plain flour
  • 20g cocoa powder
  • 1/2 tsp of salt
  • 1 tsp of vanilla extract
  • 1 tsp of instant coffee granules (optional) – I use it because it helps bring out the chocolate flavour
  • And then whatever flavours* you’d like to add, or not.

Method:

  1. Preheat the oven to 180°C/355°F/Gas Mark 4. Line a deep tin. For this quantity a 20cm square tin or a rectangular 27×20 or 28×18 will work.
  2. Melt the chocolate and butter together and just after it has melted, add in the salt, vanilla extract and the optional instant coffee granules and leave it on the side to cool down. There are various ways you can melt chocolate and butter.
    • The more cautious, ahem proper, approach is to use a bain marie, that is put the butter and dark chocolate in a heatproof bowl that can sit on top of a saucepan with simmering water. Make sure that the bottom of the bowl doesn’t touch the hot water in the saucepan. Slowly melt the chocolate and stir regularly. This way you won’t burn the chocolate.
    • Another easier way is to use the microwave. Put chocolate and butter in a heatproof bowl, place a paper kitchen towel on top of the bowl so that butter won’t pop out as it melts. Melt it in 20 second bursts, stirring each time.
    • My way, is to use a heavy bottomed saucepan. I put the chocolate and butter in it and melt it at a low heat, stirring regularly. I take it off, just as the last few chocolate/butter bits aren’t quite melted because they will melt in the residual heat of the saucepan.
  3. In the meantime, measure out the flour and cocoa powder into a small bowl. Sieve it if there are lots of lumps in the flour and cocoa. Otherwise, use a whisk to loosen and mix them together.
  4. As soon as the chocolate/butter mixture is off the heat, crack the eggs into a medium sized bowl and add the sugar. Use a stand mixer or an electric hand mixer on high speed to start whisking the eggs and sugar until they are at a ribbon stage. Ribbon stage is when the egg and sugar mixture are a pale yellow colour, doubled or even tripled in volume and when you lift the whisk over the mixture, the batter will fall slowly and leave a trail like a ribbon that will hold its shape for a few seconds. It will take about 10 minutes. I still use a timer to make sure I beat them for long enough. Don’t start beating the eggs/sugar until the chocolate/butter has melted because the chocolate/butter mixture needs this time to cool down.
  5. When the eggs and sugar have reached a ribbon stage, reduce the speed to low and add the melted chocolate and butter mixture to the eggs and sugar. Whisk until it all appears to have mixed together. If you are using an electric hand mixer, you may need to turn off the mixer, add the chocolate/butter and then switch it back on again to avoid a mess. I speak from experience, haha.
  6. Now fold in the flour and cocoa powder using a spatula, or a spoon until it is well combined.
  7. Pour into the baking tin.
  8. Bake in the oven for 18-20 minutes. They should be firm to touch at the top but still wobble when you shake it. Leave to cool completely in the tin and if you can bear it, cover them and leave them overnight in the fridge. They will be easier to cut and the flavours will have deepened.

*You can add various flavours to this, or not if you want them plain. I’ve given you a few of suggestions and photos below. Do let me know how else you adapt them.

For raspberry burst brownies 2.0, I add 90g of raspberries. I mix in half before I pour it into the baking tin and then scatter the remaining half where there are spaces.
For raspberry and white chocolate, do the above and add 100g of chopped white chocolate. Mix half the chocolate into the batter with the raspberry and then fill the spaces with the remaining 50g.
Walnut Brownies
For nutty ones, I use 100g of nuts. For this one, I’ve used walnuts. I pick out 12-16 walnut halves to place on top for evenly then roughly chop and mix in the rest to the mixture before I pour into the baking tin and then place the remaining walnut halves on the top.
Salted Caramel and Hazelnut Brownies
For hazelnut and salted caramel. I made these to use up leftover ingredients as I was packing to return to the UK. Use 100g of roughly chopped hazelnuts and 100g of salted caramel. I mixed in half the hazelnuts into the mixture, then after I poured it into the tin, I blobbed salted caramel with a teaspoon evenly and scattered the rest of the hazelnuts over the top.
Swirls of cheesecake in brownies
Swirled cheesecake brownies, but I’ve realised that the salted caramel and the cheesecake ones are a little more complicated, so I’ll post those recipes another day.

What happened next with that interview? How many points have I accumulated? In this current job hunting cycle, I racked up 103 points. Incidentally, I got offered that job, even without the promise of these brownies. So, I’m currently in the throes of transition once again and relocating down to the Midlands.

Raspberry Burst Brownies

IMG_9721
Raspberry Burst Brownies

I don’t understand why I’ve never put raspberries in a dark chocolate brownie before.  The flavour combination is ingenious!  These brownies have quickly become my signature bake since I decided to bake them 7 weeks ago, popping out my oven week in-week out.

IMG_9675

I meant to follow BBC’s Good Food’s Best Ever Chocolate Raspberry Brownies and duly noted that they suggested mixing half of the raspberries into the mixture and reserving half of the raspberries to scatter at for the end.  However, I couldn’t quite understand why I’d want to put milk chocolate into the batter and dilute the intense dark chocolatey-ness that I wanted to couple with the raspberry flavour.

IMG_9676

IMG_9677

So, I reverted back to my default brownie recipe.   This time, I have no microwave.  (However, I’ve kept the microwave bit in the instructions, in case you do).  I really wanted to demonstrate how the brownies can be made using one pot.  In all honesty, I never expected that this brownie would have it’s own post.  But when Sarah and I bit into one, the first occasion I baked them, a raspberry just burst in my mouth.  I laughed, said that they were amazing and promptly named them, Raspberry Burst Brownies.

IMG_9678

Ingredients for Raspberry Burst Chocolate Brownies adapted from Usborne First Cookbook.

  • 4oz/100g dark chocolate
  • 4oz/100g butter
  • 1tsp vanilla extract
  • 2 beaten eggs
  • 4oz/100g plain flour
  • 1/2 tsp baking powder
  • 6oz/160g caster sugar
  • 2 tbsp cocoa powder
  • pinch of salt
  • 1 or 2 tbsp of milk if the mixture is too firm.
  • 85g-100g frozen or fresh raspberries (I find that 85g is enough)

Method

1. Preheat the oven to 180C/350F/Gas Mark 4.  Line a square baking dish with baking paper. I use a 20x20cm baking tin.

2. Melt the chocolate and butter together on a gentle heat, in a heavy bottomed pan.  Alternatively zap them in a heatproof bowl in the microwave.

3. As the chocolate and butter is melting, or being zapped in the microwave, measure out the flour, baking powder and cocoa powder into another bowl.  Sift the flour if you want to, but it’s not necessary.

4. Add the vanilla extract, salt and sugar to the chocolate melted goodness and mix well.

5. Add the beaten eggs and keep mixing to combine it all.  Don’t worry – they won’t scramble.

6. Gradually add in the flour, baking powder and cocoa powder so that the whole mixture is well combined.

7. Mix in half of the raspberries now.  With the remaining half, scatter them over the top to fill in any deficit spaces before you put it into the oven.

8. Bake in the oven for 20-25 mins.  The secret is to take them out when the top is firm to touch but still wobbles when you shake it.

Verdict?  They are amazing!  Sarah actually told me off for not telling her how amazing they were, when she ate one a few weeks later.  (But we’d taste tested them together that first time…) They are that combination of sweet but sour, and a perfect flavour partnership between the dark chocolate and the raspberry.  But what I love best about them is that the whole raspberries burst in your mouth as you eat them.  Bliss!
IMG_9680IMG_9681 IMG_9472

My Favourite Chocolate Brownies: Chocolate Brownie Hunt

ChocolateBrownie1

I really like this Chocolate Brownie recipe.  The end result is densely chocolate, moist and good.  The ingredients and the method is ever so simple and you can’t go wrong with it¹.  I’ve even forgotten to add eggs to it once and it was just extra gooey and went wonderfully well with icecream.  I found the recipe in my Usborne First Cookbook, which I bought when I was in primary school.   Now, when I think about it, it is my first ever cookbook.  So, the newer editions (which Amazon tells me there’s a few) may not have this recipe.  Anyhow, my mistake was not making them until I was about twenty.  By this point, I had passed from a nine-year old who disliked brownies (in the ’80s British brownies were more like a boring chocolate cake) to a twenty-year old who had spent a year in the US and wanted to recreate that dense chocolate experience.  The brownies were an instant hit and I gained a reputation as a Chocolate Brownie Queen.  This is the recipe that I go back to all the time, even though I’m on an Ultimate Chocolate Brownie Recipe Hunt.

What I love about this recipe is that it is a fantastically easy basic brownie recipe and I’ll often add things to suit the ocassion.  I’ve listed a few that I’ve tried below.

Ingredients for Dark Chocolate Brownies adapted from Usborne First Cookbook.

  • 4oz/100g dark chocolate
  • 4oz/100g butter
  • 1tsp vanilla extract
  • 2 beaten eggs
  • 4oz/100g plain flour
  • 1/2 tsp baking powder
  • 6oz/160g caster sugar
  • 2 tbsp cocoa powder
  • pinch of salt
  • 1 or 2 tbsp of milk if the mixture is too firm.

And the secret ingredient?  Well, this is when you make it your own and add in something extra. Here’s a starter for 5:

  1. My favourite – a 200g packet of maltesers/revels etc.
  2. 50g of roughly chopped walnuts/pecans/brazil nuts etc.
  3. 100g celebrations
  4. 2 tbsp Baileys or any Irish Cream liquor.
  5. Zest of one orange and 1 tsp of mixed spices and 1 tsp of cinnamon.

Method

1. Preheat the oven to 180C/350F/Gas Mark 4.  Line a square baking dish with baking paper. The dish be between 20 – 25cm.

Top Tip: I’ve found that stoneware, pyrex or ceramic dishes produce better results that a baking tin.

2. Melt the chocolate and butter together in a heatproof bowl in the microwave. 

3. As the chocolate and butter is being zapped in the microwave, measure out the flour, baking powder and cocoa powder into another bowl.  Sift the flour if you want to, but it’s not necessary.

4. Add the vanilla extract and sugar to the chocolate melted goodness and mix well.

5. Add the beaten eggs and keep mixing to combine it all.  Don’t worry – they won’t scramble.

6. Gradually add in the flour, baking powder and cocoa powder so that the whole mixture is well combined.

7. Let your imagination go wild and add in your extra ingredients.  In the top photo I used maltesers and hazlenuts.

8. Bake in oven for 20 mins.  The secret is to take them out when the top is firm to touch but still wobbles when you shake it.

The verdict? Yummmm…. simple and delicious.  I really like the brownie that it produces.

Happy Hogmanay 2010.

¹However, I did get it wrong.  Once.  Very badly.  I added in cointreau, orange zest and mixed spices, which lent it a lovely Christmassy feel.  It would totally have worked, except I had run out of some ingredients so I substituted:

flour with wholemeal flour
eggs with vinegar and bicarbonate of soda

As I took it out the oven, the bubbling mistake was unrecognizable as a brownie, in looks or taste.  A complete disaster in the brownie front but as I explained away the disaster and said it tasted a bit like a Christmas flapjack, it all went.  What a laugh!  But – don’t repeat my disaster.  Some ingredients are irreplaceable.

Chocolate Brownie Hunt: Coco and Me’s Luxury Chocolate Brownie

Before I got distracted by baking with vegetables, I was on the hunt for the ultimate chocolate brownie recipe.

As a child, I really disliked brownies until the day I tasted one baked by some American friends. Since then, it’s all about baking fudgy brownies. As I’ve discovered the world of food blogs, my interest has grown into a preoccupation about trying out and hunting down the ultimate chocolate brownie recipe.

What I love about brownies is the sheer simplicity of the recipes that produce such gorgeous mouthfuls of gooeyness. So on top of that, I’ll also be considering the incredible fudginess, intensity of the flavour and the moistness. Mmmm… So, let the ultimate brownie challenge begin!

Coco and Me Luxury Chocolate Brownie

The first one I’m trying out is Coco and Me’s luxury chocolate brownies recipe and I’m definitely learning a few tips from the expert on the baking front. She has a fabulous brownie recipe and guide which I won’t copy out here (just follow the link above). Instead, some snippets from my thoughts whilst trying it out.

  • Coco’s luxury one’s take much longer prep time than my usual recipe mostly due to the fine chopping of the chocolate. However, I’m liking the step of melting the butter in a pan and then adding sugar. Just realized that if I kept at it then I’d be making some sort of caramel. Question – does that add to the fudginess?
  • Coco wants me to add the eggs into this hot mixture – won’t they scramble..? No, they don’t! Then I add it to the chocolate so that it melts it all. Hmmm… that worked really well. I’ve changed my method to do this now for my recipe.
  • Coco also uses, proportion wise, almost double the amount chocolate and butter to flour…. My normal recipe is same amount of butter, chocolate and flour. Will this reflect in the intensity of the flavour?
  • Coco asks for a mixture of nuts. For good measure, I’ve added brazil nuts, walnuts, hazlenuts and pistachios with pecans to decorate the tops.

So, prep wise – Coco’s took longer to prepare. But the real test will be in the testing.

So MMmmm-ometer (all out of 5Mmm’s)
Simplicity – MMMm (i think that with practice this will go to 4.5 Mmmms)
Fudginess – MMMM
Intensity of Flavour – MMMM
Moistness – MMMMM
Reviews from tasters/testers – won lots of votes this one, especially because of the mixture of the nuts and the moistness.
Verdict – A definite contender with 16.5/20 (possibly 17.5)

I’m interested to hear your verdicts too on this recipe.

There’s a wee ps. to this entry. Coco and Me has a stall in London’s Broadway Market and she sells these brownies and more chocolate delights there. Sadly, each time I’ve been down to visit, she has been away… 🙁 If you get the chance to go down there – please taste a brownie for me.

%d bloggers like this: