Brown Butter Hazelnut Chocolate Blondies

Tower of hazelnut chocolate blondies
Some hazelnut and chocolate blondies

Rarely will I just make something up and immediately conclude that it is amazing. Those who know me will testify to how I critique what I make, and recipes go through several iterations before I am happy with them. As I write, I’ve suddenly realised that this recipe also had several predecessors as a cookie re-enacted as a blondie. Wow – I had dismissed that because I hadn’t been trying to tweak that recipe. Nonetheless, this blondie came about with happy accidental happenstance.

Basically, a couple of Mondays ago, I decided that I wanted to bake brownies or blondies. On the Tuesday I ate a rich peanut brownie from Chocnroll, which satisfied my craving for brownies and so I turned my mind to blondies. When Wednesday evening happened, I had finished disseminating the findings of the first round of testing we had done on a major project I’m working on at work, written a lot of action points and very much needing to bake as therapy. Does anybody else do this? I know that I’m not alone in this.

Baking has often been a creative outlet that helps me to complete the stress cycle and thus switch off my buzzing work brain. I listened to Brené Brown’s podcast with Emily and Amelia Nagoski’s work on Burnout and how to complete the stress cycle and doing something creative is a way to complete the stress cycle and so now I feel very much validated.

I mentioned before that I have been working on another – yet unfinished – blondie recipe and I set out to make that. However this time, I added in another egg for extra hoped for fudginess, so that it mimicked my fudgy brownie recipe. As I browned some butter, I realised that I had no pecans nor white chocolate. So the substitutions began and a new blondie was birthed.

Once roasted, rub the hazelnut skins off with a tea towel – Step 2

I’ve since seen on the internet other recipes that call their version of a hazelnut and chocolate blondie a gianduja one. I’ve since thought about grinding up hazelnuts to make a chocolate hazelnut butter that I add in as a layer in the middle or on top. Then in consultations with friends, I decided that this added layer of complication takes away from the simple joy of baking blondies. Admittedly the browning of the butter may be a step too far for some, but it is so essential for the flavour! I promise you that it will be worth learning a new technique that you can use over and over again.

Ribbon stage
Ribbon stage – Step 4

Ingredients for Brown Butter, Hazelnut and Chocolate Blondies

  • 200g butter which I then browned
  • 200g dark brown sugar
  • 3 eggs
  • 1/2 tsp salt
  • 200g plain flour
  • 100g hazelnuts
  • 150g chocolate. I used 100g of milk and 50g dark chocolate.

Method

  1. Preheat the oven to 350F/180C or 170C fan.
  2. Roast the hazelnuts first for 10 mins using the baking tin for the blondies, until the skins come off them. Use a dry tea towel to rub the skins off the hazelnuts, then chop just over half of them. Don’t miss out this step.
  3. Brown the butter: melt the butter in a medium saucepan on a medium heat and it will start to froth and cackle. That is the water evaporating. Continue and stir the sides and scrape the bottom a few times so that it doesn’t burn. When it is ‘as quiet as a ninja’ (quote from Stella Parks) it is ready. Take it off the heat and either pour the butter in a bowl to cool down, not forgetting to scrape the browned bits from the sides and bottom. Or as I often do, fill up the sink with cold water and carefully place the hot pan in there to cool down.
  4. Now whisk the eggs and sugar together until it is at a ribbon stage. I used a stand mixer on a medium setting (3 on a Kenwood) for about 8 mins. I have instructions on whisking to a ribbon stage in my fudgy brownie recipe
  5. As the eggs and sugar are whisking, line the tin. I used a 20cm square tin.
  6. Now on the lowest setting, continue whisking but pour in the butter and add the salt. Whisk again on a medium setting until combined. I’m always amazed by the reaction and how it goes to almost like a buttercream consistency.
  7. Fold in the flour, chopped hazelnuts and chopped chocolate.
  8. Pour half the mixture into the tin, sprinkle over the unchopped hazelnuts and pour the rest of the mixture into the tin.
  9. Bake in the middle of the oven for 17-20 mins until cooked on top. If it looks a bit jiggly, that is ok. It’ll harden up as it cools.
  10. Allow to cool completely. I like to leave mine overnight. And then cut into 12-16 pieces.
Hazelnuts added as a layer
Hazelnuts added as a middle layer – Step 8
Baked blondies
The baked brown butter, hazelnut and chocolate blondies

And the verdict? Suitably more-ish, dense and fudgy. Surprisingly not overly sweet with the milk chocolate because of the dark chocolate. Lastly, it is always worth roasting the hazelnuts because it improves the texture and flavour.

Fudgy Chocolate Brownies: infinitely adaptable

Experimenting with peanut butter and salted caramel brownies.

Recently, I was asked in an interview, “what do you contribute to a team?” The first thought that popped into my head was brownies. However, perhaps that wouldn’t be such a professional way to answer the question? So, instead I answered something about how I am a really good team player and the many different skills I’d bring to the team, rather than saying that my contribution is a baked sugar high laden with chocolate. I meant to mention my excellent brownies at the end as an aside, but I forgot.

Immediately once the interview was over and as I reflected on how it went, I wished that I had led with the brownies though because it would have revealed more of my true self. My flatmate and colleague concurred (now assigned to the status of previous flatmate and colleague: that teaching job contract having just ended and we’ve moved out). Though, we then agreed in the next breath that my crack cookies are my best work. So, another time, I’ll be that little bit braver, relax and say, “brownies and cookies.”

The first time that I made these during lockdown was at the beginning of marking many, many student essays whilst living at my sister’s. I’d broken a personal record and spent 5 hours on a paper, checking for plagiarism and looking up citations, and still hadn’t finished it when thoroughly fed up and discouraged, I decided to put it down until the next day. A WOD (workout of the day) with 100 burpees and an evening spent singing, baking these brownies put me in a better mood. I left it out on the side to cool down and develop even more flavour overnight. My sister said that her contribution to my happiness was not diving into them that night. I shared a photo of them on a work group chat and subsequently made friends with a colleague who wanted the recipe.

Pretty Raspberry Brownies
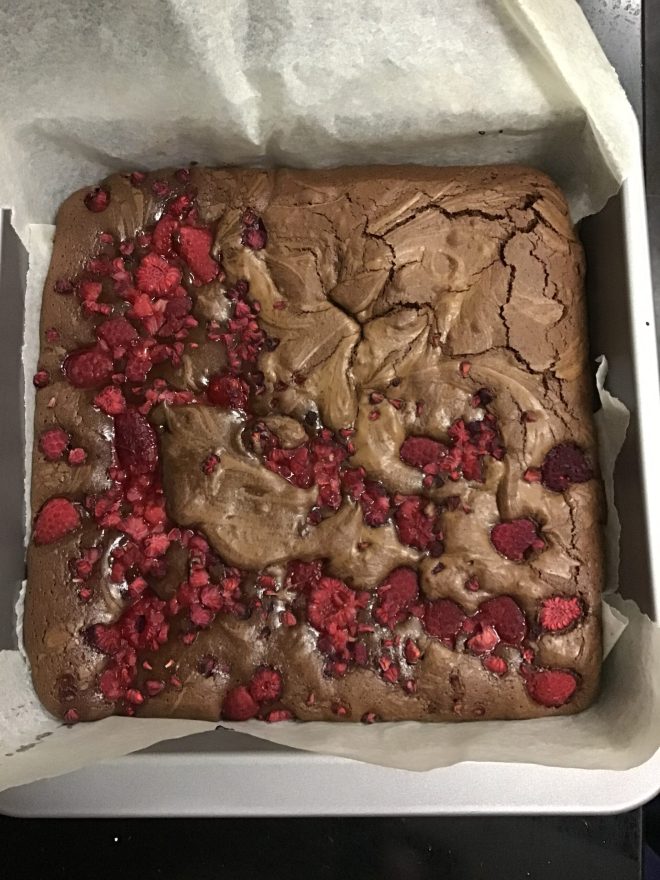
The raspberry burst brownies which fuelled the essay marking

Awkwardly, I didn’t have the recipe at hand to share. It lived in the form of an excel spreadsheet, a hangover from my baking business days. Instead, I sent her a link to my raspberry burst brownies and made a mental note that it was time to publish this recipe.

I created this recipe in Cambodia whilst supplying brownies for a cafe because I wanted to create a brownie with more height and volume that I could adapt with a variety of fillings, such as cheesecake and salted caramel. In addition, my usual go to, very easy brownie recipe which the raspberry burst brownies are adapted from suddenly stopped working for me after I upgraded my oven. They were coming out cakier. Some people prefer their brownie consistency like that but I much prefer them to be fudgier with that delightful cracked top. The timing of it might have been purely a coincidence and have nothing to do with me switching from one of these electric toaster ovens to a standing oven cooker. I’ve shared the only decent photo that I appear to have of my toaster oven for you. If you’ve always lived in the UK, then you may have no concept of what I’m talking about. In most parts of S.E Asia, ovens do not come standard in a furnished kitchen. This is the oven in which I began my baking business and I used it for the first 2 years. It only allowed me to do one tray of cookies, a cake or brownies at a time and by the end it wouldn’t heat above 150°C. When I moved and invested in a new oven, it was a game changer.

My toaster oven that lived on the floor
My toaster oven lived on the floor. I’m piping coconut churros.
my new oven
I moved apartment and my new oven fitted into this space perfectly. This was taken the day the oven was delivered and fitted. If you look carefully you can see I had to buy extra long wiring because the power socket was on the other side of the room.

Anyway, it gave me an excuse to try out a new brownie making method for me that I’d seen Ed Kimber use in this video in which you mix the eggs and sugar for about 10 minutes until they form into a ribbon stage (I’ve explained what ribbon stage is in step 4 of the method) and then add the melted chocolate and butter. Mixing the eggs and sugar for that long, creates volume and structure and I deduced, would help me create that dense fudgy consistency and crinkly top each time. It did. At the bottom of the post, I’ve also included for you, a few photos of the different flavours that I’ve played with and how I’ve adapted them.

I played around with the sugar quantity. Most brownie recipes ask for larger quantities of sugar, but I’ve always liked the challenge of seeing how little sugar I can add to baking and it still taste good. From experience, 150g is too little but anything between 200-230g is perfect. I’ll adapt it depending on the additional flavours I want to add. For example, with salted caramel, I use less because of the added sweetness from the caramel. With raspberry I use more to counteract the tartness of the raspberries.

Brownies components ready to mix together
All the components ready to mix together

I prefer to make these in a stand mixer using the whisk attachment because it is easier to leave the stand mixer running during the egg and sugar whisking part whilst getting on with other tasks, rather than holding an electric hand mixer for 10 minutes.

Top tip 1: if using an electric hand mixer, place a tea towel underneath the bowl to keep it stable and stop it moving around.

Top tip 2: once baked, leave these to cool down completely, cover and place in the fridge overnight. Not only will they taste better as the flavours mature and deepen, but they will also be cold. Cut them with a sharp knife and you’ll get those beautiful clean lines.

So here’s the recipe for the Infinitely Adaptable Fudgy Chocolate Brownies. They’ll make between 12-16 brownies or 20 mini brownie bites.

Ingredients

  • 150g unsalted butter, cut into small cubes
  • 150g dark chocolate (at least 60%), broken up, roughly chopped
  • 3 large eggs
  • 200-230g caster sugar (depending on how sweet you’d like them and the additional flavours you want to add)
  • 100g plain flour
  • 20g cocoa powder
  • 1/2 tsp of salt
  • 1 tsp of vanilla extract
  • 1 tsp of instant coffee granules (optional) – I use it because it helps bring out the chocolate flavour
  • And then whatever flavours* you’d like to add, or not.

Method:

  1. Preheat the oven to 180°C/355°F/Gas Mark 4. Line a deep tin. For this quantity a 20cm square tin or a rectangular 27×20 or 28×18 will work.
  2. Melt the chocolate and butter together and just after it has melted, add in the salt, vanilla extract and the optional instant coffee granules and leave it on the side to cool down. There are various ways you can melt chocolate and butter.
    • The more cautious, ahem proper, approach is to use a bain marie, that is put the butter and dark chocolate in a heatproof bowl that can sit on top of a saucepan with simmering water. Make sure that the bottom of the bowl doesn’t touch the hot water in the saucepan. Slowly melt the chocolate and stir regularly. This way you won’t burn the chocolate.
    • Another easier way is to use the microwave. Put chocolate and butter in a heatproof bowl, place a paper kitchen towel on top of the bowl so that butter won’t pop out as it melts. Melt it in 20 second bursts, stirring each time.
    • My way, is to use a heavy bottomed saucepan. I put the chocolate and butter in it and melt it at a low heat, stirring regularly. I take it off, just as the last few chocolate/butter bits aren’t quite melted because they will melt in the residual heat of the saucepan.
  3. In the meantime, measure out the flour and cocoa powder into a small bowl. Sieve it if there are lots of lumps in the flour and cocoa. Otherwise, use a whisk to loosen and mix them together.
  4. As soon as the chocolate/butter mixture is off the heat, crack the eggs into a medium sized bowl and add the sugar. Use a stand mixer or an electric hand mixer on high speed to start whisking the eggs and sugar until they are at a ribbon stage. Ribbon stage is when the egg and sugar mixture are a pale yellow colour, doubled or even tripled in volume and when you lift the whisk over the mixture, the batter will fall slowly and leave a trail like a ribbon that will hold its shape for a few seconds. It will take about 10 minutes. I still use a timer to make sure I beat them for long enough. Don’t start beating the eggs/sugar until the chocolate/butter has melted because the chocolate/butter mixture needs this time to cool down.
  5. When the eggs and sugar have reached a ribbon stage, reduce the speed to low and add the melted chocolate and butter mixture to the eggs and sugar. Whisk until it all appears to have mixed together. If you are using an electric hand mixer, you may need to turn off the mixer, add the chocolate/butter and then switch it back on again to avoid a mess. I speak from experience, haha.
  6. Now fold in the flour and cocoa powder using a spatula, or a spoon until it is well combined.
  7. Pour into the baking tin.
  8. Bake in the oven for 18-20 minutes. They should be firm to touch at the top but still wobble when you shake it. Leave to cool completely in the tin and if you can bear it, cover them and leave them overnight in the fridge. They will be easier to cut and the flavours will have deepened.

*You can add various flavours to this, or not if you want them plain. I’ve given you a few of suggestions and photos below. Do let me know how else you adapt them.

For raspberry burst brownies 2.0, I add 90g of raspberries. I mix in half before I pour it into the baking tin and then scatter the remaining half where there are spaces.
For raspberry and white chocolate, do the above and add 100g of chopped white chocolate. Mix half the chocolate into the batter with the raspberry and then fill the spaces with the remaining 50g.
Walnut Brownies
For nutty ones, I use 100g of nuts. For this one, I’ve used walnuts. I pick out 12-16 walnut halves to place on top for evenly then roughly chop and mix in the rest to the mixture before I pour into the baking tin and then place the remaining walnut halves on the top.
Salted Caramel and Hazelnut Brownies
For hazelnut and salted caramel. I made these to use up leftover ingredients as I was packing to return to the UK. Use 100g of roughly chopped hazelnuts and 100g of salted caramel. I mixed in half the hazelnuts into the mixture, then after I poured it into the tin, I blobbed salted caramel with a teaspoon evenly and scattered the rest of the hazelnuts over the top.
Swirls of cheesecake in brownies
Swirled cheesecake brownies, but I’ve realised that the salted caramel and the cheesecake ones are a little more complicated, so I’ll post those recipes another day.

What happened next with that interview? How many points have I accumulated? In this current job hunting cycle, I racked up 103 points. Incidentally, I got offered that job, even without the promise of these brownies. So, I’m currently in the throes of transition once again and relocating down to the Midlands.

A Hazelnut Brown Butter Cake with Baileys Ganache


hazelnut brown butter cake slice
I had already decided that I was going to like this hazelnut brown butter cake the moment I saw it. And then I read on:

‘This is a cake that has it’s roots in dacquoise and meringue.’ – Shuna Fish Lydon

A whatcha, whatchamacallit? Dacquoise and meringue.

Meringue is a dessert that we’re pretty aware of, but dacquoise? I’ve been blissfully ignorant of its existence until Monday evening. I was trying to find another cake recipe to make for Sarah’s birthday, other than Praline Almond Cake, because I didn’t have enough butter for that recipe and I was much too tired to trawl round Tescos. I can’t even remember how my brain jumped from praline almond cake to hazlenut brown butter cake, but somehow I found myself reading Smitten Kitchen Deb’s enticing blog entry on it. Debs links onto Eggbeater Shuna’s detailed poston how to make this cake. I highly recommend reading Shuna’s step-by-step instructions before baking the cake because if you follow it, it’s pretty fool-proof. And that’s where I first stumbled across dacquoise. A dacquoise, so Wikipedia tells me, is a french dessert made with layers of nut meringue and whipped cream or buttercream. The meringue is normally made with almonds and hazlenuts.

I decided to read up a bit more on the cake. I got as far as Jibuyabu’s metricised description on making this cake(thank-you) and then I stopped. It was 9:30pm and I needed to begin the baking.

My preliminary reading on this cake intrigued me. All three bloggers were in awe of this chef named Suzanne Goin, like we should all know her. “Chef Goin served this as her wedding cake. Need I say more?” – Smitten Kitchen. Well yes. Who is she? and why should that sway my decision on whether or not I should make this cake? As it turns out she is one of America’s most highly-acclaimed chef. That is, at least, according to her book on Amazon. Debs and Shuna are US based food bloggers so that probably explains their awe of her. So, okay maybe that should sway my mind. But it doesn’t really. At least, not yet. I wondered, whether she is the equivalent of say, Tom Ketteridge in the UK. Now, all you non-Brits, might be typing Tom Ketteridge into google search because you’re scratching your head and wondering, ‘who is this Tom Ketteridge dude?’ Just this incredible michelin starred chef! Ah – the nuances of across the pond baking.

I tell you what, though, if we just call the cake what it is – a hazelnut brown butter cake – I think that it makes it sound utterly enticing. Don’t you think so?

hazelnut brown butter cake ready to go
The ‘not your standard cake’ ingredients and the fun of trying out a new technique, validated it as the one to make as Sarah’s birthday cake (the same Sarah of the Cardamon, White Chocolate and Rosewater angst and Chocolate Macarons)

In Suzanne Goin’s original recipe, she serves it up with sauteed pears and icing sugar; Debs from Smitten Kitchen went for a chocolate ganache. It’s a no-brainer which option Sarah would prefer, and I tweaked Deb’s version and replaced the coffee with baileys liquor.

And I’ll tell you what – the cake lives up to expectations and tastes perfectly divine. On Tuesday evening, I served it up and we all commented on how it smelled and tasted like ferrero rocher. It’s not heavy, even with all that butter. Moreover, I believe that it would taste better as it gets older because of all that lovely moist nuttiness. Do you know – I’m pretty sure that we all managed two slices, after a pretty big main meal – so there’s not much a chance of this cake hanging around that long.

Hazelnut Brown Butter Cake with Baileys Ganache, adapted from Smitten Kitchen, Jibuyabu and Sunday Suppers at Lucques

Ingredients for the cake

  • 140g blanched whole hazelnuts plus some extra for garnish
  • 225g butter
  • 1/2 vanilla bean or 1tsp of vanilla extract
  • 170g icing sugar
  • 45g plain flour
  • 180g egg whites, which is about the equivalent of 5 extra large egg whites or 6 large egg whites
  • 45g granulated sugar

Method

1. Preheat the oven to 180°C/350°F/Gas Mark 4 and prepare a 23cm or 25cm springform cake tin, by greasing the sides and lining the bottom with baking paper. I only had a 23cm cake tin and it turned out fine.

toasted hazelnutshazelnuts and icing sugar
2. Toast the hazelnuts under the grill or in the oven, by spreading them out in one layer on a baking tray, until they smell gorgeously nutty and turn a golden brown. It normally takes between 10-15 minutes. Once done, leave them cool. I transferred them onto another baking tray so quicken the cooling process.

3. Put the butter in a medium sized pan. Slice the vanilla bean lengthways down the middle and scrape out all the seeds onto the butter. Add the vanilla bean to the pan. Now, make the brown butter. I was a bit intimidated by this ingredient until I read this tutorial on Poire au Chocolat. Cook the butter on a medium heat until the butter browns, finishes crackling at you and smells nutty. It’ll take a good couple of minutes for this amount of butter. Take the pan off the heat and leave it to one side to cool. Remove the vanilla pod and dump it in the bin.

preparing butter to brown with vanilla
4. Weigh out the icing sugar and place in a food processer. Once the hazelnuts have cooled down, add them to the food processer too and whizz them up until they are finely ground (this takes about 10 minutes, interspersed with moments of me scraping the sides of the food processer with a knife so that everything gets whizzed up). Add the flour and pulse it a few times to ensure that the flour is evenly mixed through. This mixture will smell gorgeously nutty and it tastes good too, if you happen to get some of it on your fingers while you are emptying this out into a large bowl. There are some perks for being a bit clumsy.

5. Whisk the eggs with a stand mixer or a handheld electic beater. I held off adding the sugar until the eggs had formed soft peaks, but in the original recipe she says to add the sugar in from the start. Keep whisking until they form stiff peaks.

6. In a small bowl, take a large dollop of egg white and a generous splash of brown butter and mix it together vigorously before re-adding and folding it to the egg whites. Eggbeater Shuna explains this process as creating an emulsion between two ingredients that would normally repel each other (whisked egg whites and butter) so that after it is introduced to egg whites, it makes it easier to incorporate the remaining large quantities of ingredients.

7. Alternate folding in the dry mixture of the icing sugar, hazelnuts and flour and the liquid brown butter to the egg whites, being careful not to overmix and knock back all the air that you’ve carefully worked into the egg whites.

cake batterhazelnut brown butter cake
8. Pour the batter into the cake tin and bake for 40-50 minutes. It’s done when the cake is coming away from the sides of the tin and a knife comes out clean. Allow the cake to cool in the tin for about 30 minutes, before then inverting it onto a wire rack so that you can peel the baking paper from it’s bottom.

9. Turn the cake back over onto the plate that you’ll be serving on.

** You could serve it just like this with a dusting of icing sugar and sprinkle the reserved hazelnuts. To make it pretty, why not use a stencil?

Ingredients for the ganache

  • 100g dark chocolate
  • 100ml double cream
  • 2 tbsp baileys or irish cream equivalent

Method

chocolate ganache 1chocolate ganache 2
1. Break up the chocolate into small pieces and place in a small pyrex bowl. As you can see, I put mine directly into a pyrex measuring jug to make the pouring bit over the cake easier.

2. Heat up the double cream in a small pan until it just starts bubbling and then pour it over the chocolate. Leave it for a few minutes, then gently stir until all the chocolate has melted and the mixture is smooth. Add in the baileys and stir to incorporate.

preparing to dress the cake with ganachecake with ganache
 

3. Carefully pour the ganache evenly over the cake. It doesn’t matter if some of the ganache spills over the sides of the cake. I think that it adds a certain charm and elegance. Decorate the top of the cake with the remaining hazelnuts. I toasted and crushed them before sprinkling them over the cake. Alternatively, you could make caramel hazelnuts or a hazelnut praline (unfortunately, I had run out of sugar as well, so couldn’t pursue either of those options). Or… just serve it as it is. Plain with the chocolate ganache.

You can make this a day or two in advance and store it in the fridge or in an airtight container in a cold room. So, go on – bake this one up and impress your friends.

Happy Birthday Sarah Cake

Beetroot and Hazelnut Cake

Once upon a time, when I lived with two very lovely former housemates in my previous abode, we liked to discover ways of cooking with ‘new’ vegetables. Actually you could either blame one of my housemate – or give credit to her – for why I got sidetracked from my ultimate chocolate brownie recipe quest. She told me that she had abandoned some beetroot in the fridge when she went away. So I decided to bake a cake with them.

When I was younger, I didn’t know that beetroot could come in any other way than sitting in a jar of pickle. And I wasn’t very keen on it. Now, i’ve tried it roasted and crisped (i love the latter) but making a cake with it? I was in a very adventurous mood when I set my mind to it. The only two criteria that it had to meet was that it was a Good Food Channel recipe (so that I could enter their photo competition) and I had the ingredients in my cupboard. Here’s the result!

Beetroot and Hazelnut Cake

Beetroot and Hazelnut Cake adapted from the Good Food Channel

I’ve adapted the recipe slightly. I use less sugar and made my own judgements where the recipe was a bit vague about what flour to use and what to do with the beetroot. Also, I didn’t have any apricot jam so I couldn’t glaze the cake as the recipe suggested. It was yum yum.

Ingredients
200ml vegetable oil
150g golden caster sugar
150g raw beetroot, grated
100g chopped walnuts, plus extra for decoration
100g chopped toasted hazelnuts
3 eggs, separated
1 tsp baking powder
2 tsp mixed spice
3 tsp milk (I used unsweetened soya milk)
200g plain flour

Method

  • Preheat the oven to 200C/Gas Mark 6 and grease a 20cm cake tin.
  • Grate the beetroot into a large bowl. Be careful not to stain anything. Beetroot juice is very red. At one point, I wondered whether the redness on my hands was blood or juice when I accidently grated my thumb.
  • Add the oil, sugar, walnuts, hazelnuts, egg yolks, baking powder and mixed spice to the beetroot and mix it well.
mixing with grated beetroot
  • Mix in the milk and plain flour.
  • In a different bowl, whisk the egg whites until they form firm peaks.
  • Fold the whisked egg whites to the beetroot mixture.
  • Pour the cake mixture into the cake tin and decorate with the nuts. (it looks very very pink!)
pink cake
  • Bake in the oven for 30 mins (or until the tester skewer comes out clean).
  • Leave to cool for 5 mins in the cake tin and then take it out to cool on a wire rack.

Verdict? This was such a moist cake (courtesy of the beetroot) and once the beetroot was grated, it was a really simple cake to put together and bake. Colleagues at work enjoyed eating this. But it generated a fair bit of controversy… tee hee. If I bake another beetroot cake, I’d like to partner beetroot with chocolate. I think that it’ll be a killer combo!

ps. I’m so excited. On the Good Food Channel website, you can see my photo for this recipe. The competition was probably their ploy of increasing their range of food photographs!