Vegan hot cross buns (tangzhong method)

vegan hot cross buns
Vegan hot cross buns

Recently, I felt like I have had a breakthrough with my approach to vegan baking thanks to the MsCupcakes book. So I have been leaning into it. The book helped me reevaluate how I approach the free-from baking category. I’ve noticed that many vegan recipes have adapted an existing recipe purely with substitutions for ingredients, like ground flaxseed instead of an egg, or oil instead of butter. Sometimes the ingredient can seem peculiar and unusual, depending on where you live. For example, flax seeds were difficult to get hold of for a while. However, the book helped to start thinking that rather than finding substitutions for things, I should try to think about what that particular ingredient brings and whether I can replicate that texture or flavour in another plant-based way.

I love the spring that the tangzhong brings to the bun

Therefore in the last month, I have been testing out vegan hot cross buns because it’s Easter and because enriched bread should, in theory, be quite simple to adapt. Spare a thought for the family that I live with. They have been through five iterations of a vegan hot cross bun recipe in my quest to perfect them.

The first time, I substituted soy milk for milk and oil for butter and omitted the apples. They were alright but under-proved and missing the freshness from the apple. Next, I made buttermilk, using soy milk and cider vinegar in order to create a softer, rich dough. Buttermilk helps to create a soft texture normally in bread. They were better but the texture was a bit dense. Then I used the tangzhong method to create springy soft buns that would last longer and they were amazing. Why didn’t I stop there? They took 3 rises. One for the dough, then an overnight one with the fruit added in, and a final prove once the buns were shaped. The buns were cracking a bit as if they were underproved. As amazing as they were in flavour and texture, I wanted to simplify and shorten the method. (You can, of course, still do this recipe in 3 rises.) The fourth time, I decided to try reducing the number of rises to two, but they ended up under-proving and cracking at the top. I left it for a week while my brain mulled over it. Do plant-based enriched bread recipes generally take longer to prove than non-vegan recipes? I felt like they shouldn’t as they don’t contain eggs that can slow down the rise. Perhaps it has just been my impatience to get them baked that has resulted in under proved buns. I almost hit publish on the recipe at the end of March but then my perfectionism kicked in. A few days later, I hit on an easy solution – double the yeast in the recipe. It is such a simple answer that you wonder why I hadn’t thought of it earlier. Anyhow, that is what I did and this is what I present to you now.

I adapted this by adding the tangzhong knowledge I learned from last year’s sticky apple and raisin hot cross bun recipe to Paul Hollywood Hot Cross Bun recipe because mixed peel is back in the shops this year. However, I reduced the amount because I think that 50g is just fine. Some more notes on how you can vary the method. I like making this in the stand mixer as the tangzhong makes it a wetter dough. You can knead by hand but it will take longer.

Soft silky hot cross bun dough

I’ve also been trying out different ways of mixing in the fruit with varying degrees of messy success. Method 1 is the put the fruit and the dough into the same bowl and mix it in. A slightly more detailed explanation of this is in my non-vegan version of Paul Hollywood’s Hot Cross Buns. Method 2 is to roll out the dough into a rectangle, scatter the fruit evenly over the top and then to take hold of one of the shorter sides and fold it a third into middle, and repeat on the other side so that it looks like a long rectangle. Next take one short end of the rectangle and repeat the folds again, so that it becomes a more compact rectangle. It is a neater process until the point when I roll it out into a long sausage shape in order to portion out 15 buns. At which point the dough starts breaking and the fruit spills out and away from the dough like runaway gems onto the countertop. Maybe I just need to work on my method 2. Finally, you can also make this with three rises or two, depending on your schedule. If going for three then reduce the yeast to 7g to allow for the overnight rise. The first rise is just the dough, the second as an overnight one after the fruit is mixed in and the third after the buns have been shaped. The method below details it for two.

Ingredients for vegan hot cross buns. This makes 15.

  • 500g strong white bread flour
  • 125ml water for the tangzhong
  • 250ml soya milk (or any unsweetened plant-based one) + 20ml apple cider vinegar or lemon juice
  • 60g caster sugar
  • 14g instant yeast
  • 1tsp (10g) salt
  • 2tsp cinnamon
  • 1tsp mixed spice
  • 70g dairy free margarine (I used vitalite) or vegan butter
  • 1 apple
  • Zest of 2 oranges
  • 150g sultanas
  • 50g mixed peel

Ingredients for the crosses

  • 45g plain flour
  • 2-3 tbsp cold water

Ingredients for the orange glaze

  • 1.5 tbsp granulated sugar
  • Juice of half an orange

Method

  1. First, make the buttermilk. Mix 250ml of soya milk and 20ml of apple cider vinegar in a measuring jug. Stir and leave to coagulate.
  2. Next make the tangzhong. Weigh out 500g of bread flour into a mixing bowl and from it take 25g (about 1 heaped tablespoon) of flour and put it in a small saucepan. Add 125ml of cold water, put it on the hob at medium heat and whisk or stir to combine the flour and water together in order to make a roux, or a paste. Keep stirring until it comes together and your whisk or spatula leaves a line. It’ll take about 1.5-2 mins. Leave to cool while measuring out the dry ingredients.
Your tangzhong is ready when you can leave a line in it
  1. In the mixing bowl with the flour, add in the yeast, sugar, salt and spices. Stir to mix.
  2. In the saucepan with the tangzhong, add the margarine and buttermilk and stir to combine. The margarine won’t melt completely and the buttermilk will make it look bitty and curdled but that’s okay. It will all get mixed in.
  3. Now add the wet ingredients to the flour and knead. I knead it in the stand mixer. I start at low (1) until all the ingredients are mixed in and then continue at medium (3) for about 9-10 minutes until the dough is stretchy and smooth. Take the dough out of the mixing bowl to form into a ball. Put a bit of oil in the bowl and place the dough back in there and cover. Leave for about an hour or until doubled in size.
  4. In the meantime, chop the apples, zest the oranges and stir to combine in a small bowl with the sultanas and mixed peel. Line two baking trays (or one large one).
After the first rise
  1. When the dough is ready, lightly flour the surface and turn the dough out onto it. Gently make it into a rough rectangle using your fingers to gently knock the air out of the dough. Take one long end, fold into the middle and press down with the heel of your hand. Repeat it with the other side. Then fold it in half and gently roll. The dough should feel stronger.
  2. As you know, I’ve been trying out a new way to incorporate the fruit with varying degrees of messy success. Here, I’m going to say to go with the second method because I think that with practice and tweaking, it will be easier. Roll out the dough into a rectangle, scatter the fruit evenly over the top and then take hold of one of the shorter sides and fold it a third into the middle, and repeat on the other side so that it looks like a long rectangle. Next, take one short end of the rectangle and repeat the folds again, so that it becomes a more compact rectangle. Then roll it out into a long sausage shape, divide into 3 equal parts, and then each part into 5. Each piece of dough will roughly weigh 90g. Cover the little portions with a tea towel as your form the buns.
  3. Add more flour to your surface. I like to have a little mound of it to dip into. Form the buns by taking each corner into the middle so it is a tighter round shape. Then flour the palm of your hand, or dip the top of the bun into some flour. With the dough in the middle of your hand, make your hand into the shape of a claw and move it around quickly in a circular shape. I’ve included a video of it below because it’s easier to show it.
How to shape a bun.
  1. Then put each bun onto the baking trays, leaving 2-3cms between each bun. Cover and leave to rise.
  2. As you wait, make the paste for the crosses by mixing the flour and water together. Put it into a piping bag and snip a little hole off the end.
  3. The buns will have finished their second rise after about an hour, when most of them will be almost touching each other or if you press down slightly on them, they will spring back gently but leave a small indent. Of course, this depends on the weather. In a hotter climate, this will take about 30 mins. About 15 mins before you think they’ll have finished rising, preheat the oven to 200°C/400°F/Gas Mark 6.
The buns ready after their second rise
Piping crosses. Also, the consistency for the paste is like this
  1. Pipe crosses on them by piping a line along each row of buns and then repeating in the other direction.  The crosses want to hug the sides of the buns.
  2. Bake on the middle shelf of the oven for 10 mins and then lower the temperature to 180°C. Bake for another 15-20 minutes, until golden brown. My oven has hot spots, so I turn the tray around after the first 20 mins.
  3. As they bake, make the orange glaze. Measure out the sugar and juice from half an orange into a small saucepan and melt the sugar over a gentle heat. Then turn it up to a medium heat for a few minutes so that some of the water evaporates and it thickens slightly.  Brush the sugar syrup over the warm buns and leave them to cool.

The verdict? I can’t resist one, still hot from the oven, sticky with the glaze and too hot for my mouth. They are full of flavour from the orange zest, fresh apple, spices and dried fruit and the kitchen smells delicious as you’re making them. The texture is springy and soft and they stay like that for 3 days. I love the sticky glaze on them. They are yummy toasted and buttered but honestly, I prefer to just eat them as they are. So, after day 3, when they are a little hard, I will heat them on high (800W) in the microwave for 15 seconds and they’re perfect.

Finally, everyone who has tried them tells me that they can’t tell that they are vegan.

Cheesecake Brownies

Two baking trays with brownie mixture. The one on the left hand side has salted caramel, the one on the right hand side is cheesecake
Salted caramel and cheesecake brownies side by side

You may have picked up already that I really enjoy playing around with the different flavour combinations in a brownie. When I ran a home baking business, as my side hustle, in Phnom Penh, I’d sometimes put a poll out on social media. What brownie flavour would you like next? Cheesecake was a popular request. Cambodians generally really like cheesecake but I made very few to sell because the ingredients were pricey. Thus when this hybrid worked out, it turned out to be a happy compromise. As I am me, I found ways to play around with more flavours and ingredients. I’ve listed them at the end of the cheesecake ingredients.

cake box with cheesecake brownies inside, a green business card with love, Han-Na
Cheesecake Brownies were a popular order

Last month, I wrote about how I’d picked up a painful thumb injury which I was trying to let heal. It is mostly better now so I made cheesecake brownies and a giant cookie this weekend.

When I posted a picture of this cheesecake version on the post about the infinitely variable fudgy brownies, I said that I’d give you the recipe later as it involves a few more steps. Since then, my brownie recipe and story have featured on TheBrightApp (which is a new social networking site that someone I know is involved in – go check it out). There was a comment that the variations could feature as a different recipe post each time, which is kind. I’m not sure if that will be possible, but here’s the cheesecake brownie version in the meantime.

Ingredients all lined up
Cheesecake Brownie ingredients all lined up ready
All the swirls

I adapted this from Smitten Kitchen’s Cheesecake-Marbled Brownie recipe. I wanted to use my more recent whisking to ribbon stage brownie method, so I took note of the cheesecake ingredients and the marbling instructions but combined it with my chosen brownie method. However, you could use my simpler, no frills or ribbons, brownie recipe too. There are more detailed instructions in the previous posts on how to make brownies in general. I’ve added photos below the recipe to expand on the addition of cheesecake.

Ingredients for Cheesecake Brownies, adapted from Smitten Kitchen

Brownie ingredients

  • 150g unsalted butter, cut into small cubes
  • 150g dark chocolate (at least 60%), broken up, roughly chopped
  • 2 large eggs plus 1 egg white*
  • 200g caster sugar
  • 100g plain flour
  • 20g cocoa powder
  • 1/2 tsp of salt
  • 1 tsp of vanilla extract

Cheesecake ingredients

  • 150g full-fat cream cheese
  • 1 egg yolk from the egg in the brownie ingredients*
  • 50g caster sugar
  • 1tsp vanilla extract, or replace with
  • Optional flavour ideas – zest of an orange, 1 tbsp of dark rum or plum wine.
  1. Preheat the oven to 180°C/355°F/Gas Mark 4. Line a deep tin. For this quantity a 20cm square tin or a rectangular 27×20 or 28×18 will work.
  2. Start preparing the brownie mixture. Melt the chocolate and butter together and just after it has melted, add in the salt, vanilla extract and leave it on the side to cool down. Ways of doing this are on a previous post.
  3. As you keep an eye on the chocolate and butter melting, prepare the cheesecake mixture. Put all the cheesecake ingredients into a small bowl. Save the egg white for the brownie mixture. Mix to combine until smooth. I often use a hand mixer, but you could beat with a spatula. See photos below.
  4. Turn your attention to readying the rest of the brownie mixture. In a stand mixer bowl (if using) otherwise a medium bowl, crack the two eggs and add the saved egg white into the bowl and add the sugar. Use a stand mixer or an electric hand mixer on high speed to start whisking the eggs and sugar until they are at a ribbon stage. Ribbon stage is when the egg and sugar mixture are a pale yellow colour, doubled or even tripled in volume and when you lift the whisk over the mixture, the batter will fall slowly and leave a trail like a ribbon that will hold its shape for a few seconds. It will take about 10 minutes. I still use a timer to make sure I beat them for long enough. Don’t start beating the eggs/sugar until the chocolate/butter has melted because the chocolate/butter mixture needs this time to cool down.
  5. As the eggs and sugar are whisking, measure out the flour and cocoa powder into another bowl. Sieve it if there are lots of lumps in the flour and cocoa. Otherwise, use a whisk to loosen and mix them together.
  6. When the eggs and sugar have reached a ribbon stage, reduce the speed to low and add the melted chocolate and butter mixture to the eggs and sugar. Whisk until it all appears to have mixed together. If you are using an electric hand mixer, you may need to turn off the mixer, add the chocolate/butter and then switch it back on again to avoid a mess. I speak from experience.
  7. Now fold in the flour and cocoa powder using a spatula, or a spoon until it is well combined.
  8. Pour all the mixture into the baking tin. Debs says that if you want to create an even more marbled effect, then reserve some brownie batter to dollop on top of the cheesecake before swirling them together. I’ll let you experiment.
  9. Use a tablespoon to dollop the cheesecake mixture evenly into the brownie mixture. Use the back of the spoon to swirl the brownie and cheesecake together. I like to go up and down vertically and then again horizontally. See photo below.
  10. If you want to add in any texture (such as crushed biscuits) or fruit (such as raspberries or blackberries), do it now and push them into the marbled mixture.
  11. Bake in the oven for 20-25 minutes. They should be firm to touch at the top but still wobble when you shake it. Leave to cool completely in the tin and if you can bear it, cover them and leave them overnight in the fridge. They will be easier to cut and the flavours will have deepened.
ingredients for the cheesecake element
The ingredients for the cheesecake mixture – see step 3
Cheesecake mixture beaten until smooth
Beat the cheesecake mixture until smooth – see step 3
a table spoon dolloping cheesecake mixture into the brownie mix
Cheesecake mixture being dolloped – Step 9
the end of the spoon going up and down to create a swirling effect between the brownies and the cheesecake mixtures
Begin to swirl – step 9
frozen raspberries added to half of the cheesecake brownie before baking
I added some frozen raspberries to half of the tin because I fancied some raspberry cheesecake brownies. I didn’t measure it out, but I’m guessing 45g for half a tin?
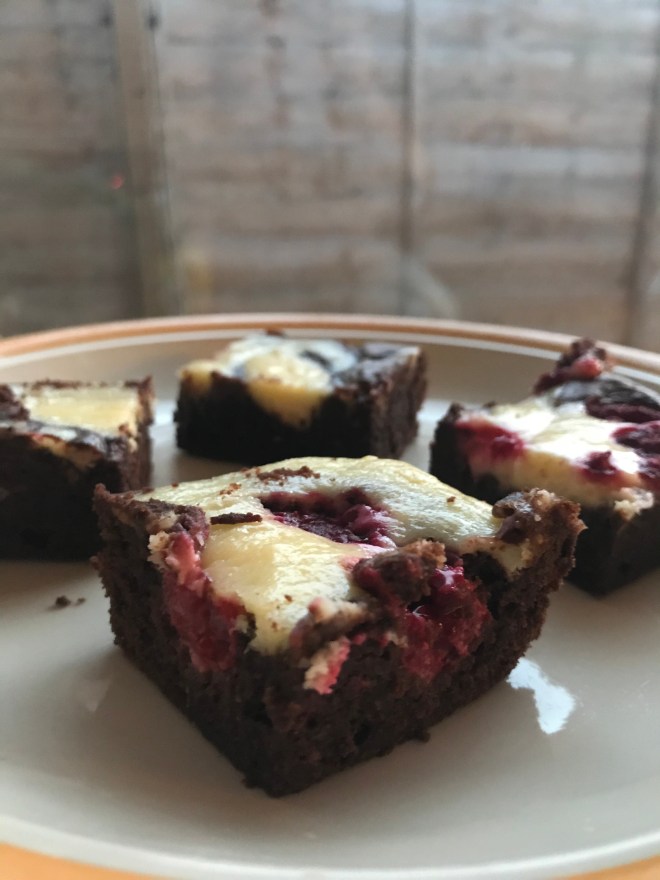
4 cut up brownies.  The two nearest are raspberry cheesecake brownies and the two further away are vanilla cheesecake brownies
Tada – two variations from one tin. At the forefront there is raspberry cheesecake brownies and at the back, vanilla cheesecake brownies

Paul Hollywood’s Hot Cross Buns

IMG_8934
The best hot cross buns in Phnom Penh!

If my previous post was months in the making, this has been years.

This time 3 years ago, my friend Rachel posted a beautiful photo of her freshly  baked hot cross buns, complete with twinkly fairy lights in the background.  What got me was that she commented on how incredibly delicious they were, much more than any shop bought variety.  She’d used Paul Hollywood’s Hot Cross Buns recipe from BBC Good Food, which she said was overly long (two rises).  Regardless, I  promptly tried it out and the resulting buns were life changing to say the least.

I will never buy another hot cross bun again.

IMG_2592
The life changing hot cross buns!

These home made hot cross buns had bags more flavour and were so moist compared to any Best, Finest or Taste the Difference version.  That year (the only year I made two batches of hot cross buns), I must have raved about the experience so much, that I talked another friend, Sarah into baking hot cross buns for the first time.  We tried out Paul’s slightly simplified (one rise) version on BBC Food.  Boom!  What a taste sensation.

Sarah piping crosses onto hot cross buns
Year 1: Initiating Sarah into baking hot cross buns

Then of course I moved out to Cambodia where you can’t buy hot cross buns anyway and baking is a bit of an adventure.  My first year, Sarah and Joe sent me mixed peel because it wasn’t available in Phnom Penh then but the yeast had died so the buns were lumpy fruit rock cakes.  The second year, they tasted good but they looked anaemic: I hadn’t figured out how my oven worked.  This year, post-long bike ride, unaware that it was Good Friday (which is easy to do in Cambodia), I baked my best batch of hot cross buns, since moving out to Cambodia.  It wasn’t until my housemate (another) Sarah was sinking her teeth into a hot freshly baked bun and said, “It’s definitely Good Friday.  It’s definitely Easter”, that I remembered again why we eat hot CROSS buns on Good Friday.  Duh – seriously, where has my brain wandered off to?

IMG_8925
“It’s definitely Good Friday! It’s definitely Easter!” – Sarah

IMG_8921

But seriously, I don’t know why I don’t bake hot cross buns more often.  Oh, yeah, I remember.  It’s an Easter thingy.  And it’s in the weird time of Lent where all my friends have decided to fast from sugar and all that, so by the time I get round to baking them, I only manage to bake the one batch.  Well, this year, I’ve decided that I’m going to try out a tropical version with mangoes, ginger and lime during Khmer New Year.

IMG_8926
One way to keep the ants off your food in a hot country – create an island!

I’ve adapted Paul Hollywood’s recipes a wee bit to add a bit more spice and replace the apricot jam glaze with an orange syrup one.  No reason really, except this last time, I was too lazy to buy apricot jam didn’t want another jam jar cluttering up my fridge.  I reckon it works pretty well.

And I swear that at one time, I watched a Bake Off Masterclass, in which Paul Hollywood baked these and recommended mixing the fruit into the dough inside the mixing bowl.  It’s much more efficient and you don’t have any bits of fruit trying to escape.  It’s not very explicit in his instructions so I’ve changed that too.

IMG_8892

Paul Hollywood’s Hot Cross Buns, adapted from his recipes on BBC Food and BBC Good Food

Ingredients for Hot Cross Buns

For the buns

  • 300ml/10fl oz whole milk
  • 500g/1lb 2oz strong white flour
  • 75g/2½oz caster sugar
  • 1 tsp salt
  • 7g fast-action yeast
  • 50g/1¾oz butter
  • 1 free range egg
  • 150g/5oz sultanas
  • 80g/30z mixed peel
  • 1 apple, cored and chopped
  • 2 oranges, zest only
  • 2tsp ground cinnamon
  • 1tsp mixed spice or 1/2 tsp ground ginger, 1/8 tsp ground cloves, 1/8 tsp ground nutmeg, 1/8 tsp ground coriander, 1/8 tsp ground nutmeg
  • sunflower/vegetable oil for greasing

For the cross

  • 75g/2½oz plain flour
  • about 5 tbsp of water

For the orange syrup glaze

  • 1 tbsp sugar – caster or granulated
  • juice of half an orange.

Method

1. Bring the milk to the boil and then leave to cool until it’s hand hot (i.e 37°C) .  Heating the milk creates a softer dough.

2. In a bowl, measure out the sultanas, mixed peel, cinnamon, mixed spice, orange zest and chopped apple, and then mix them together.

IMG_8895 IMG_8896

3. In a large bowl, mix the flour, yeast, sugar and salt.  Then rub in the butter to the flour, like you’re making short-crust pastry.  Then add the egg and slowly add the milk until you form a sticky dough.

4. Knead the dough for about 10-20 minutes (by hand always takes longer) until it becomes smooth and elastic.

IMG_8897 IMG_8899

5. Now mix in the fruit.  Add the fruit into the large bowl and then spread the dough on top of the fruit so that the fruit is fully covered by the dough.  Then gently try and wrap the dough all around the fruit so that the fruit is fully enclosed.  Don’t worry if you can’t entirely.  Then gently massage the fruit into the dough so that the two are thoroughly combined.  Empty it out onto the side.

IMG_4889IMG_4890IMG_4891

6.  Grease the large mixing bowl using a tablespoon of sunflower/vegetable oil, add the dough back in the bowl and cover it with cling film.  Rest the dough for about 1-2 hours until it has doubled in size.

7. Line a baking tray with baking paper.  Once the dough has risen, turn the dough out onto a lightly floured surface, and strengthen it.  Bring one side into the middle and press firmly with the palm of your hand, do the same with the other side, then both sides together and press firmly.  Roll out a bit to so that it’s easier to divide.  Divide into 3 equal parts and into 5 again, so that you have 15 pieces altogether.  Lightly flour the surface in order to roll each piece a smooth ball.  Arrange the buns on a baking tray lined with baking paper, leaving just enough space so that buns touch when they expand.  Lightly cover with oiled clingfilm or a damp tea towel.  Leave to rise for an hour.

Top tip: to roll the balls, turn the sides into the middle, then turn over so that the seam side is on the bottom.  Make your hand into a claw shape and roll the ball inside your claw and move your hands quickly in circles – et voilà, smooth balls!

IMG_4894IMG_4895IMG_4896IMG_8909

8.  Pre-heat the oven to 220°C/425°F/Gas Mark 7.

9. Meanwhile, prepare the mixture of the crosses.  Measure out the flour.  Add in the water, 1 tablespoon at a time, until it forms a smooth, thick paste.  It needs to be pipe-able, not too thin so that it disappears when it bakes and not too thick that it’s impossible to pipe.  Put the paste into a piping bag.

10.  Once the buns have risen, pipe crosses onto the buns, by piping a line along each row of buns and then repeat in the other direction.  The crosses want to hug the sides of the buns.

IMG_8910IMG_8913IMG_8914

11. Bake on the middle shelf of the oven for 20-25 minutes, until golden brown.

12.  Measure out the sugar and orange juice into a small saucepan and melt the sugar over a gentle heat.  Brush the orange syrup over the warm buns and leave them to cool.

IMG_8919

13.  Gently break the buns apart and enjoy.

Verdict?  They were the best hot cross buns in Phnom Penh!

IMG_8936
The perfect easter breakfast – coffee and hot cross buns!

Oh so yummy, festive, orange, cranberry and chocolate bread

oh so yummy, festive orange, cranberry and chocolate bread

Merry (belated) Christmas everyone!

It’s funny the foods that you crave.  I keep surprising myself with what my tastebuds hanker after.  My latest three cravings are mature cheddar cheese and milk chocolate digestives.  Those two cravings kicked in a year after I moved and as I didn’t buy or eat a lot of cheese in the UK, can you see why I surprised myself?!

My friend Hannah came to spend Christmas in Cambodia this year.  I asked whether she’d like to bring out a selection of cheeses out with her so that we could have a cheese and wine evening.  And she did!  She had an unexpected 24 hour delay in Doha, and amazingly the cheese survived!  I don’t think that I’ve ever relished the flavours of each of those cheeses, as much as I did that evening!  Thank you, Hannah.

A selection of beautiful english cheeses, trying to disguise themselves as pac men. Thank you Hannah!
A selection of beautiful english cheeses, trying to disguise themselves as pac men.  The camembert is baking in the oven. Thank you Hannah!

Hannah and Esther waiting patiently for me to take this photo and finding it very funny!

I said three, right.  Well, there’s this bread…

I’m pretty sure that Sainsburys does an AMAZING chocolate, cranberry and orange bread at Christmas time.  I’ve eaten it pretty much every year since discovering it.  Except last year.  Last year, was my first Christmas in Cambodia and I couldn’t find any cranberries, frozen, fresh or dried in the whole of Phnom Penh.  Not that I could search very far and wide because of my poorly left knee.

orange, cranberry, chocolate bread

I’ve been thinking about this eating this bread for a couple of months now.  So in November, I bought a bag of dried cranberries whilst I was in Australia to bake it as my festive loaf.

dark chocolate chunks dried cranberries

I couldn’t find a recipe for this bread online.  So, I modified Richard Bertinet’s cranberry and pecan bread recipe from Dough to recreate one of Sainsbury’s festive bread creations.  I loved it.  Hannah loved it.  (She’d never heard of or eaten it before – WHAT?!?!? and she lives in the UK!)  It smells intoxicating and the flavours balance and complement each other perfectly.  We were happy to eat it, just as it was.  No spread, it doesn’t need one.  If you want to, you could try eating it with cheese, like we did.   Surprisingly it works.

Three things:

  1. Make sure that you use chocolate chunks and not chocolate chips.  Chocolate chunks are bigger and taste more satisfying than chocolate chips.
  2. Make it a white loaf.  It’s meant to be a festive treat.  Don’t spoil it by adding more fiber to it.
  3. The chocolate makes it a messy bread to cut and eat.   That could be because it’s just a wee bit warmer in Cambodia than the UK at this time of year… But I dare you to resist eating it when it’s fresh out of the oven!

Finally, finally (and this isn’t late!).  Hope that you have a wonderful New Year’s Day celebration and wishing you all the best for 2015.

orange zest

orange, cranberry and chocolate dough

Ingredients for my oh so yummy, festive Orange, Cranberry and Chocolate Bread.

  • 500g strong white flour
  • 7g fast action yeast
  • 10g salt
  • 350g water – you can do 350ml but weighing it is always more accurate I think.
  • zest of 1 orange
  • 100g dark chocolate cut roughly into chunks
  • 100g dried cranberries

Method

1. Put the dark chocolate, cranberries and orange zest in a small bowl and give it a good mix.  I discovered that the orange zest actually starts plumping up the cranberries while you’re making the dough – cool!

2. In another medium sized bowl, weigh out the flour, add in the yeast and give it a quick stir to mix it into the flour.  By mixing the yeast with flour first, I don’t worry about the salt touching the yeast and thus deactivating the yeast.

3. Now add in the salt, give it a stir.  Then add in the water.   Use a dough scraper, or your hands to combine the water and flour together as much as possible before turning the mixture out onto your work surface.  It is quite a wet dough to begin with, so don’t worry.

4.  Knead until the dough is springy and smooth.  This probably takes about 10 minutes but it depends on what method you use and how wet the dough was to begin with.  I use Richard Bertinet’s slap and fold method.

5.  Now transfer the orange zest, cranberries and chocolate into the medium sized bowl you used for the dough mixture.  Then, lay the dough on top and spread it out so that it envelops the entire surface.  What you’re going to attempt to do next is wrap the dough around the chocolate and the cranberries and mix it so that you can combine them with the dough.  Doing it this way in the bowl makes it a much neater, efficient process, than if you were to do it on a work surface.

6. Once the chocolate and cranberries are combined with the dough, turn it out from the bowl briefly.  Add a little bit (about a tablespoon) of vegetable oil to the bowl to prevent the dough from stick to it as the dough rises.  Cover with cling film or a wet tea towel and leave it rise.  I leave mine to rise in the fridge for a couple of hours so that the flavours have longer to mature.  You could leave it at this stage, in the fridge, for a couple of hours to 2 days.

7.  Prepare a baking tray by lining it with baking paper, or covering it with a layer of semolina so that it doesn’t stick to the tray.  Once the dough has doubled in size, turn it out onto your work surface.  Push your fingers firmly into the dough to leave dents.  This is a much gentler way of knocking the air out.  While you’re doing that try to shape it roughly into a rectangle.

8. Next, strengthen the dough.  Mentally divide the dough into three sections.  Take a third of the dough to the centre and push it down firmly in the middle with the heel of your hand.  Then take the other third of the dough to the centre and push it down firmly with the heel of your hand.  Finally fold the mixture in half and again push it down firmly with the heel of your hand.

9.  This next bit is up to you.  I cut my dough into two halves and shaped one into a circle and the other into a square-ish loaf.  You can shape it into one or as many loaves as you wish.    Cover with damp tea towel or oiled cling film.  Let them rest until they have doubled in size again.  In the meantime, preheat the oven to 250°C/480°F/Gas Mark 9.

10.  When the dough is ready, cut deep, clean incisions in it to help create shape and release gas.  I made a hash (#) sign on one loaf and cut three slices on the other.  I then sprayed the tops of them with water to create a bit of steam as they bake.  (My new electric oven doesn’t like it when you spray the inside of the oven with water.)

11. Whack them in the oven.  After 10 minutes turn the oven down to 220°C/425°F/Gas Mark 7 and bake for 40-50 minutes.  Check that the bread is ready – it should sound hollow when you tap it’s bottom.  If not, set the timer for another 5 minutes and check again.  Let them rest for at least 5 minutes before you enjoy and devour it.

orange, cranberry, chocolate bread


Spiced Autumnal Orange Drizzle Cake with Dark Chocolate Embers


spiced autumnal orange drizzle cake
 

It’s autumn on campus. I love going for walks with friends around the fields on the beautifully bright days that we’re lucky to have. And with the dark nights drawing in and the leaves falling off the trees, it is the perfect time to brave your face to the brisk night at a bonfire, or turn in early and watch the flames lapping the wood in the fireplace.

leaves falling off treesleaves turning yellowsilhouettes
When I came up with this cake 2 years ago, I had both types of fires in my mind as inspiration. I had also been watching Masterchef and one of the contestants had created a dish using charcoal to recreate the fiery taste of a bonfire. I decided to use dark chocolate, not feeling quite knowledgeable enough about charcoal flavouring (perhaps leave that for another time). My idea being that the chocolate would visually recreate the burning embers of a fire, and the orange and spices would add the warmth in the flavour.

I used the Lemon Drizzle Cake recipe as my starting point for bringing to life a perfect autumnal treat.

Ingredients for Spiced Autumnal Orange Drizzle Cake with Dark Chocolate Embers

  • 125g/4.5oz butter
  • 75g/3oz caster sugar
  • 2 large eggs, beaten
  • 150g/5oz self-raising flour
  • 1 tsp baking powder
  • 1 tsp ground cinnamon
  • 1.5 tsp mixed spice
  • zest of one orange* see top tip.
  • 2 tbsp (or 30 ml) of Cointreau or milk if you don’t want to use alcohol
  • 85g/3.5oz dark chocolate, roughly chopped

Top Tip: wash the fruit with a wee bit of washing up liquid to take the wax off, unless you can buy unwaxed oranges (I find them harder to source compared to lemons and limes). It will make the zesting of the orange much more effective and easier.

Method

1. Preheat the oven to 180C/350F/Gas Mark 4 and line a 2lb loaf tin.

2. If you don’t have an electric whisk, like me, then mix the butter, sugar, orange zest together first before adding in the eggs, then the flour, spices and baking powder. If you have an electric whisk, then add in all of the above ingredients and whizz them up until the mixture is smooth.

3. Stir in the Cointreau/milk so that the mixture falls softly off the spoon – that’s my interpretation of ‘a soft, dropping consistency’.

4. Stir the chocolate into the cake mixture. I wanted the chocolate to sink to the bottom of the cake, so didn’t coat the chocolate with flour.

5. Spoon the cake mixture into the loaf tin and smooth the top. Pop it into the oven and let it bake for about 40 minutes, or until the tester/knife comes out clean.

6. While the cake is in the oven, prepare the orange drizzle. (if you prefer it a bit sweeter, then increase the sugar)

Ingredients for Orange Drizzle

  • Juice of one orange
  • 1 tbsp of Cointreau
  • 30g golden caster sugar

7. I normally use a chopstick to poke wholes in the cake for the drizzle to pour into. This time I experimented with a cocktail stick in case they make smaller holes. Nope. I’ll return to the chopstick next time.

8. Slowly pour the drizzle evenly over the cake when it is fresh out of the oven. Ta da!

Verdict – Mmmmmmmm…. Moist and flavoursome. The chocolate, orange and spice mix is a winner with adults and children alike. The added bonus is that this is a simple and quick cake to bake (especially if you have an electric whisk).