Peanut butter brownies

A slice of brownie with peanut butter in the middle held in a hand
Delicious peanut butter brownie

Do we need another brownie recipe? It’s a 100% YES from me, when it includes peanut butter in a chocolate brownie. The salty sweetness from this combination is marvellous. For 4 years on and off, I have been thinking about how to make this, buying various peanut butter brownies to explore what it is that I’m after and testing out various recipes. Then, Smitten Kitchen’s peanut butter swirled brownie recipe gave me the step up I needed to get to this recipe. I don’t know why I didn’t search her recipes earlier, to be honest.

There are a few lessons that I’ve learned on the way. Firstly, if you use peanut butter straight from the jar, with no addition of sugar or egg, it dries out in the oven and goes claggy in your mouth. Then I read (and dismissed) various probably wonderful peanut butter recipes that used milk chocolate, or incorporated the peanut butter into the batter because I realised that I wanted to eat distinct peanut butter bits. Next, I tried Smitten Kitchen’s swirled approach and I realised that I preferred the peanut butter evenly spread out, rather than marbled through. Lastly, if you chill the peanut butter mixture in a fridge or preferably in a freezer, it is malleable and less messy to shape.

For this recipe, I’ve combined my fudgy brownie recipe and adapted Smitten Kitchen’s peanut butter batter. I had followed her recipe going on what she says about acknowledging the high sugar level but promising that it won’t taste excessively so. However the family (including the kids) I live with, all found it overly sweet and rich. So, I’ve pretty much halved the sugar, not just because I’m a ‘let’s halve the sugar’ fiend. Mind you, I wasn’t using her brownie recipe, so perhaps that’s where it made a difference.

I’ve made this gluten free quite easily by replacing the plain flour with a plain gluten free flour mix. I double check the peanut butter to make sure that there are no hidden ingredients in there that gluten-free people can’t eat. I’ve yet to find one…

Ingredients for 16-20 mini peanut butter brownies, adapted for Smitten Kitchen and my infinitely adaptable fudgy brownie recipes.

Peanut butter mixture

  • 190g smooth or crunchy peanut butter
  • 80g soft brown sugar
  • 1 egg
  • 1/4 tsp vanilla extract
  • pinch of salt (ONLY if there is no salt added in your peanut butter)

Brownie batter

  • 150g unsalted butter, cut into small cubes
  • 150g dark chocolate (at least 60%), roughly chopped
  • 3 large eggs
  • 180g caster sugar
  • 100g plain flour
  • 20g cocoa powder
  • 1/2 tsp of salt
  • 1 tsp of vanilla extract

Method:

  1. Preheat the oven to 180°C/355°F/Gas Mark 4. Line a deep tin. For this quantity, a 20cm square tin or a rectangular 27x20cm or 28x18cm will work.
  2. First, make the peanut butter batter by adding all the ingredients into a small bowl and mixing it together with a spatula. Then put it into the freezer for 10-15 minutes so that it becomes stiff but still pliable. If you remember to, mix it once halfway through.
  3. While the peanut butter batter is in the freezer, melt the chocolate and butter together and just after t has melted, add in the salt and vanilla extract and leave it on the side to cool down. There are various methods you can do this, which I’ve detailed in my previous infinitely adaptable fudgy chocolate brownies recipe.
  4. Measure out the flour and cocoa powder into a small bowl. Sieve it if there are lots of lumps in the flour and cocoa. Otherwise, I use a whisk to loosen and mix them together.
  5. As soon as the chocolate/butter mixture is off the heat, crack the eggs into a medium-sized bowl, or a stand mixer bowl, and add the sugar. Use a stand mixer or an electric hand mixer on high speed to start whisking the eggs and sugar until they are at a ribbon stage. Ribbon stage is when the egg and sugar mixture is a pale yellow colour, doubled or even tried in volume and when you lift the whisk over the mixture, the batter will fall slowly and leave a trail like a ribbon that will hold its shape for a few seconds. It will take about 10 minutes. I often use a timer to make sure that I whisk them for long enough. Don’t start whisking the eggs and sugar together until the chocolate and butter have melted because this needs time to cool down.
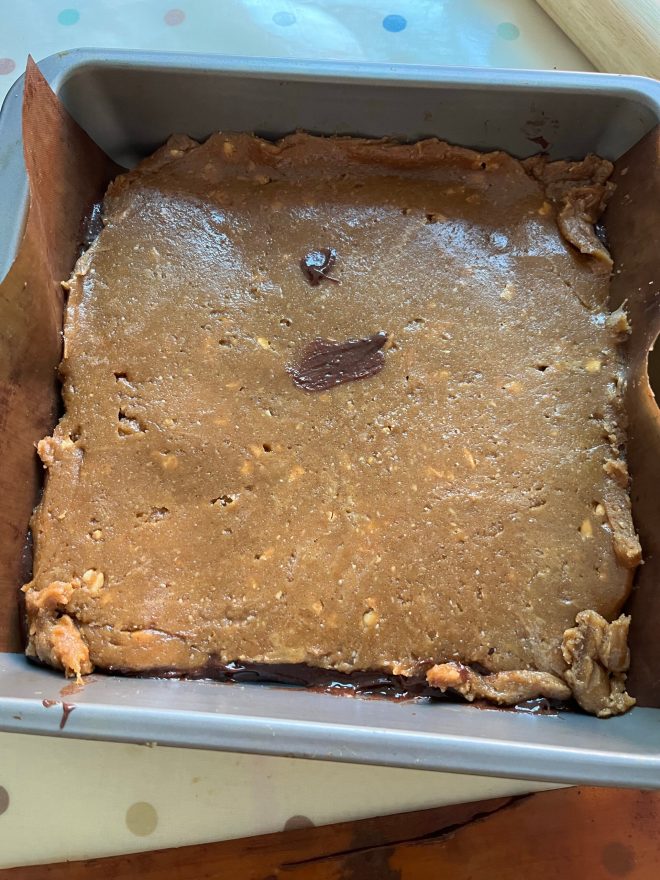
  6. While the eggs and sugar are whisking, it’s probably time for the peanut butter batter to come out of the freezer. It should be sufficiently hardened but pliable (like the consistency of soft plasticine or play dough). Roll and shape it between two pieces of baking paper, so it is even and the size and shape of the baking tin (see photo).
  7. When the eggs and sugar have reached a ribbon stage, reduce the speed to low and add the melted chocolate and butter mixture to the eggs and sugar. Whisk until it all appears to have mixed together. You may want to use a spatula around the sides and bottom to check.
  8. Now fold in the flour and cocoa powder using a spatula, or a spoon until it is well combined.
  9. Pour half the mixture into the baking tin. Then carefully position the peanut butter batter layer on top and peel away the baking paper. Then add the other half of the brownie mixture on top, creating a peanut butter brownie sandwich (see photos).
  10. Bake in the oven for 18-20 minutes. They should be firm to touch at the top but still wobble when you shake it. Leave to cool completely in the tin and if you can bear it, cover them and leave them overnight in the fridge. They will be easier to cut and the flavours will have deepened.

The verdict? It is everything that I’d hope for in a peanut butter brownie. 4 years is a long time to be thinking about a recipe, but I can say that it was worth persisting. Normally, I say to leave it overnight but even I couldn’t resist cutting a little square to check if I’d found my peanut butter brownie recipe. Only – if like me you don’t want to wait overnight, perhaps wait an hour or so. I may not have waited and burned my mouth. 😂 Enjoy.

Step 6 – roll it between two baking sheets into the shape of your baking tin.
You can’t smell this, but it smells irresistible. Assuming you like chocolate and peanut butter of course.

Turkey or chicken pasta bake, inspired by Singapore Airlines

The first time I made this, I used fusilli pasta.

It is not usual that you eat a dish on a plane and find it so tasty that it inspires you to make a version of it at home. However, that is exactly what happened on the Singapore Airlines flight involving a chicken pasta bake. It wasn’t the dish that we would have chosen, but it was the only option that was left. Wasn’t that fortuitous?

It also paired wonderfully with their red wine on offer, which was glorious. I’m telling you, this was an unexpectedly wonderful food memory.

When I tried recreating the dish at home, I used a mish mash of two recipes – this turkey bolognese recipe from Delicious and a chicken pasta bake from BBC Good Food. The timing of it chimed with my housemate’s training for the London Marathon and it turns out that it’s a great dish for carb loading or nourishing athletes. The day after the first time I made it, the kids commented again on how yummy it was. Noteworthy praise, indeed.

The second time, I wanted to try out something I’d seen on Instagram. A pasta bake without cooking the pasta first. This was partly as a cost-saving activity and because pasta can become too soft in a pasta bake at times, which had happened in my first attempt at this dish. I was a little bit apprehensive about it. I’d read that if you soak the dry pasta in cold water first, then it will hydrate the pasta but stop it from going overly soft when baked in the oven. Oh, ladies and gentlemen, I’m delighted to tell you that it worked!

You can prepare this a day or two beforehand. Make it until step 5, then cover it and pop it in the fridge until you want to bake it.

Step 2 and 3
Step 4 – Bubble, bubble, simmer, simmer

Both times, I ended up using turkey, rather than chicken, mince. This was purely down to what was available at the shops at the time. My recommendation would be not to go for the lean version as turkey/chicken mince tends to be quite lean in comparison to red meat. This dish benefits from the extra juice from the non-lean mince. And if someone doesn’t like noticing that they are eating the vegetables, then I’d suggest once the vegetables have been cooked until soft (step 2), whizzing it down with a food blender until all evidence is mush.

I made an extra little one as an extra dinner as my housemate’s was carb loading pre-marathon

Recipe for Turkey or Chicken Pasta bake, inspired by Singapore Airlines. This will feed 6 people (2 of whom may have been small children with healthy appetites).

Ingredients

  • 300g penne pasta
  • 1-2 tbsp oil (olive or vegetable)
  • 1 onion, finely chopped
  • 2 celery sticks, chopped
  • 2 carrots, chopped
  • 3 garlic cloves, roughly chopped
  • 500g turkey or chicken mince
  • 2 x 400g tinned chopped tomatoes
  • 1 tbsp tomato puree
  • 1 tbsp dried oregano
  • 1/2 tsp of each – dried rosemary, thyme, basil
  • 1 tsp sugar
  • salt and pepper to season
  • 150g mascarpone
  • small handful of fresh flatleaf parsley, finely chopped
  • grated cheddar cheese – enough to cover the dish

Method

  1. In a large-medium sized bowl, submerge the uncooked penne pasta in cold water and let it soak while you cook the sauce.
  2. Heat 1-2tbsp of oil in a deep frying pan or wok. Over a medium heat, fry the onions, celery and carrots for about 10 minutes until softened.
  3. Add the garlic and the mince and cook for 5 minutes until browned.
  4. Stir in the tomato puree and dried herbs, then add the tinned tomatoes, and sugar. Bring it to a boil and then turn it down to a simmer for 10-15 minutes. Then season with salt and pepper. Finally, stir in the mascarpone and the fresh parsley. If choosing to make this on the day, then preheat the oven now (see step 6).
  5. Drain the pasta, which should have softened and changed colour slightly by then. Mix the penne pasta into the sauce. Pour it into a large ovenproof dish. Sprinkle over the grated cheese in an even layer.
  6. Preheat the oven to 180°C / 350°F/ Gas Mark 6. Bake in the oven for 20 minutes until it bubbles. I normally serve it with some more vegetables and an optional glass of red wine.

Enjoy and thank you Singapore Airlines for feeding and inspiring me.

A versatile herby courgette pasta

Playing around with portrait mode on my phone for this photo

For a blog titled Courgettes and Limes, I’d realised that there is a dearth of recipes using courgettes or limes. So, I started writing this post in the middle of courgette season in the UK, but have only gotten round to finishing it now when the season is pretty much over. Short story – I was working abroad, got ill and then went on holiday.

This is an easy courgette pasta recipe that I love to make because it is versatile and quick. Over the 10 years that I’ve been making it, there have been so many variations. I’ve listed a few of them at the bottom of the post. I like it because it is tasty and fresh from the herbs and lemon/lime juice, easily counts as one of your portions of vegetables per day and is naturally vegetarian and vegan. Over the summer, I experimented with it once more, substituting extra virgin oil with sesame seed oil, which added a rich nuttiness to the dish. Oh my – for me, it was a game changer.

One tip that I learned recently is for a dish like this is that to prevent burning the garlic when cooking, do not chop the garlic too finely, or crush it.

Simple herby courgette pasta for one. If you want to feed more people, then double, triple, quadruple… the ingredients list and allow a bit more time for cooking.

Ingredients

  • enough dried pasta for you (anything between 60-90g according to the internet) – fusilli, linguine, spaghetti, are some that I’ve used that work well
  • 1 tbsp of vegetable oil
  • 1 medium sized courgette – any colour (or half a large courgette)
  • 1 garlic clove
  • 1 red chilli or chilli flakes – as much or as little as you like
  • A large handful of a variety of fresh herbs (parsley, coriander, dill, mint)
  • 1 spring onion (optional)
  • 1 tbsp of sesame seed oil to garnish
  • 1 tbsp of sesame seeds or pine nuts or flaked almonds (toasted)
  • salt and pepper
  • a squeeze of lemon/lime juice

Method

  1. Before you boil the pasta, use the pan to toast the nuts or seeds. Put the nuts or seeds into the pan, heat them up on a medium heat until they turn a brown colour. Tada, they’re toasted. They will also smell glorious. Take out of the pan and set aside to cool.
  2. While they’re toasting, prep the vegetables. Finely slice the courgette, roughly chop the garlic, deseed and finely slice the chilli (if using).
  3. Boil water in the kettle to cook the pasta, and then add the pasta into the pan used to toast the nuts/seeds. Add the boiling water and salt to the pasta and cook according to the instructions on the packet. If you don’t have a kettle, bring enough water to cook the pasta to boil in a pan. Add salt and pasta and then cook.
  4. In a medium sized frying pan, add a tablespoon of vegetable oil and a pinch of salt, fry the courgettes and garlic until the courgettes are translucent and browned.
  5. While the courgettes cook, roughly chop the herbs that you’re using and finely slice the spring onion.
  6. Once the pasta has cooked, reserve half a cup of the starchy pasta water, then drain it and add the pasta to the courgettes (I guess if you quadrupled the recipe, you might want to add the courgettes to the drained pasta).
  7. Add as much or as little of the pasta water to loosen it, then mix in the herbs, spring onion, 1 tablespoon of sesame seed oil, the toasted nuts/seeds and a squeeze of lemon or lime juice. Season with salt and black pepper.
  8. Enjoy!
Mise en place
I really do chop my garlic roughly and it has kept them from cooking so quickly – leading to less charring
Ready for the sesame seed oil, juice and the nuts
A selection of herbs

Variations

  • Use extra virgin olive oil instead of sesame seed oil for a more Mediterranean flavour.
  • Use a mint and basil herb combo.
  • Add a finely sliced shallot in with the courgettes
  • If I only have one herb at hand – I like to use parsley or coriander
  • Other nuts and seeds that I’ve used: hazelnuts, pumpkin seeds, sunflower seeds, mixed seed mix.
  • Instead of salt at the end, season with finely grated parmesan or grana padano, or even a strong cheddar.
  • The chilli, lemon or lime juice is all optional.
Herby courgette pasta

Arriving into Malmö

I arrive at 10.26.
Sunset’s last fingers still waving.
Lights on the river gleaming.

I walk cobbled streets, twinkling squares.
Face lit up by maps. Trying hard
not to look like a stranger in a new city.

But my backpack gives me away.
Besides, which of these smiling, laughing,
Drinking, chattering merrily,
Dining out because it’s the weekend, people care anyway?

My hotel is at the corner.
Worn yellow. Hotel Continental.
Chosen for its 3 stars and 5 minute walk from the station.

Hi – Hanna Sha?
Yes. Please sign here.
He gives me a key and I take the lift to the top.
My room is round the corner at the end.

It is minimal and bare. I imagine I’m in a monastery.
Then, I pick a stray black hair up from the pillow – 3 stars.
I wash my face, brush my teeth, open the window.

The noise from the city centre spills in.
Tomorrow I will round a corner and be awed
by Kungsparken’s trees, running paths and blue skies.

But now, this circle says no to my travel adaptor.
So I half-watch Bush Snr and Jnr silently charge my phone.
And sleep, feet at the headrest.

Malmö train station at 10.30pm in the summer

Unexpectedly, I holidayed in Malmö recently. I was meant to be staying in Copenhagen for the entirety of my holiday but Covid and last minute AirBnB cancellations interrupted those plans. I loved Malmö. The cycle lanes, the parks, the pastries, the falafels, the breads… I ate the best kanelbullar (a cinnamon roll) at Slottsträgårten Kafé and fell in love with breakfast sandwiches at St. Jakobs Stenugnsbageri. I did eventually make it to Denmark and my friends there.

Breakfast sandwich with other pastries
The best kanelbullar for Fika

My version of my mum’s very easy kimchi

a hand mixing cut cabbage leaves with kimchi paste

Here is a very easy kimchi recipe for you. It is my mum’s mak-kimchi 막김치 or 맛김치 recipe, made even easier by me. Mak-kimchi is the one where the cabbage is all cut up, rather than quartered, which makes it quicker to make and serve up. The leaves are cut into bite-sized pieces. This means that you don’t have to cut them when you serve it, which you do with a traditional kimchi recipe where the cabbage is quartered and fermented thus.

In Korea it is made with Korean cabbage, baechu. I only discovered recently that it is slightly different from Chinese leaves or Napa cabbage, which is what my mum uses and most kimchi recipes outside of Korea use. In the UK, it’s called Chinese leaves; in the US it is called Napa cabbage. I haven’t provided an exact quantity of cabbage in grams as in the winter, the Chinese leaves can be so skinny that I need 3, but in the summer they are so big and I use 2.

We grew up in the North East of Scotland, where there wasn’t a big Korean community. There weren’t any Korean food shops like you got in New Malden (London) then, and the Chinese supermarket hardly, if at all, stocked Korean ingredients. So my mum learned to adapt her recipe to supplement the carefully hoarded essential Korean ingredient – the gochugaru, the Korean red chilli pepper flakes – with the ingredients that were readily available to her. This is all by way of an explanation of why this particular recipe is perhaps a bit different from the others that you’ll see on the internet.

gochagaru
An example of some gochugaru powder that I bought in the UK

By the way, gochugaru is an essential ingredient. The Korean red chilli pepper flakes have a particular flavour, that you won’t get from another chilli substitute. People have tried to substitute it with the following and then reported back to me that it didn’t taste right (well of course – you missed out an essential ingredient!):

  • chilli flakes
  • chilli powder
  • cayenne powder
  • red chillies
  • fresh birds eye chillies
  • paprika

Learn from their mistakes, go and buy some. Korean food has gained in popularity since I was a child, and in the UK, gochugaru is readily available in many Chinese or Korean food stores. I’ve even spotted it in some of the larger supermarkets.

This version is not particularly spicy. You can adjust the spice levels if you desire by adding in more tablespoons of gochugaru. There was also a period of time when my mum had to cut out all spicy food from her diet, and as she was the main chef in the home, meant that we did too. However, she continued making kimchi and the recipe evolved around her dietary requirements.

*My recipe varies from my mum’s a little (or a lot, depending on how important you think the changes are). Firstly, in our method of cutting up the cabbage. She separates out each leaf of cabbage, halves it and then cuts it into pieces. I halve the whole cabbage lengthways, then cut again lengthways so that it is quartered. Then I cut them into bite-sized pieces – about 2.5-3cm wide. I think that my way is quicker; my mum is shocked by it. I also don’t use shrimp paste, or fresh shrimps when I make it simply because I can’t be bothered to and I stick to fish sauce for ease. However, my mum does because it adds a deeper flavour to it. Maangchi’s Easy kimchi recipe and Korean bapsang Easy kimchi recipe, the other two recipes that I refer to from time to time, include shrimp. Maybe one day, I will do the same.

Equipment you will need:

  • A large sharp knife and chopping board
  • A blender or food processor. A hand blender also works. If you don’t have any of these then you’ll need a vegetable grater.
  • 1-2 large bowls, like a washing up bowl.
  • 1 large colander
  • Saucepan and spatula
  • Storage: I store the kimchi in various former large (500-700g) pickle/beetroot jars. Prepare about 5, depending on their size.

Ingredients

  • 2-3 Napa cabbage or Chinese leaves, depending on their size. Normally I use 2 medium-large ones.
  • lots of table salt
  • 1 medium white/brown onion, peeled
  • 1 ripe pear
  • 5cm ginger, peeled – it depends how fat or skinny the ginger is. Aim for 1:1 ginger to garlic.
  • 6-7 cloves of garlic, peeled
  • 1-2 red peppers, depending on the quantity of Chinese leaves
  • 5 spring onions
  • 1-2tbsp fish sauce
  • 2 tbsp gochugaru – the Korean red chilli pepper flakes
  • 1 tbsp glutinous rice powder, sometimes called sweet rice powder (GF people – this doesn’t contain any gluten but it is sticky)
  • 5 tbsp or 75ml of cold water

Method – Stage 1: prepare and salt the cabbage. This is an important step in cleaning and killing any bad bacteria.

  1. To clean the cabbage, remove any of the outer leaves that have discoloured too much or too bruised. Cut the cabbage into bite-sized pieces using either my mum’s way or my way* and put into a large bowl/basin. Fill the bowl with water to clean the leaves. Drain in the colander. You will probably have to do this in stages due to the quantity of the leaves.
  2. In a separate bowl, put one layer of cabbage in, then generously sprinkle salt over it. Next put another layer of cabbage over that first layer and generously sprinkle salt over it. Repeat with all the cabbage.
  3. Leave for about 2-5 hours, turning every 30-60mins to salt evenly, so that the salt draws out the moisture out of the cabbage. In my experience, the length of time it takes varies depending on the quantity and the weather. It is faster in warmer weather. Do not, and I repeat DO NOT, leave the cabbage to salt overnight. It will make the overall flavour of the leaves a bit too salty.
  4. You will know when it is ready when the white sections of the cabbage are more translucent, bend easily and don’t snap. The cabbage will have reduced by about half too. When ready, drain the water and rinse in clean water 2-3 times to remove the salt. Drain and set aside.
Halfway there – it’s not bendy and translucent enough yet
When it is ready, it will bend easily and be more translucent.

Stage 2: make the rice paste. Do this while the cabbage is salting to give it time to cool. This is optional, but does add make the fermentation process quicker and helps the cabbage to absorb the kimchi paste better.

  1. In a small saucepan dissolve 1 tbsp of glutinous rice flour into 75ml of cold water. Heat it on a medium heat, stirring, until your spatula leaves a line through it. Leave it aside to cool.
The glutinous rice paste

Stage 3: prepare the kimchi paste

  1. Wash and prepare your vegetables (apart from the spring onions – you’ll use them later) and pear to put into the blender/food processor. Peel and cut the onion into quarters, cut the pear into 3 cm chunks (skin on), cut the ginger and red peppers into 3 cm chunks, and pop in the peeled garlic cloves. Whizz it up so that it has all blended.

If you don’t have a blender or food processor then use a grater to mince the garlic, ginger, pear, onion and red pepper into a large bowl. The coarse side of a box grater may work or I’ve used one of the Korean vegetable graters that I listed under equipment.

  1. Mix in the gochugaru, the rice paste and 1 tbsp of fish sauce and give it another whizz in the blender.
  2. Wash and clean the spring onions. We use be using the whole spring onion. I notice that in the UK only the white part gets used, which makes me 😢. Chop the bottom off, trim the top, then slice the spring onions diagonally in 2-3cm strips.

Stage 4: mix them all together

  1. Now thoroughly mix the cabbage with the kimchi paste. Taste and if you think that it should be a bit saltier, add one more tablespoon of fish sauce. Taste again and if you think it needs a bit more then add a bit more. Remember though, you can always add salt but you can’t take it away.

Stage 5: store, ferment and serve

  1. Then it’s time to store it in cleaned jars. Leave a bit of space at the top so that any kimchi juices can bubble up during the fermentation process. I leave it out on a kitchen countertop for 1 day and then store it in the fridge. From experience, it is a good idea to put it on something, such as a plastic container in case any juices spill out.
  2. To serve and eat – it is best to leave it to ferment for a couple of days. When you go to serve some up, then turn it around a bit in the jar and get the stuff that isn’t at the top. You can also eat it immediately on the very day that you made it, if you want to. If you do, I recommend serving it like a salad drizzled with some sesame seed oil and sprinkled with some toasted sesame seeds over it.
Freshly made kimchi in their jars ready for fermenting

Enjoy and do let me know how you get on 😊.

Vegan hot cross buns (tangzhong method)

vegan hot cross buns
Vegan hot cross buns

Recently, I felt like I have had a breakthrough with my approach to vegan baking thanks to the MsCupcakes book. So I have been leaning into it. The book helped me reevaluate how I approach the free-from baking category. I’ve noticed that many vegan recipes have adapted an existing recipe purely with substitutions for ingredients, like ground flaxseed instead of an egg, or oil instead of butter. Sometimes the ingredient can seem peculiar and unusual, depending on where you live. For example, flax seeds were difficult to get hold of for a while. However, the book helped to start thinking that rather than finding substitutions for things, I should try to think about what that particular ingredient brings and whether I can replicate that texture or flavour in another plant-based way.

I love the spring that the tangzhong brings to the bun

Therefore in the last month, I have been testing out vegan hot cross buns because it’s Easter and because enriched bread should, in theory, be quite simple to adapt. Spare a thought for the family that I live with. They have been through five iterations of a vegan hot cross bun recipe in my quest to perfect them.

The first time, I substituted soy milk for milk and oil for butter and omitted the apples. They were alright but under-proved and missing the freshness from the apple. Next, I made buttermilk, using soy milk and cider vinegar in order to create a softer, rich dough. Buttermilk helps to create a soft texture normally in bread. They were better but the texture was a bit dense. Then I used the tangzhong method to create springy soft buns that would last longer and they were amazing. Why didn’t I stop there? They took 3 rises. One for the dough, then an overnight one with the fruit added in, and a final prove once the buns were shaped. The buns were cracking a bit as if they were underproved. As amazing as they were in flavour and texture, I wanted to simplify and shorten the method. (You can, of course, still do this recipe in 3 rises.) The fourth time, I decided to try reducing the number of rises to two, but they ended up under-proving and cracking at the top. I left it for a week while my brain mulled over it. Do plant-based enriched bread recipes generally take longer to prove than non-vegan recipes? I felt like they shouldn’t as they don’t contain eggs that can slow down the rise. Perhaps it has just been my impatience to get them baked that has resulted in under proved buns. I almost hit publish on the recipe at the end of March but then my perfectionism kicked in. A few days later, I hit on an easy solution – double the yeast in the recipe. It is such a simple answer that you wonder why I hadn’t thought of it earlier. Anyhow, that is what I did and this is what I present to you now.

I adapted this by adding the tangzhong knowledge I learned from last year’s sticky apple and raisin hot cross bun recipe to Paul Hollywood Hot Cross Bun recipe because mixed peel is back in the shops this year. However, I reduced the amount because I think that 50g is just fine. Some more notes on how you can vary the method. I like making this in the stand mixer as the tangzhong makes it a wetter dough. You can knead by hand but it will take longer.

Soft silky hot cross bun dough

I’ve also been trying out different ways of mixing in the fruit with varying degrees of messy success. Method 1 is the put the fruit and the dough into the same bowl and mix it in. A slightly more detailed explanation of this is in my non-vegan version of Paul Hollywood’s Hot Cross Buns. Method 2 is to roll out the dough into a rectangle, scatter the fruit evenly over the top and then to take hold of one of the shorter sides and fold it a third into middle, and repeat on the other side so that it looks like a long rectangle. Next take one short end of the rectangle and repeat the folds again, so that it becomes a more compact rectangle. It is a neater process until the point when I roll it out into a long sausage shape in order to portion out 15 buns. At which point the dough starts breaking and the fruit spills out and away from the dough like runaway gems onto the countertop. Maybe I just need to work on my method 2. Finally, you can also make this with three rises or two, depending on your schedule. If going for three then reduce the yeast to 7g to allow for the overnight rise. The first rise is just the dough, the second as an overnight one after the fruit is mixed in and the third after the buns have been shaped. The method below details it for two.

Ingredients for vegan hot cross buns. This makes 15.

  • 500g strong white bread flour
  • 125ml water for the tangzhong
  • 250ml soya milk (or any unsweetened plant-based one) + 20ml apple cider vinegar or lemon juice
  • 60g caster sugar
  • 14g instant yeast
  • 1tsp (10g) salt
  • 2tsp cinnamon
  • 1tsp mixed spice
  • 70g dairy free margarine (I used vitalite) or vegan butter
  • 1 apple
  • Zest of 2 oranges
  • 150g sultanas
  • 50g mixed peel

Ingredients for the crosses

  • 45g plain flour
  • 2-3 tbsp cold water

Ingredients for the orange glaze

  • 1.5 tbsp granulated sugar
  • Juice of half an orange

Method

  1. First, make the buttermilk. Mix 250ml of soya milk and 20ml of apple cider vinegar in a measuring jug. Stir and leave to coagulate.
  2. Next make the tangzhong. Weigh out 500g of bread flour into a mixing bowl and from it take 25g (about 1 heaped tablespoon) of flour and put it in a small saucepan. Add 125ml of cold water, put it on the hob at medium heat and whisk or stir to combine the flour and water together in order to make a roux, or a paste. Keep stirring until it comes together and your whisk or spatula leaves a line. It’ll take about 1.5-2 mins. Leave to cool while measuring out the dry ingredients.
Your tangzhong is ready when you can leave a line in it
  1. In the mixing bowl with the flour, add in the yeast, sugar, salt and spices. Stir to mix.
  2. In the saucepan with the tangzhong, add the margarine and buttermilk and stir to combine. The margarine won’t melt completely and the buttermilk will make it look bitty and curdled but that’s okay. It will all get mixed in.
  3. Now add the wet ingredients to the flour and knead. I knead it in the stand mixer. I start at low (1) until all the ingredients are mixed in and then continue at medium (3) for about 9-10 minutes until the dough is stretchy and smooth. Take the dough out of the mixing bowl to form into a ball. Put a bit of oil in the bowl and place the dough back in there and cover. Leave for about an hour or until doubled in size.
  4. In the meantime, chop the apples, zest the oranges and stir to combine in a small bowl with the sultanas and mixed peel. Line two baking trays (or one large one).
After the first rise
  1. When the dough is ready, lightly flour the surface and turn the dough out onto it. Gently make it into a rough rectangle using your fingers to gently knock the air out of the dough. Take one long end, fold into the middle and press down with the heel of your hand. Repeat it with the other side. Then fold it in half and gently roll. The dough should feel stronger.
  2. As you know, I’ve been trying out a new way to incorporate the fruit with varying degrees of messy success. Here, I’m going to say to go with the second method because I think that with practice and tweaking, it will be easier. Roll out the dough into a rectangle, scatter the fruit evenly over the top and then take hold of one of the shorter sides and fold it a third into the middle, and repeat on the other side so that it looks like a long rectangle. Next, take one short end of the rectangle and repeat the folds again, so that it becomes a more compact rectangle. Then roll it out into a long sausage shape, divide into 3 equal parts, and then each part into 5. Each piece of dough will roughly weigh 90g. Cover the little portions with a tea towel as your form the buns.
  3. Add more flour to your surface. I like to have a little mound of it to dip into. Form the buns by taking each corner into the middle so it is a tighter round shape. Then flour the palm of your hand, or dip the top of the bun into some flour. With the dough in the middle of your hand, make your hand into the shape of a claw and move it around quickly in a circular shape. I’ve included a video of it below because it’s easier to show it.
How to shape a bun.
  1. Then put each bun onto the baking trays, leaving 2-3cms between each bun. Cover and leave to rise.
  2. As you wait, make the paste for the crosses by mixing the flour and water together. Put it into a piping bag and snip a little hole off the end.
  3. The buns will have finished their second rise after about an hour, when most of them will be almost touching each other or if you press down slightly on them, they will spring back gently but leave a small indent. Of course, this depends on the weather. In a hotter climate, this will take about 30 mins. About 15 mins before you think they’ll have finished rising, preheat the oven to 200°C/400°F/Gas Mark 6.
The buns ready after their second rise
Piping crosses. Also, the consistency for the paste is like this
  1. Pipe crosses on them by piping a line along each row of buns and then repeating in the other direction.  The crosses want to hug the sides of the buns.
  2. Bake on the middle shelf of the oven for 10 mins and then lower the temperature to 180°C. Bake for another 15-20 minutes, until golden brown. My oven has hot spots, so I turn the tray around after the first 20 mins.
  3. As they bake, make the orange glaze. Measure out the sugar and juice from half an orange into a small saucepan and melt the sugar over a gentle heat. Then turn it up to a medium heat for a few minutes so that some of the water evaporates and it thickens slightly.  Brush the sugar syrup over the warm buns and leave them to cool.

The verdict? I can’t resist one, still hot from the oven, sticky with the glaze and too hot for my mouth. They are full of flavour from the orange zest, fresh apple, spices and dried fruit and the kitchen smells delicious as you’re making them. The texture is springy and soft and they stay like that for 3 days. I love the sticky glaze on them. They are yummy toasted and buttered but honestly, I prefer to just eat them as they are. So, after day 3, when they are a little hard, I will heat them on high (800W) in the microwave for 15 seconds and they’re perfect.

Finally, everyone who has tried them tells me that they can’t tell that they are vegan.

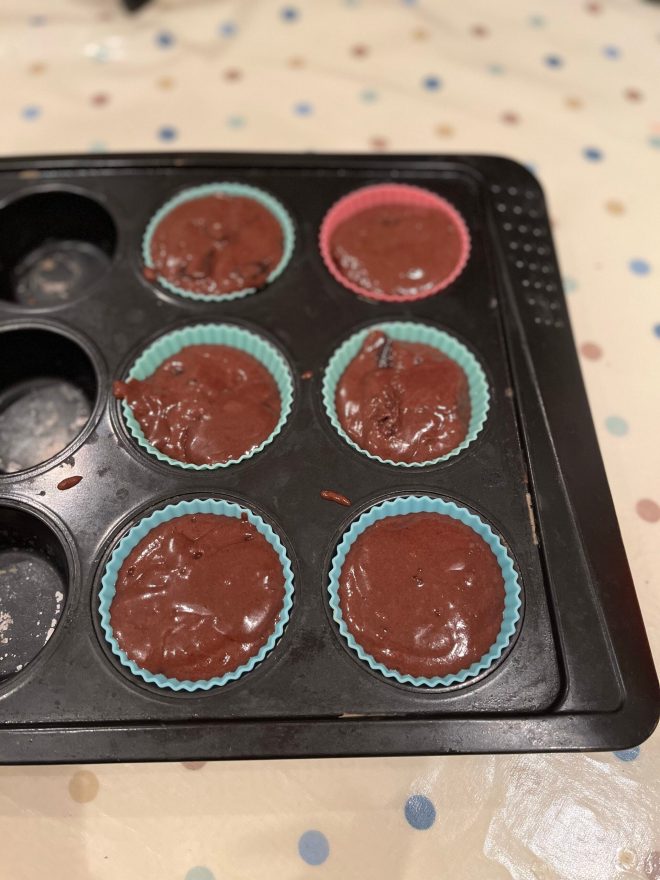
Double Chocolate Muffins (vegan)

The final recipe test for vegan double chocolate chip muffins

I decided to lean into vegan baking last month, it being Veganuary. I came across a recipe book at the library, The Naughtiest Vegan Cakes in Town by Mellissa Morgan, of Ms Cupcake (a London vegan bakery which sadly closed 2 years ago). First off, this is a fantastic recipe book if you are new to vegan baking. She includes a Quick Start guide with explanation on ingredients, which is useful if, like me, you’ve felt overwhelmed by them, and a guide to baking without eggs and dairy. There is an additional section on substitutions (e.g. if you want to go gluten-free and refined sugar free) and trouble shooting common vegan baking problems. However, as the best way to review a book is to test out the recipes, I duly borrowed the book and tried out the Victoria sponge cake, which turned out very well. Then when my vegan colleague mentioned that she craved muffins, I set out to make them.

Now, there is no double chocolate chip muffin recipe in the book. Therefore, I adapted her mint chocolate chip cupcakes. The first iteration were incredibly good. The texture and the flavour were spot on. I made the first batch with soya milk and another with almond milk. They both worked and the type of plant based milk didn’t make enough of a difference. However, I calculated the amount of sugar in each muffin and at the original 200g in the recipe (which makes 12) that was just over a tablespoon of sugar per muffin. That’s without the additional sugar from the chocolate chips/chunks. A little high perhaps? Thus began a series of experiments to reduce the amount the sugar in the recipe. I detailed it in a little table for you.

Amount of sugar in the recipeSugar per muffin (approx) without the addition of chocolateTexture/FlavourAdditional flavouring
200g16.67 (just over a tablespoon)incredibly good1.5 tsp instant coffee
180g15g (1 tbsp)incredibly good1.5 tsp instant coffee
150g12.5 (2.5tsp)still yummy2 tsp vanilla extract and 1 tsp instant coffee
120g10g (2 tsp)denser texture, slightly too bitter1 tbsp vanilla extract
Results of sugar reductions in double chocolate muffins

I took it as low as 120g, which then changed the texture of the muffin so that it becomes denser, slightly stodgy and began to taste a bit soapy and bitter. The chocolate chunks in the muffin masked that unpleasantness. However, let’s be frank. When you bite into a double chocolate muffin, you want it to taste good, not healthy.

So, in the recipe below, I’m going to suggest that you could add anything between 150-180g of sugar. Consult the table above to decide how much sugar you’d like and how to adapt the additional flavourings. I think coffee always complements and enhances chocolate. The vanilla extract brings out sweetness without adding any sugar.

In the end, as I was testing out many variations of this recipe, I decided that I’d halve the recipe each time. That is one of the joys of this particular recipe. It’s pretty simple to scale up or down.

By the way, I like making this in a large measuring jug. It is easier for pouring the mixture into the muffin cases at the end, but a medium sized bowl also works. I alternated between using a whisk and a metal spoon/spatula to mix, but I prefer the whisk for the quantity below.

Top tips: mix until it has just combined and bake them immediately.

Fill the muffin cases and then tap to release the air bubbles

Ingredients for Double Chocolate Chip Muffins, adapted from Mellissa Morgan. It will make 12 muffins.

  • 200ml unsweetened plant based milk – I tend to use soya milk
  • 20ml cider/rice vinegar or lemon juice
  • 150-180g caster sugar (my favourite is 180g*)
  • 170g self raising flour (or 170g of plain flour and 2tsp of baking powder and omit the 1/4tsp of baking powder that follows)
  • 30g cocoa powder
  • 1/4 tsp baking powder (omit this if you’re using plain flour + 2tsp of baking powder)
  • 1/4 tsp bicarbonate of soda
  • 1/4 tsp salt
  • 150g 70%+ dark chocolate roughly chopped up, alternatively use dark chocolate chips (check to see that they are dairy free)
  • 80g vegetable oil
  • 1 tsp instant coffee granules/powder*
  • 2tsp of vanilla extract*

*When using 180g of sugar, add 1 tsp of instant coffee but no vanilla extract. Unless you really want to.

Method

  1. Mix the soya milk and the vinegar together and set aside for 10 minutes. This makes a soya buttermilk. Then add 1tsp of instant coffee so that it has a chance to dissolve. Preheat the oven to 180°C/350°F/Gas mark 4 and line your muffin tray with muffin cases.
  2. In a large measuring jug or a medium sized bowl, measure out the dry ingredients, that is the self raising flour, caster sugar, cocoa powder, baking powder, bicarb of soda, salt and the roughly chopped dark chocolate. Whisk it together so that they are all combined thoroughly.
  3. Add the vegetable oil and the vanilla extract (if using) to the curdled soya milk mixture and whisk to combine. Then add this to the dry mixture and mix quickly until just combined. It’s important not to work quickly and not over mix it. If there are a few lumps, that is okay. If it is lumpy, on the other hand, I’d continue mixing it for a few more seconds.
  4. Tap the jug onto the surface. This stops the raising agents from working too quickly. Then pour or measure out the batter evenly into each of the muffin cases. Tap the muffin tray hard on the work surface to pop the bubbles, then bake in the middle of the oven for 20 minutes. They’re ready when a skewer comes out without cake crumbs but may have a little bit of melted chocolate hanging onto it. Let them cool in the muffin tray for 5-10 minutes before taking them out to cool completely. They will store in an airtight container for 5 days, maybe more..? Honestly, they haven’t made it any further than that in my house.

The verdict? Incredibly good. The texture is airy and light, and the chocolate chunks in the muffin are so satisfying. I always think that almost every chocolate baked good will taste better the next day. So, make them at night and have one for breakfast the next day. 😉

On the note of vegan chocolate. I’ve observed a greater selection of vegan chocolate, which is great. However, they are often much pricier. A lot of dark chocolate, 64%+, is dairy free. I will always check the list of ingredients on the packet before using. I prefer to chop it up roughly and then add it. I haven’t ever checked to see if dark chocolate chips are dairy-free. If you do, then please let me know in the comments.

Baking the GBBO 2021 Technical Challenges part 2

This is part 2 of the baking challenge that I set myself whilst I watched the Great British Bake Off 2021. Three of these were baked in the week that I unexpectedly had at home because the winter holiday I had booked was rescheduled due to Omicron. The disappointment of that was offset by relishing the unexpected free time to do some Christmas baking.

I’ll write my final reflections here before I list how the bakes went. What I like about setting myself a baking challenge like this, is that I can grow as a baker in my repertoire and knowledge. I will bake things that I don’t normally make, such as genoise sponge and puff pastry, push myself to try something new, like tuile biscuits and vegan sausage rolls and give me the excuse to make something that I’ve been wanting to for a while, like the Twix bars. Most of the bakes went well and of course there were some that I could definitely improve on. The important thing for me is that I enjoyed doing this and learning from it.

At this current time, I am fortunate to be living with a family who give me the time and space to bake. Between them, the workplace and well-timed visitors, everything gets eaten in good time. In the past, one of the things that would have stopped me from doing a challenge like this would be the difficulties in sourcing the ingredients, the obstacles faced by the climate (try making the Prinzregententorte in a hot and humid climate) and that so much of the end product would end up with so much going into the freezer and forgotten.

Prue Leith’s Sable Breton from Patisserie week

Sable Breton

I was really excited when they announced this as the technical challenge on Patisserie week because I had made it already, 2 years ago, on a whim during my sabbatical. The recipe came from Suzue and William Curley’s Patisserie. I can report to you that my sablé dough was too hard, the pistachio paste lacked the pistachio flavour and I bought jam rather than make a raspberry/strawberry confiture. I’ve had a quick glance over the GBBO recipe and noticed the inclusion of pistachio oil and extract. I don’t know where you’d buy that from but I’d get it to produce a stronger pistachio flavour. While you are at it, if you can afford the extra expense, buy shelled pistachios because shelling them takes a tediously long time and your thumbs will hurt after a while.

Prue Leith’s Vegan Sausage Rolls from Free from week

I love experimenting with vegan baking so I wanted these vegan sausage rolls to taste really good but I was a bit sceptical as to whether they would work. Correction – whether I could make it work. In the past, I haven’t had much success with rough puff pastry as the butter would leak out as it baked in the oven resulting in a soggy, unrisen pastry. This time round, I really pleased with the end result as the filling was delicious and the resulting pastry was crisp and the lamination evident. I don’t know whether it was because I used baking block which has a higher melting point, or I’m gradually getting better at making it. The only way to find out is to conduct a side by side experiment with one made with butter and the other with baking block. I would definitely make this one again as the filling was delicious and substantial. Yes, it was a bit of a faff to get the different ingredients. I replaced the flax seed egg with a chia seed egg, which was fine, as we already had chia seeds. The kids weren’t so keen on the filling as the adults were.

Paul Hollywood’s Jammy Biscuits from Biscuit week

Starry jammy biscuits

I made these in the run up to Christmas and so I substituted the hearts for stars. They made a good Christmas cookie/biscuit. We all enjoyed eating them, even if overall I found them a little too sweet. You can see from the photo how much the oven temperature differs in our oven. I substituted jam sugar with the same amount of granulated sugar and a tablespoon of lime. I think the lime juice is also what gave the raspberry jam such brightness. A nice challenge to do and with Valentine’s Day coming up, you could go back to using hearts.

Paul Hollywood’s Belgian Buns from the Final

Hands down, this was one of my favourites to bake and eat in the technical challenges. I love baking bread. There was a confusing/funny moment when I misread the recipe and missed out the 120ml of water that is added to the dough, alongside the milk and butter. I thought that it looked too dry, but when you are trying out a new recipe, how are you supposed to know exactly what you are looking for? I only spotted my mistake later. Did you know that you can add water to dough once it has been kneaded and left to rise? Yes and that is what I did. After searching online, the internet seemed to suggest that I could knead the water in gradually. The dough was much better after that, soft and silky. The lemon curd filling was a fresh and welcome variation from the normal cinnamon butter fillings that I’m used to, so much so that I professed to liking it more. It’s pretty easy to make so make it and thank me for it later. However, if you don’t like lemons or are allergic to citrus fruit, then don’t make them.

Prue Leith’s Sticky Toffee Pudding from Dessert week

This was the final one that I made. I had put it off for a few reasons:

  • I needed to get the small pudding moulds
  • The toffee sauce was made more like a caramel and different to how I’d made them previously
  • I’d never made tuile biscuits before
  • We don’t eat a lot of desserts
  • I wasn’t sure that I wanted to make something that was going to be so sweet.

Dear reader, I made it just so that I could finish this baking challenge that I set myself. Was it worth it? If you like sticky toffee pudding then I think that it is worth making them. The sponge is light and springy and the tuile biscuits were my favourite component to eat. However, it was too sweet for me. I could only eat half of it before I felt sick. I would still want to make a toffee sauce in the way that I normally make it (because it’s easier than making a caramel). I didn’t bother making the creme Anglaise purely because I’ve made custard before and I had run out of containers to freeze the egg whites. Besides, in the past, I would pair sticky toffee pudding with double cream.

So there you have it. If this inspires you to bake some of them, then do let me know.

Christmas Cranberry Mincemeat (vegan)

chopped cranberries and dried fruit in two jars
Last minute cranberry mincemeat

One Christmas back in 2010, my friend Andrew introduced me to a cranberry mincemeat recipe using very fresh ingredients that is quick to make and can be used on the same day. There is no suet or butter, nor gentle cooking or baking of the ingredients so the trade off is that it will not last as long as more traditional mincemeat recipes. It was a game changer for me in two ways. Firstly, I loved how the lime zestiness and cranberry tartness cut through what can be the overly rich sweetness of mincemeat. Quite a few people, who object to the richness of traditional mincemeat, like this one. Secondly was the fact that it could be made last minute and used immediately. At that point, I don’t think it registered with me that it was also vegan.

I realised that I hadn’t noted down exact quantities when I went to make it the following year and the internet helped me to find a Delia variation of it. Then I moved to Cambodia, where I couldn’t get cranberries so I created another version of it using local dried fruit. However, when I discovered frozen cranberries in Thai Huot, I happily reverted back to using what had now become my own version of Andrew’s original recipe. When I returned to the UK, I took a 2 year hiatus from making this to try out Delia’s more traditional versions because suet was available. However, this year, when my Christmas holiday plans got derailed by the Omicron variant and I suddenly had a week at home, I decided to cheer myself up and make mince pies with this last-minute mincemeat.

This recipe will make about 650-750g of mincemeat. I sterilised a 500g beetroot jar and 330g jam jar to store them in. When I want to bake a lot of mince pies, I double this recipe and prepare more space in the fridge.

Ingredients for Cranberry Mincemeat, adapted from Andrew.

  • 225g fresh or frozen cranberries
  • 1 large green apple – preferably Granny Smiths or Bramley, but any tart apple will do
  • 100g currants – can be substituted with raisins
  • 100g sultanas
  • 100g mixed peel
  • zest and juice of 1 lime
  • half a fresh nutmeg, grated
  • 65g dark brown sugar

Method – also in the photos below.

  1. Cut the cranberries in half and put into a medium sized bowl*. If they are very large cranberries, then cut into thirds or quarters. If they are very small cranberries, then you can leave them whole. Very small cranberries are difficult to cut and are more commonly found, in my experience, in the frozen packets.
  2. Add in the currants, sultanas, mixed peel, the zest and juice of 1 lime.
  3. Grate the apple with the skin on, into the bowl. Then add in the sugar and grate in half a fresh nutmeg. Give it a good mix to combine it all and use straight away.

Top Tip: I halve cranberries this way because I think it’s slightly faster. Lay one hand down firmly on the cranberries so that they don’t move. With your other hand, use a sharp knife parallel to your palm and carefully cut the cranberries horizontally. I haven’t got a video of this – but if you search for how to halve cherry tomatoes, you should be able to see it.

From experience, you can store this in sterilised jars or tupperware for up to 4-6 weeks in the fridge. Sterilise jars by washing them and putting them in an oven (140°C and above) until they are dry. This normally takes less than 10 minutes.

As well as the usual mince pies (bottom photo), I’m planning to use it to make a stollen babka wreath using a challah dough that was far too chilled out to rise over the weekend, and now finally is ready to be used.

cranberries cut in half in a bowl
1. Cut the cranberries in half
2. Add in the dried fruit
3. Grate in apple, the zest and juice of a lime, sugar and grate in half a fresh nutmeg. Give it all a good mix.
The first of this year’s mince pies

Baking the GBBO 2021 Technical Challenges Part 1

The adjustment to going back to working onsite and the teaching load in the first semester in the academic year resulted in a quiet blog recently. I’m also trying to get my head around Instagram reels and whether to create one on poaching eggs, which has delayed that post. Anyhooo, that all aside, I have been baking, though not creating new recipes.

*Spoiler alert* If you haven’t watched the GBBO 2021 yet and would not like to know what the technical challenges are, then please don’t read ahead.

There was no plan to bake this year’s technical challenges until I realised it was happening by pure accidental happy spontaneity. Then I made an active choice to continue on with it because baking makes me happy and I like trying out and learning new things. Below you have my attempts at five of the technical challenges. I’ll write about the others later on, when I complete them. If you’re a bit unsure about making them, then my top tips are:

  1. Read the instructions of the recipe all the way through and then again.
  2. Have the ingredients and equipment prepared.
  3. Don’t worry if things go wrong, Prue and Paul aren’t going to be judging them anyway.

Prue Leith’s Malt Loaf from Cake week

Malt loaf

This is an easy bake and you can leave the fruit to soak in the tea overnight as prep. I made them the same weekend that I made the ciabatta breadsticks. The homemade version is SO much BETTER than what I’ve ever bought. I’m not sure I can ever go back. I baked two at the same time and took one into work. I found two things difficult. The most challenging thing was sourcing the malt extract. I try not to buy on Amazon in an effort to support local stores. I went into a supermarket, where I was shown Marmite, when asking for malt extract and then directed to Holland and Barratts. I bought it from there. The second one was self-created. I heated the malt extract and sugars for too long and so it was overly-sticky. Don’t do that and you’ll be fine.

The most delightful thing about this bake was when I opened the malt extract and tasted it. I was transported back to something I ate as a small child in Korea. I don’t know what it is (Koreans out there, can you help me?) but I remember thinking that this is surely nectar from heaven. I am a big fan of malt extract.

Paul Hollywoods Ciabatta Breadsticks from Bread week

  • ciabatta breadsticks
  • pink hummus

I made the ciabatta breadsticks on the same weekend that I made Nigella’s beetroot hummus recipe. I discovered that the make a delightful pairing. It is also delicious with some kimchi as well. Get all the colours and flavours together for a party in your mouth.

Ciabatta dough is tricky because it is so wet and soft. Alternatively, I think of it as a soft, plush dough, luxurious to work with. “Show the dough who’s boss” – Richard Bertinet quote – rings in my head when I work with it. I deliberately bought manchego cheese to make this. I was surprised by the combination of olives and coriander but it is scrumptious. The recipe says that it will make 18. Make the 18+ if you don’t have baking trays that are long enough. I gave about half of them away to friends but they were gone in our household within 3 days.

Prue Leith’s Prinzregententorte from German week

layered chocolate cake with vanilla sponge
Prinzregententorte (with an extra layer)

This was the bake at which I realised that I wanted to commit myself to baking each of the technical challenges. There was a playdate happening at the same time as this bake which got in the way of trying to complete it in the 4 or so hours that the bakers had in the tent. I didn’t. It has been awhile since I had baked for more than 2 hours straight so I found this bake physically tiring, although satisfying when making the various elements. We had a break for dinner and so it took me about 5 hours to make. The next day, people reacted with a mixture of horror and surprise that I chose to bake a cake that took me 5 hours.

The recipe is detailed and methodical. Have all your ingredients and equipment prepared, clear out an afternoon/evening and don’t put a time pressure on yourself. We don’t have a 23cm baking tin, so I did some maths to reduce the recipe to make a 20cm one and I improvised acetate with baking paper. I enjoyed making the German buttercream and the genoise sponges. I was tempted to see if it would work on a pan, like pancakes, but decided against it. Dinner coincided with when I had just melted chocolate for the decorations. Thus I left it to cool down a bit too long and therefore lost the tempering. However, in this context, it didn’t really matter. There was a birthday at the weekend and so we cut into the cake. I was so pleased with the even layers and the cake is one of the best chocolate cakes I have ever tasted.

Paul Hollywood’s Baklava from Pastry week

I was really nervous about this one because of the filo pastry. A long time ago, I had tried to make filo. It dried out and the texture of the resulting bake was both stiff and rubbery, an unpleasant combination. I hadn’t seen the method that they use in this recipe and it worked really well.

Again, I adapted the recipe because we don’t have a 25cm round baking tin. I halved the filling recipe to fit into the 20cm one. The next challenge to this was cutting the star design. I asked Sarah to help me figure it out and we did. Use a sharp knife and cut all the way through. I took it to church the next day for a bring a share lunch, and to my surprise it all went. Fortunately, I had kept back about a quarter of it for us to try out and to share with friends.

Paul Hollywood’s Caramel Biscuit Bars from Caramel Week

The 5 year old was looking through some of my photos and when she spotted this and said ‘oh look, sausages!’ 😆 I have called them, chocolate sliding off the caramel bars.

I decided to make these on the same afternoon as making the baklava. I’m just going to name them as most of us know them 😄 – the Twix bars. They are one of my favourite chocolate/confectionary bars and I have been wanting to make them for a long time, so this technical challenge gave me the perfect reason to get on and bake them.

I added a bit of toasted almonds in the biscuit base to add an extra flavour element to it (I’m not sure they did really). I did what one of the contestants did and broke the biscuit as I took it out of the tin. I like making caramel but still scared my housemate a little when I made it. I should have let my milk chocolate cool down a bit more before I dipped the caramel and biscuit into it. However, I was distracted by watching fireworks (it was the day after Bonfire Night) and creating photos in the garden with the family with sparklers making fun shapes. Once the chocolate had sufficiently set enough for us to handle, we ate them with a hot drink whilst watching the Strictly results.

%d bloggers like this: