Cheesecake Brownies

Two baking trays with brownie mixture. The one on the left hand side has salted caramel, the one on the right hand side is cheesecake
Salted caramel and cheesecake brownies side by side

You may have picked up already that I really enjoy playing around with the different flavour combinations in a brownie. When I ran a home baking business, as my side hustle, in Phnom Penh, I’d sometimes put a poll out on social media. What brownie flavour would you like next? Cheesecake was a popular request. Cambodians generally really like cheesecake but I made very few to sell because the ingredients were pricey. Thus when this hybrid worked out, it turned out to be a happy compromise. As I am me, I found ways to play around with more flavours and ingredients. I’ve listed them at the end of the cheesecake ingredients.

cake box with cheesecake brownies inside, a green business card with love, Han-Na
Cheesecake Brownies were a popular order

Last month, I wrote about how I’d picked up a painful thumb injury which I was trying to let heal. It is mostly better now so I made cheesecake brownies and a giant cookie this weekend.

When I posted a picture of this cheesecake version on the post about the infinitely variable fudgy brownies, I said that I’d give you the recipe later as it involves a few more steps. Since then, my brownie recipe and story have featured on TheBrightApp (which is a new social networking site that someone I know is involved in – go check it out). There was a comment that the variations could feature as a different recipe post each time, which is kind. I’m not sure if that will be possible, but here’s the cheesecake brownie version in the meantime.

Ingredients all lined up
Cheesecake Brownie ingredients all lined up ready
All the swirls

I adapted this from Smitten Kitchen’s Cheesecake-Marbled Brownie recipe. I wanted to use my more recent whisking to ribbon stage brownie method, so I took note of the cheesecake ingredients and the marbling instructions but combined it with my chosen brownie method. However, you could use my simpler, no frills or ribbons, brownie recipe too. There are more detailed instructions in the previous posts on how to make brownies in general. I’ve added photos below the recipe to expand on the addition of cheesecake.

Ingredients for Cheesecake Brownies, adapted from Smitten Kitchen

Brownie ingredients

  • 150g unsalted butter, cut into small cubes
  • 150g dark chocolate (at least 60%), broken up, roughly chopped
  • 2 large eggs plus 1 egg white*
  • 200g caster sugar
  • 100g plain flour
  • 20g cocoa powder
  • 1/2 tsp of salt
  • 1 tsp of vanilla extract

Cheesecake ingredients

  • 150g full-fat cream cheese
  • 1 egg yolk from the egg in the brownie ingredients*
  • 50g caster sugar
  • 1tsp vanilla extract, or replace with
  • Optional flavour ideas – zest of an orange, 1 tbsp of dark rum or plum wine.
  1. Preheat the oven to 180°C/355°F/Gas Mark 4. Line a deep tin. For this quantity a 20cm square tin or a rectangular 27×20 or 28×18 will work.
  2. Start preparing the brownie mixture. Melt the chocolate and butter together and just after it has melted, add in the salt, vanilla extract and leave it on the side to cool down. Ways of doing this are on a previous post.
  3. As you keep an eye on the chocolate and butter melting, prepare the cheesecake mixture. Put all the cheesecake ingredients into a small bowl. Save the egg white for the brownie mixture. Mix to combine until smooth. I often use a hand mixer, but you could beat with a spatula. See photos below.
  4. Turn your attention to readying the rest of the brownie mixture. In a stand mixer bowl (if using) otherwise a medium bowl, crack the two eggs and add the saved egg white into the bowl and add the sugar. Use a stand mixer or an electric hand mixer on high speed to start whisking the eggs and sugar until they are at a ribbon stage. Ribbon stage is when the egg and sugar mixture are a pale yellow colour, doubled or even tripled in volume and when you lift the whisk over the mixture, the batter will fall slowly and leave a trail like a ribbon that will hold its shape for a few seconds. It will take about 10 minutes. I still use a timer to make sure I beat them for long enough. Don’t start beating the eggs/sugar until the chocolate/butter has melted because the chocolate/butter mixture needs this time to cool down.
  5. As the eggs and sugar are whisking, measure out the flour and cocoa powder into another bowl. Sieve it if there are lots of lumps in the flour and cocoa. Otherwise, use a whisk to loosen and mix them together.
  6. When the eggs and sugar have reached a ribbon stage, reduce the speed to low and add the melted chocolate and butter mixture to the eggs and sugar. Whisk until it all appears to have mixed together. If you are using an electric hand mixer, you may need to turn off the mixer, add the chocolate/butter and then switch it back on again to avoid a mess. I speak from experience.
  7. Now fold in the flour and cocoa powder using a spatula, or a spoon until it is well combined.
  8. Pour all the mixture into the baking tin. Debs says that if you want to create an even more marbled effect, then reserve some brownie batter to dollop on top of the cheesecake before swirling them together. I’ll let you experiment.
  9. Use a tablespoon to dollop the cheesecake mixture evenly into the brownie mixture. Use the back of the spoon to swirl the brownie and cheesecake together. I like to go up and down vertically and then again horizontally. See photo below.
  10. If you want to add in any texture (such as crushed biscuits) or fruit (such as raspberries or blackberries), do it now and push them into the marbled mixture.
  11. Bake in the oven for 20-25 minutes. They should be firm to touch at the top but still wobble when you shake it. Leave to cool completely in the tin and if you can bear it, cover them and leave them overnight in the fridge. They will be easier to cut and the flavours will have deepened.
ingredients for the cheesecake element
The ingredients for the cheesecake mixture – see step 3
Cheesecake mixture beaten until smooth
Beat the cheesecake mixture until smooth – see step 3
a table spoon dolloping cheesecake mixture into the brownie mix
Cheesecake mixture being dolloped – Step 9
the end of the spoon going up and down to create a swirling effect between the brownies and the cheesecake mixtures
Begin to swirl – step 9
frozen raspberries added to half of the cheesecake brownie before baking
I added some frozen raspberries to half of the tin because I fancied some raspberry cheesecake brownies. I didn’t measure it out, but I’m guessing 45g for half a tin?
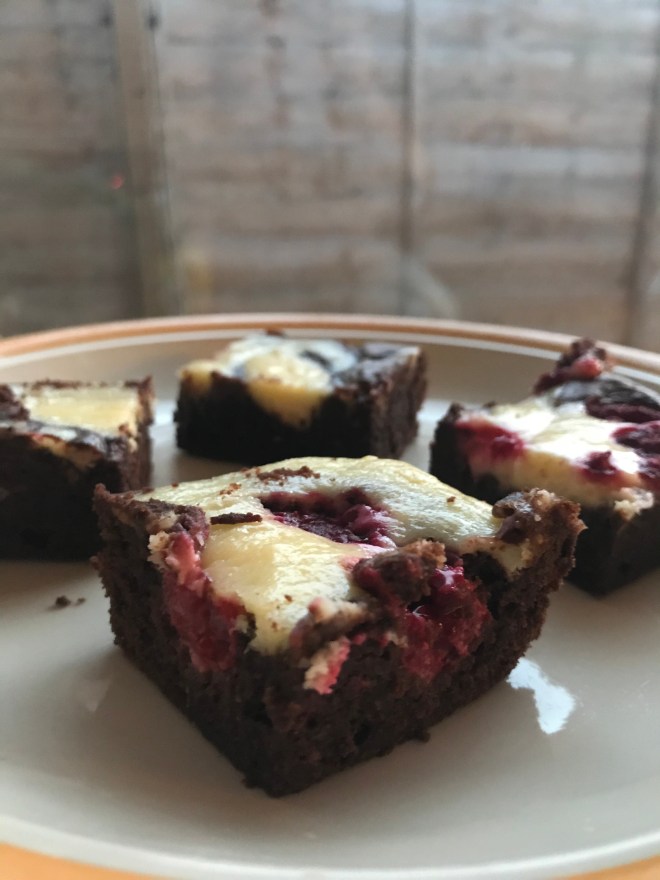
4 cut up brownies.  The two nearest are raspberry cheesecake brownies and the two further away are vanilla cheesecake brownies
Tada – two variations from one tin. At the forefront there is raspberry cheesecake brownies and at the back, vanilla cheesecake brownies

Brown Butter Hazelnut Chocolate Blondies

Tower of hazelnut chocolate blondies
Some hazelnut and chocolate blondies

Rarely will I just make something up and immediately conclude that it is amazing. Those who know me will testify to how I critique what I make, and recipes go through several iterations before I am happy with them. As I write, I’ve suddenly realised that this recipe also had several predecessors as a cookie re-enacted as a blondie. Wow – I had dismissed that because I hadn’t been trying to tweak that recipe. Nonetheless, this blondie came about with happy accidental happenstance.

Basically, a couple of Mondays ago, I decided that I wanted to bake brownies or blondies. On the Tuesday I ate a rich peanut brownie from Chocnroll, which satisfied my craving for brownies and so I turned my mind to blondies. When Wednesday evening happened, I had finished disseminating the findings of the first round of testing we had done on a major project I’m working on at work, written a lot of action points and very much needing to bake as therapy. Does anybody else do this? I know that I’m not alone in this.

Baking has often been a creative outlet that helps me to complete the stress cycle and thus switch off my buzzing work brain. I listened to Brené Brown’s podcast with Emily and Amelia Nagoski’s work on Burnout and how to complete the stress cycle and doing something creative is a way to complete the stress cycle and so now I feel very much validated.

I mentioned before that I have been working on another – yet unfinished – blondie recipe and I set out to make that. However this time, I added in another egg for extra hoped for fudginess, so that it mimicked my fudgy brownie recipe. As I browned some butter, I realised that I had no pecans nor white chocolate. So the substitutions began and a new blondie was birthed.

Once roasted, rub the hazelnut skins off with a tea towel – Step 2

I’ve since seen on the internet other recipes that call their version of a hazelnut and chocolate blondie a gianduja one. I’ve since thought about grinding up hazelnuts to make a chocolate hazelnut butter that I add in as a layer in the middle or on top. Then in consultations with friends, I decided that this added layer of complication takes away from the simple joy of baking blondies. Admittedly the browning of the butter may be a step too far for some, but it is so essential for the flavour! I promise you that it will be worth learning a new technique that you can use over and over again.

Ribbon stage
Ribbon stage – Step 4

Ingredients for Brown Butter, Hazelnut and Chocolate Blondies

  • 200g butter which I then browned
  • 200g dark brown sugar
  • 3 eggs
  • 1/2 tsp salt
  • 200g plain flour
  • 100g hazelnuts
  • 150g chocolate. I used 100g of milk and 50g dark chocolate.

Method

  1. Preheat the oven to 350F/180C or 170C fan.
  2. Roast the hazelnuts first for 10 mins using the baking tin for the blondies, until the skins come off them. Use a dry tea towel to rub the skins off the hazelnuts, then chop just over half of them. Don’t miss out this step.
  3. Brown the butter: melt the butter in a medium saucepan on a medium heat and it will start to froth and cackle. That is the water evaporating. Continue and stir the sides and scrape the bottom a few times so that it doesn’t burn. When it is ‘as quiet as a ninja’ (quote from Stella Parks) it is ready. Take it off the heat and either pour the butter in a bowl to cool down, not forgetting to scrape the browned bits from the sides and bottom. Or as I often do, fill up the sink with cold water and carefully place the hot pan in there to cool down.
  4. Now whisk the eggs and sugar together until it is at a ribbon stage. I used a stand mixer on a medium setting (3 on a Kenwood) for about 8 mins. I have instructions on whisking to a ribbon stage in my fudgy brownie recipe
  5. As the eggs and sugar are whisking, line the tin. I used a 20cm square tin.
  6. Now on the lowest setting, continue whisking but pour in the butter and add the salt. Whisk again on a medium setting until combined. I’m always amazed by the reaction and how it goes to almost like a buttercream consistency.
  7. Fold in the flour, chopped hazelnuts and chopped chocolate.
  8. Pour half the mixture into the tin, sprinkle over the unchopped hazelnuts and pour the rest of the mixture into the tin.
  9. Bake in the middle of the oven for 17-20 mins until cooked on top. If it looks a bit jiggly, that is ok. It’ll harden up as it cools.
  10. Allow to cool completely. I like to leave mine overnight. And then cut into 12-16 pieces.
Hazelnuts added as a layer
Hazelnuts added as a middle layer – Step 8
Baked blondies
The baked brown butter, hazelnut and chocolate blondies

And the verdict? Suitably more-ish, dense and fudgy. Surprisingly not overly sweet with the milk chocolate because of the dark chocolate. Lastly, it is always worth roasting the hazelnuts because it improves the texture and flavour.

Raspberry Burst Brownies

IMG_9721
Raspberry Burst Brownies

I don’t understand why I’ve never put raspberries in a dark chocolate brownie before.  The flavour combination is ingenious!  These brownies have quickly become my signature bake since I decided to bake them 7 weeks ago, popping out my oven week in-week out.

IMG_9675

I meant to follow BBC’s Good Food’s Best Ever Chocolate Raspberry Brownies and duly noted that they suggested mixing half of the raspberries into the mixture and reserving half of the raspberries to scatter at for the end.  However, I couldn’t quite understand why I’d want to put milk chocolate into the batter and dilute the intense dark chocolatey-ness that I wanted to couple with the raspberry flavour.

IMG_9676

IMG_9677

So, I reverted back to my default brownie recipe.   This time, I have no microwave.  (However, I’ve kept the microwave bit in the instructions, in case you do).  I really wanted to demonstrate how the brownies can be made using one pot.  In all honesty, I never expected that this brownie would have it’s own post.  But when Sarah and I bit into one, the first occasion I baked them, a raspberry just burst in my mouth.  I laughed, said that they were amazing and promptly named them, Raspberry Burst Brownies.

IMG_9678

Ingredients for Raspberry Burst Chocolate Brownies adapted from Usborne First Cookbook.

  • 4oz/100g dark chocolate
  • 4oz/100g butter
  • 1tsp vanilla extract
  • 2 beaten eggs
  • 4oz/100g plain flour
  • 1/2 tsp baking powder
  • 6oz/160g caster sugar
  • 2 tbsp cocoa powder
  • pinch of salt
  • 1 or 2 tbsp of milk if the mixture is too firm.
  • 85g-100g frozen or fresh raspberries (I find that 85g is enough)

Method

1. Preheat the oven to 180C/350F/Gas Mark 4.  Line a square baking dish with baking paper. I use a 20x20cm baking tin.

2. Melt the chocolate and butter together on a gentle heat, in a heavy bottomed pan.  Alternatively zap them in a heatproof bowl in the microwave.

3. As the chocolate and butter is melting, or being zapped in the microwave, measure out the flour, baking powder and cocoa powder into another bowl.  Sift the flour if you want to, but it’s not necessary.

4. Add the vanilla extract, salt and sugar to the chocolate melted goodness and mix well.

5. Add the beaten eggs and keep mixing to combine it all.  Don’t worry – they won’t scramble.

6. Gradually add in the flour, baking powder and cocoa powder so that the whole mixture is well combined.

7. Mix in half of the raspberries now.  With the remaining half, scatter them over the top to fill in any deficit spaces before you put it into the oven.

8. Bake in the oven for 20-25 mins.  The secret is to take them out when the top is firm to touch but still wobbles when you shake it.

Verdict?  They are amazing!  Sarah actually told me off for not telling her how amazing they were, when she ate one a few weeks later.  (But we’d taste tested them together that first time…) They are that combination of sweet but sour, and a perfect flavour partnership between the dark chocolate and the raspberry.  But what I love best about them is that the whole raspberries burst in your mouth as you eat them.  Bliss!
IMG_9680IMG_9681 IMG_9472

%d bloggers like this: