Multi-seeded Wholemeal Bread

Multi-seed wholemeal bread

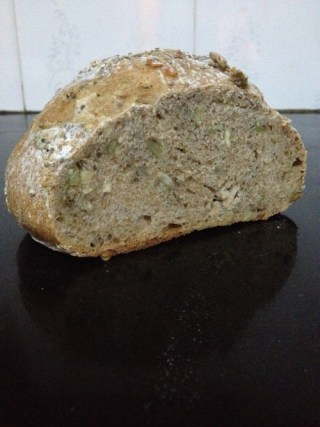
Multi-seeded wholemeal bread is by far the best thing that I bake here in Cambodia.  It’s better than any cake, biscuit or pie that I’ve made and any macaron that I’ll attempt to make in this humid heat.  I’ll give you three reasons why.

  1. It tastes nuttily wholesome and super-yummy.
  2. I love wholemeal bread and I’ve yet to be able to buy wholemeal bread that tastes like proper British wholemeal bread, anywhere in Phnom Penh.
  3. You can’t go wrong with it.  When your oven has no temperature gauge (like mine), you know that you’ll be safe whacking the oven on the highest heat and leaving the dough to bake in the oven without fear of sinking, like you’d get in a cake.

Ingredients for Multi-seed wholemeal bread

It took me a few months to find wholemeal flour, mind.  I came across farine du blé noir and wholewheat flour on the shelves in Lucky Supermarket and stood scratching my head as to whether either of them was wholemeal flour.  I was pretty sure that wholewheat flour was the american name for wholemeal, but farine du blé noir?  As I discovered later with the help of google search – that’s french for buckwheat flour.  Not exactly what I was looking for.

Then it took another few weeks before I could bake the bread.   My left knee twisted one November evening as I was lying in bed and I was in excruciating pain.  I couldn’t walk, straighten my knee or put any pressure on it.  Visits to multiple doctors, an X-ray and  MRI scan later revealed severe inflammation and fluid caused by a fall off a motorbike several months beforehand.  Walking on Phnom Penh’s uneven surfaces, hopping on and off tuk tuks and motos had served to aggravate the injury.  My mum advised me not to do any baking that required standing up, and have you tried to hand knead dough sitting down?  Not worth the effort if you’re as short as me.  So, I was pretty much laid up on a sofa with an ice-pack on my knee for the best part of a month and a half.

ingredients for wholemeal breadrough looking dough

2 weeks in, I was pretty bored.  So I hobbled out on my moto to buy some wholewheat flour from Lucky and made my first wholemeal loaf.  It was overproved and underbaked.  But when I tore off that first piece of bread and bit into it, I was the happiest little baker in the whole of Cambodia.  I’m pretty sure no-one rivalled my happiness.

Then my tastebuds started hankering after a multi-seeded loaf, like Warburtons Seeded Batch.  I was reading Richard Bertinet’s Dough and realised that I could just experiment by putting some seeds into my bread recipe.  And that’s how I came up with my multi-seeded wholemeal bread recipe, which as you know, is the BEST thing that I bake in Cambodia.

combine the ingredientsadd the dough to the seeds

I think that part of the reason for why the bread tastes so good is that I’ve always allowed this bread to have a slow rise in the fridge to give the flavours a longer time to mature.  However, I don’t think that it’ll ruin the flavour of the bread too much if you a) don’t have enough room in your fridge or b) want to biting into it within 3 hours from start to finish.  

dough ready to pop into the fridge

I find that I can’t eat a whole loaf in time before the humidity causes the mould to break out on my bread 🙁 !  Thus, I’ve taken to making two smaller loaves and freezing one loaf once I’ve baked it.

So, here’s the scrumptious, nuttily, wholesome Multi-seeded Wholemeal Bread recipe, with it’s foundations in Richard Bertinet’s Dough.

Ingredients

  • 250g wholemeal flour – use strong bread flour if you can.
  • 250g strong white bread flour
  • 7g fast action yeast
  • 10g salt
  • 350g tepid water
  • 30g extra-virgin olive oil – but normal olive oil will also work too
  • 100g various seeds – I used equal measures of pumpkin, sunflower, chia and sesame seeds

Method

1. Measure out both flours and yeast in a medium-large bowl and mix.  Then mix in the salt.  I’m in the habit of adding the salt at this point so that it won’t touch the yeast.

2. Add the water and oil and stir to combine.  I use a scraper at this point to combine the ingredients, but you can use just your hands. It’ll make a wet dough but don’t be scared by it. The wetness of the dough should ensure that it’s a soft texture. Turn it out onto your work surface and knead. If you’re like me and a bit slow at kneading, it’ll take about 15-20 minutes. Of course, you could use a machine fitted with a dough hook. In which case, put all ingredients for the dough into a large bowl, ensuring that the yeast and salt are added to opposite sides of the bowl. Mix on a slow speed until it all combines and then move it onto a medium-high speed for about 10-15 minutes until the dough is smooth and elastic.

3. Measure out the seeds into the same mixing bowl that you used for the bread dough.  Add the kneaded bread dough to the same bowl and work the seeds into the dough in the bowl.  Sometimes, for the last few minutes, I’ll finish combining the seeds into the dough out of the bowl .

Top Tip: Work the seeds into the dough in the mixing bowl to prevent the seeds from escaping everywhere.

4. Pour a little bit of vegetable oil into the bowl and lightly cover the dough with oil. This helps the dough not to stick as it rises. Cover the bowl with cling film and leave it for an overnight prove in the refrigerator.  Alternatively you could leave in a warm place for at least 1 hour and doubled in size.

5. Prepare your baking tray or loaf tine.  Once the dough has doubled in size, gently place it on the work surface and gently press down on the dough with your fingers to release the gas.  Do this into a rectangular shape.  I find this works just as well as punching the dough – a tip I learned from Richard Bertinet.  Strengthen the dough by folding the dough a third of the way down into the middle, press down with the heel of your hand.  Repeat with the other side, then fold over the middle and press firmly with the heel of your hand.  The dough should feel firmer and stronger.

6. Lightly flour the surface to shape the dough.  For a round loaf, like in the photos, I tuck the ends into the middle of the bread, turn it over so that the tucks are on the bottom, keep one hand as still as I can partly under the cob and then use my other hand to turn and shape the dough into a tight, round shape.  Here’s a link to The Fresh Loaf on shaping dough, as a visual aid.

7.  Transfer onto a baking tray/loaf tine (depending on the shape of your loaf), cover loosely with cling film or a tea towel, until doubled in size.  This might take 40 mins – 1.5 hour.

8. Meanwhile, preheat the oven to 250°C/480°F/Gas Mark 9.

9.  When the dough is ready.  Cut deep, clean incisions to help create shape and to help release gas.  On this loaf, I made a big hash sign (#) but made the mistake of not flouring my knife beforehand, so the dough stuck to the blade.  Lightly flour the top of the bread.

10.  Spray the inside of the oven with water to create steam and put the dough into the oven.  Bake for 10-15 minutes at 250°C/480°F/Gas Mark 9 then reduce it to 220°C/425°F/Gas Mark 7 for another 40 minutes.  Check whether the bread is ready – it should make a hollow sound when you tap it’s bottom.  If not, set the timer for another 10 minutes and check again.

multi-seed wholemeal bread

p.s. Oh and what happened to my left knee?

I’m delighted to report that it’s on the mend.  Have I told you that Claire (of the white chocolate, oat and raspberry cookie fame) is also a physiotherapist?  She gave me some physio advice and taped up my knee while I was in New Zealand. I’ve faithfully been doing my exercises twice a day and resting it up lots.  However, I reacted to the tape so progress has been slower than I’d have liked.  I’ve not been able to dance or jump or walk for 10 minutes without regretting it the next day.  Last week, I went to a conference in Singapore called Kingdom Invasion, where they prayed for healing for my knee.  Whilst I was in Singapore, my knee got a lot better.  Good enough that I can jump, dance and swim breast-stroke without pain.  I’m still doing my physio and not overdoing physical activity – but the knee is definitely on course for a complete healing.  I can’t wait for the day when I start running again.  Praise God!

Pip and me leaping off the ledge for my photo of the day
Pip and me leaping off the ledge for my photo of the day at Adventure Cove, Sentosa

A pre-intermediate lesson on Panzanella

Panzanella 1

The English language and lesson plans.

I think that those are the best two phrases which sum up my life at present.

During this month of July, I’m training to be an English Language teacher, so that I can take this new skill and (hopefully) qualification with me to Cambodia.  I’m doing the intensive 4-week CELTA course and we’ve just passed the halfway mark.  In our most recent tutorials, my teaching practice group had been encouraged to try out materials in the classroom, outside of our coursebooks.  On Monday we had a lesson on using ‘authentic’ texts.  Texts, which are not created for the sole purpose of teaching.  I felt inspired to try it out in my next lesson… which just happened to be the next day.

Step 1: tear up the bread

Me, being me, wanted to try using a recipe as authentic text.  We teach in pairs.  Each person has 45 mins to do half of the lesson.  On Tuesday, I was teaching with Rachel.  We divvied out the skills and the language.  I had listening and vocabulary, Rachel had writing and grammar.

H (imagine it with lots of enthusiasm): “I was thinking that we could do food as a topic and use a recipe to teach it.”

R: Ooh.  Yes.  There’s lots of imperatives and vocabulary that we could be teaching.  I could get them to write a recipe to follow on.

Tomatoes and Panzanella bread

And as I had the enviable task of teaching the skill of listening, I thought that a short video from someone like Nigella would be good as they’re easily accessible on the BBC Good Food or youtube.

Half an hour into drafting out the two parts of our lesson, our teacher tells us that recipes are notoriously tricky to teach because the extensive vocabulary, and more importantly, she reminds us that it is Ramadan and half of the group are muslims.  Perhaps we are being a bit culturally insensitive to teach on the topic of food?  “But,” she tells us, “it’s too late to change the topic of the lesson.”  So, Rachel and I continue with our plans, with a tinge of apprehension.  Enlightened, I wondered aloud, whether Nigella was really the best fit for our group of learners.  “I wonder whether she’s too flirtatious on screen?”  Rachel points out, “the ingredients in her recipes aren’t always normal ones either.”

And this is how I came to be teaching 14 students, a recipe on how to make a Tuscan Bread Salad called Panzanella – i mean, it’s not even an English dish!  However, importantly for our group of pre-intermerdiate learners, the ingredients are few and commonly available and the method is simple.

I had never heard of Panzanella until I watched Simon Hopkinson’s, A Good Cook, a few years back.  I’ve raved about him before to you, haven’t I.  I love his recipes and they have been really doable to recreate.  Panzanella has become my favourite taste the summer salad: the one that I make when I want to taste a bit of sunshine, regardless of the weather outside.  The difference in flavour imparted by sun-ripened tomatoes and good extra virgin olive oil sets it apart.  It’s also simple to make, healthy, easily adaptable to other ingredients and filling because of the bread.  Have I sold it to you yet?  I’ll continue.  How about, it’s a great way to use up any stale bread and it uses ingredients that you’re likely to have knocking around in your fridge and cupboards?

onions, tomatoes, bread, panzanella

Simon Hopkinson’s Panzanella recipe, as I presented it to the class. (The italicised parts are what I’ve edited in since, for your benefit.)

Ingredients (serves 4)

  • 5 handfuls of sourdough bread (think of a slice of thick bread as being a handful)
  • salt and freshly ground black pepper
  • 7 tbsp extra virgin olive oil
  • 2 tbsp red wine vinegar
  • 1 cucumber
  • 1 red onion
  • 6 vine tomatoes – you want about 200-250g.  Try substituting cherry tomatoes (see step 5)
  • 3 garlic cloves
  • handful of basil leaves

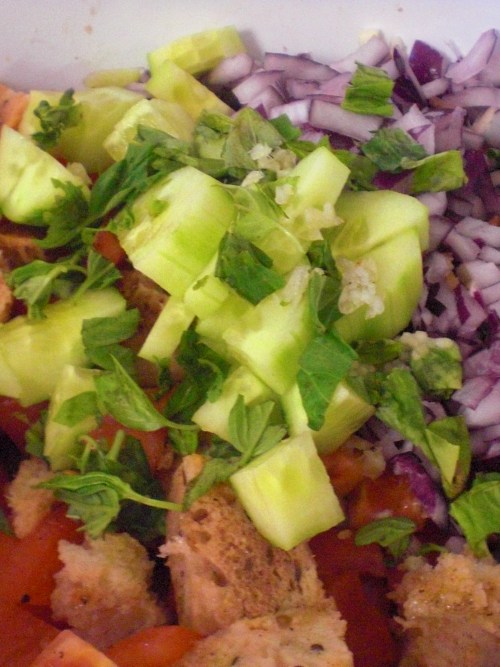
Cucumber, tomatoes, onions, bread, panzanella

Method

  1. Tear the bread into small pieces and put it into a bowl.  The best bread to use is sourdough bread, but you can use any stale bread.
  2. Season with salt and pepper.  You can always add more seasoning later on.
  3. Add the olive oil and red wine to the bowl.  You don’t have to add in all the olive oil, if you want to be a bit healthier.
  4. Put the tomatoes into another bowl and pour boiling water over them.  This helps the skin to come off.
  5. Remove the tomatoes from the water.  Peel off the tomato skins and cut the tomatoes before adding it to the bread.  If you want to be simplify this step, then you can get away with not removing the tomato skins or use the equivalent weight in cherry tomatoes.  I like removing the tomato skins, not just for the therapeutic value but also, because it softens the feel of it in your mouth when you eat it.
  6. Peel a cucumber and cut it into small pieces.  Add it to the bread and tomatoes.
  7. Cut the onion into thin slices and add it to the bread. Try using red onions or shallots because they are milder in flavour.
  8. Finely cut or crush the garlic cloves before you add them to the salad.  You could reduce the number of garlic cloves if you don’t want such a strong flavour.
  9. Tear up the basil leaves.  This is essential and you must not miss them out!
  10. Finally, mix up the ingredients.  I’d suggest mixing them up with your hands because it always tastes better when you do.
  11. You could serve this on a hot summer’s day for lunch with friends, or on any day that you want a taste of summer.
  12. Don’t forget to pair it with a fruity red wine.

And how was the lesson? (I don’t normally ask that at the end of a blog post on food!  Told you my life is about the English Language and lessons plans at the moment.)  The panzanella video with Simon Hopkinson went down really well with the learners, they learned some new words but then I got unexpectedly bogged down for 5 minutes trying to explain basil to the group.  I learned that asking, “What is basil?” is relating noise to notion (there’s some TEFL jargon for you!), and that is not the way to do teach new vocabulary!  I ran out of time to do all the planned activities because of my basil moment, so I wasn’t too sure how it had gone when I finished my part.  The group did appear to be enjoying the subject matter, even with it being Ramadan.  Then in Rachel’s part of the lesson, I was delighted when the learners reproduced the vocabulary in the recipes and produced some really detailed, high quality writing in their recipes.  In fact, our observer really praised Rachel and me on our learners’ outputs.

Well done, pre-intermediate class in room 118!

This weekend I have an assignment to write and a lesson to plans, so I’d better get back to it.  I leave you with this one question – how would you describe/define basil to english as a foreign language learners?

Panzanella

A very pink (in fact, it’s fuschia) beetroot risotto!

Very pink risotto

The photo Emily took on Sunday of our colourful meal.

My sister gave me 1kg of homegrown beetroot at the end of July and I have almost used them all up. Beetroot ticks the box of ‘unfamiliar ingredient’ that normally puts me off making a recipe. I’ve experimented with sweet and savoury recipes provided by BBC good food and delicious magazine and it’s taken away some of my unease about cooking with beetroot. My learning points:

  1. Always wear an apron. Beetroot stains are devilish to get out!
  2. Kitchen gloves are a godsend when you need to grate beetroot. It prevents a) bits of fingernail or thumb grated in and b) very pink stained hands.

Sadly, however, my main discovery has been… I really don’t like the taste of beetroot. It makes me purse my lips in a funny way as I eat it because I’m not keen on the flavour. Then, it sits rather uneasily in my stomach. So, there you go. I’ve finally admitted it. In fact, if I was the b-list celebrity being interviewed by James Martin on Saturday Morning Kitchen, I would say that my food hate is beetroot. It has even trumped my previous food hate of congealed cheese.

Which is a bit sad really, because I’d like to like this vegetable. It is so very interesting and colourful. I love how it adds a bright fuschia colour to the dish. Besides, everyone seems to like eating beetroot. In fact, I’ve only ever come across one other person who doesn’t like the taste of it.

You’ll notice I’ve written italicised notes to myself next to parts in the method, with my ideas of how I could adapt this recipe so that it will suit my palate. The thing is, this has had lots of rave reviews on the BBC good food website. I bet they all liked beetroot to start off with. I mean, which silly person, who doesn’t really like beetroot, chooses to make a dish that’s all about beetroot?

Anyway, that is just me and my tastebuds. My friends, Emily and JCT came round to help finish off the beetroot risotto the next day. They liked the flavour and especially the colour. And you know what? I’d love to serve it as a prima plata at a dinner party, because it would serve as such a great conversation starter! So for all of your beetroot lovers, let me tell you about how I made beetroot risotto, adapted from BBC Good Food.

List of Ingredients

  • 500g raw beetroot, washed peeled and cut into quarters. 500g is about 5 or 6 small-medium sized beetroots.
  • 25g butter
  • 1 onion
  • 1 clove of garlic
  • 250g risotto rice
  • a large glass of white wine
  • 750ml hot vegetable stock (or chicken stock, you’re not vegetarian)
  • 2 handfuls of parmesan (about 75g).
  • To serve: natural yoghurt or creme fraiche and sprigs of dill, or a slice of goats cheese, balsamic syrup and a scattering of fresh thyme leaves.

Method

1. Prepare your beetroot to roast in the oven. Preheat the oven to 180C. Line a large baking pan with foil. I guess this prevents the beetroot staining the tin. Clean, peel (wear the kitchen gloves!) and quarter the beetroot. Coat with olive oil and season with salt and pepper. Put them in the oven to bake for 45 mins.* I’d like to bring out more of the beetroot’s sweetness. So, next time, I think I’ll add balsamic vinegar or honey and maybe some sprigs of thyme.

*I roasted these at lunchtime, so that I could use some beetroot for a lunchtime roasted beetroot and goats cheese salad. The recipe recommended it as a ‘you could also do…’, so I did. But, if you wanted to save on time, you could choose to start on the risotto.

2. Melt the butter in an large oven proof pan that has a lid (if it doesn’t have a lid, then use cover with tin foil). I decided to test out the oven-proofness of my largest sized Judge saucepan for this recipe. (It passed the test.)

3. Chop the onions and garlic and fry them at a moderate heat until soft. Add the rice and give it a good stir so that every bit of rice is coated.

4. Now, my favourite bit – add that glass of wine. Mmmm… Stir the rice some more. Once most of the wine has disappered in the pan, add ALL of that hot stock. Bring to boil for 5 mins, stir, cover with a lid and then pop it into the oven for about 15 mins. Or until the rice is cooked, but slightly al dente.

add all the stock to the pantrying to puree the beetrootunsuccessful puree

5. When the beetroot is done, take a quarter of them and puree them. I put them in a blender and they failed to puree. Hmmm…. Cut the remainder of the roasted beetroot into small chunks. Okay, so a few options here. Next time, cut the remaining beetroot into very small chunks, say the size of a 1cm cube. Better still, if I can figure it out, puree the whole lot!

6. Grate the parmesan.

7. Take the risotto out of the oven, once the rice is ready. There should still be a bit of liquid in there. Stir in a handful of the parmesan and the beetroot puree and chunks. Watch the risotto gradually transform into a vibrant shade of PINK, as you stir and the beetroot colour bleeds into the rice. I loved watching this bit.

Fuschia Beetroot Risotto

8. Serve immediately with more parmesan cheese and a contrasting white colour. The first time, I had a dollop of yoghurt, as I didn’t have any creme fraiche, and a scattering of dill. Sadly, I only had dried dill but I could taste the life that herb brought to the dish. I’d definitely use the fresh stuff next time though. I love fresh dill. The second day, I had a hunk of goats cheese and a squirt of balsamic syrup. Definitely use fresh dill another time but if I’ve used thyme in the roasting process, then how about a few fresh thyme leaves instead of the dill?

beetroot risotto and yoghurt